For a smooth transaction process, having a structured deposit slip receipt template is key. It ensures accuracy when recording deposit details and helps you stay organized. A well-designed template saves time and reduces the chances of errors.
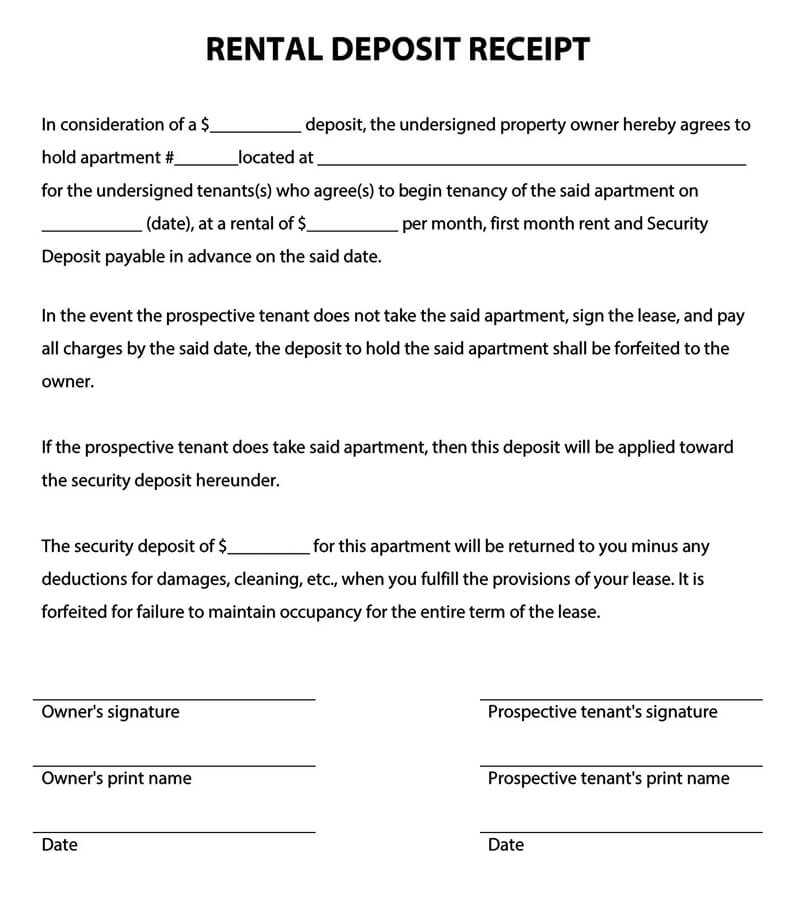
Include the following key components in your template: deposit date, account holder’s name, account number, deposit amount, and transaction reference number. This information is crucial for both record-keeping and resolving any potential discrepancies.
Make sure your template is clear and easy to fill out. A good layout with labeled sections allows for quick and efficient entries, ensuring that all necessary information is captured. Regularly update the template to reflect any changes in your banking institution’s requirements.
Here are the corrected lines with minimal repetition:
The deposit slip receipt template should include only the necessary fields. Ensure the name, account number, date, and transaction details are clearly listed. Avoid redundant sections that do not add value to the transaction record. Use concise language for better readability.
Clear Field Labels: Label each section distinctly. For example, use “Amount Deposited” instead of a generic “Details” field. This reduces confusion and ensures clarity in recording the deposit.
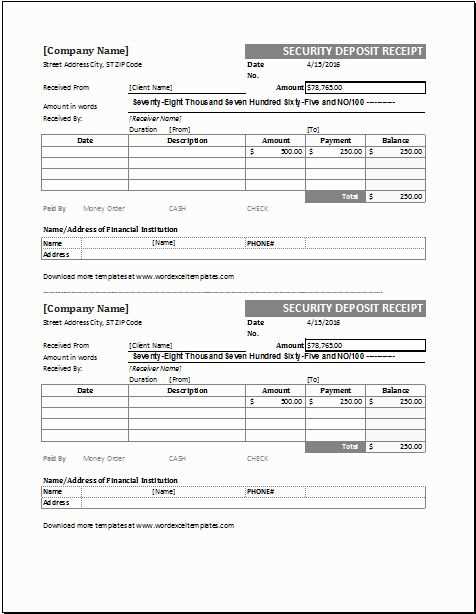
Use of Tables: Organize the information in tables for easy tracking. A table format prevents overlapping information and allows a cleaner presentation of data.
Transaction Time: Include the exact transaction time to avoid ambiguity. This helps with verification and record-keeping purposes.
By focusing on these specific elements and avoiding unnecessary repetitions, the template will be cleaner and more practical for daily use.
- Deposit Slip Receipt Template
A deposit slip receipt template should clearly outline key transaction details, ensuring transparency and accuracy. It typically includes sections for the depositor’s name, account number, transaction date, and the amount deposited. Make sure to include a unique reference number for easy tracking of the deposit.
For simplicity, arrange the template in sections. The first section should list the depositor’s details–name, address, and account number. This ensures the deposit is linked to the correct account. The second section should specify the amount of money being deposited, including a breakdown of any cash and checks if applicable. Also, include a space for the signature of the bank representative or the depositor.
Ensure that the format of the date is consistent, using the full date (e.g., February 12, 2025) to avoid confusion. The template should be designed to allow room for additional notes, such as a memo or reference number for specific instructions related to the deposit.
Incorporating a section for both deposit slip numbers and check numbers adds clarity to the record. This allows for efficient tracking and verification, especially when managing multiple deposits or reconciling account balances. Make the receipt easy to read with clear borders and sufficient spacing between sections.
Lastly, consider adding an optional section for any fees associated with the deposit, such as processing charges or account maintenance fees, so all financial aspects of the transaction are covered in one document.
To create a deposit receipt, begin by including the date of the deposit and the deposit reference number. This helps to identify the transaction. Clearly list the amount deposited, separating it into the principal amount and any applicable fees or charges. Ensure you include the name of the person or business making the deposit, along with their account or reference number if applicable. If the deposit was made through a specific method, such as cash or check, mention the method used for clarity.
Include Contact Information

Make sure to add contact details for the receiving institution, such as the bank or service center name, address, and phone number. This allows both parties to reach out if there are any follow-up questions or issues regarding the transaction.
Provide a Confirmation Statement

End the receipt with a statement confirming the deposit was successfully processed. This reassures the depositor that the transaction has been completed. Be sure to include a space for both the depositor’s and the institution’s signatures, if required, for added verification.
To tailor a deposit slip template for your business, start by incorporating your logo and company name prominently at the top. This helps establish your brand identity right from the first point of contact.
Include Required Fields
- Customer Name: Ensure there is a designated space for the customer’s name.
- Account Number: Make it easy for your customers to input their account number accurately.
- Deposit Amount: Include a clear section where the total deposit amount is entered.
- Date: Always add a space for the deposit date to maintain accurate records.
Enhance Clarity with Custom Labels

Custom labels help guide users smoothly through the form. Use simple and clear instructions like “Enter Amount” or “Account Number” to avoid confusion. Consider adding brief examples near each field to show how to fill them out correctly.
Adjust Layout for Easy Handling

Optimize your template layout by leaving enough white space around each section. A clean, organized design will make the template easier to read and complete. Arrange the fields logically so customers can quickly find and fill in the necessary information.
Don’t forget to leave room for a signature field or a confirmation box for additional security if needed. Customizing deposit templates ensures your customers have a smooth experience while also maintaining a professional and branded appearance for your business.
Always verify the deposit details, such as the account number, date, and amount, before finalizing the transaction. Any errors at this stage can lead to complications later on.
Store deposit receipts securely for future reference. Whether you choose to keep physical copies or scan them for digital storage, ensure they are easily accessible when needed.
For larger deposits, request a confirmation with a reference number or stamp. This ensures you have a verifiable record in case any discrepancies arise.
Regularly check the receipts against your bank statement to confirm that all transactions have been processed correctly. This helps prevent potential issues with your account balance.
If using a deposit receipt template, ensure all required fields are included, such as the deposit amount, account details, and transaction reference. Incomplete forms can cause delays in processing.
Ensure your deposit slip receipt includes all necessary details. This typically covers the deposit amount, the account number, and the date of the transaction. It’s best to keep the format simple, so users can quickly find the information they need. A clear layout helps avoid mistakes and ensures smooth processing.
Additionally, include a section for the bank teller’s initials or a stamp for verification purposes. This adds an extra layer of accuracy to the receipt. Make sure your template is flexible enough to accommodate varying deposit amounts, both in numeric and written forms.
Lastly, consider adding a reference number for tracking purposes. This allows both the depositor and the bank to easily trace the transaction if any issues arise. A receipt with these basic details will serve both as proof of deposit and a useful tool for record-keeping.