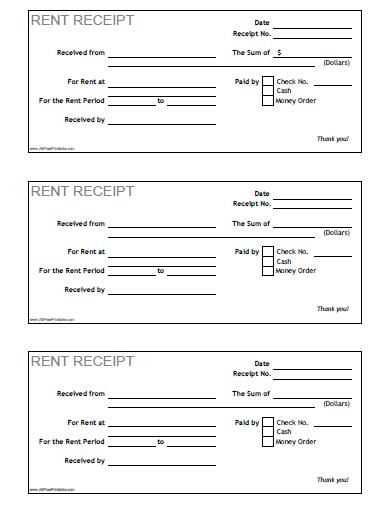
To streamline your sales process, consider creating a simple yet detailed receipt template for online orders. This document should clearly display transaction details, including item descriptions, quantities, pricing, and any applicable taxes or discounts.
Make sure to include the buyer’s name, shipping address, and contact information for easy reference. This not only improves customer service but also helps resolve any potential issues quickly. A receipt should also feature your business’s name, contact details, and order number for easy identification and follow-up.
For better clarity, you can integrate payment method information and include a summary section that totals all charges. It’s beneficial to list the terms of service or return policy at the bottom of the receipt for transparency.
Online Order Receipt Template
Ensure your online order receipt template includes the following elements: company name, order number, customer information, purchase details, payment method, and total amount. This keeps everything clear and professional for both the seller and buyer. Use easy-to-read fonts and clear formatting to improve readability. Be sure to include a unique identifier for each order, making it easier to track in case of returns or customer inquiries.
Key Elements to Include

The template should list all purchased items, quantities, prices, and any applicable taxes. A brief summary at the bottom with the total cost is essential. If possible, add a thank-you message to enhance the customer experience. Include contact information for any follow-up inquiries. Keep it concise and to the point.
Customization and Flexibility

Customize your receipt template to match your brand style. Consider including your logo, color scheme, and relevant legal disclaimers if required by your region. Offering downloadable receipts or email confirmations can simplify record-keeping for customers.
Customizing Your Online Order Receipt for Business Needs
Tailor your receipt by adding your brand logo, contact information, and a clear return or exchange policy. These elements not only reinforce your brand identity but also make it easier for customers to reach out if needed.
Personalize the Layout
Adjust the layout to fit your specific needs. Group items by category or type, include images for visual appeal, and make sure important details like order numbers, dates, and customer details stand out. A clean and organized layout increases readability and reduces confusion.
Include Custom Messaging

Incorporate personalized messages such as thank-you notes, promotional offers, or loyalty incentives. This small touch enhances the customer experience and encourages repeat business. Keep the tone friendly and professional to foster positive relations.
Including Important Details to Ensure Clear Communication
Provide clear, specific information to avoid confusion. Include the full name of the buyer and seller, as well as the business address and contact details. List the ordered items with descriptions, quantities, and individual prices. Mention any discounts or special offers applied. Indicate the total amount, taxes, and shipping charges separately for better transparency. Don’t forget to specify the payment method and any relevant transaction or order number for easy reference.
Clarify Delivery Information

State the delivery address, expected delivery date, and tracking number if available. Include any special instructions for delivery or handling if applicable. If there are multiple delivery methods, clarify which one was selected and why.
Outline Return and Refund Policies
Explain the return process, including deadlines for returns and the condition of the product for returns to be accepted. Be clear about whether refunds are issued in full or with deductions, and specify the timeline for processing refunds.
How to Format Your Template for Easy Printing and Saving
Choose a clean layout with well-defined margins and spacing to ensure a clear printout. Avoid clutter and excessive detail that could interfere with legibility. Stick to a single page width for a seamless print experience.
Step 1: Use Standard Paper Sizes

- Set your template’s width to A4 (8.27 x 11.69 inches) or Letter (8.5 x 11 inches) for universal compatibility.
- Make sure to leave sufficient margins (at least 0.5 inches) to prevent information from being cut off.
Step 2: Optimize for PDF Saving
- Ensure that your template is exportable to PDF, which preserves formatting and layout when saving or sharing.
- Check that fonts are embedded in the PDF to avoid display issues on different devices.
Test print your template before finalizing to make sure everything fits within the defined margins and prints correctly. Make adjustments as needed, especially for any graphics or logos included.