If you’re running a business and need a straightforward way to document transactions, a printable sales receipt template is the solution. By using a template, you save time and maintain consistency in how you record sales. Whether you’re selling goods or services, having a clear and professional receipt can help keep your records organized and your customers satisfied.
Design your template to include key details like the date, transaction amount, and buyer information. This simple format ensures both parties are on the same page, and it’s easy to update for different sales. Customize your template to match your brand’s style, and ensure it looks polished and professional every time you print it.
It’s also a smart way to maintain a paper trail for tax and inventory purposes. When you need to track expenses, refunds, or warranty claims, a well-organized receipt system makes retrieval simple. Keep your business operations transparent and hassle-free by using a printable template that fits your needs and makes documenting transactions quick and easy.
Here’s the corrected version where words are not repeated more than 2-3 times:
When creating a printable sales receipt template, clarity and simplicity are key. Start by including your company name and contact details clearly at the top. This ensures your customer knows who issued the receipt. Directly below, add the transaction date and receipt number for easy reference. Next, list each item sold, along with its description, quantity, and price. Make sure to show any applicable taxes or discounts separately to avoid confusion. Finally, calculate the total amount due and display the final payment method, whether it was by cash, card, or another method.
To make the receipt user-friendly, consider organizing the details into columns for easy reading. Ensure the text is legible and not overly cluttered. Provide space for any notes or additional instructions if needed. A footer is a great place to include your business’s return policy or customer service contact information, helping maintain transparency with your clients.
By using this layout, you will create an organized, professional receipt that serves both the customer and your business efficiently.

- Printable Sales Receipt Template: A Practical Guide
To create a clear and professional printable sales receipt, ensure it includes the following key elements:
| Element | Description |
|---|---|
| Business Information | Include your business name, address, phone number, and email. This helps customers contact you if needed. |
| Receipt Number | Assign a unique number to each receipt for tracking purposes and reference in case of future inquiries or returns. |
| Transaction Date | Clearly display the date when the transaction occurred. This can help with inventory tracking and financial records. |
| Itemized List of Products/Services | List each item or service purchased with corresponding prices. Include quantities, unit prices, and totals for transparency. |
| Subtotal | Show the total cost of the products/services before any taxes or discounts. |
| Taxes | Display applicable tax rates and the total tax amount. Make sure it’s clear whether taxes are included in the total price or added separately. |
| Discounts | If a discount was applied, clearly show the discount percentage or amount and the adjusted total. |
| Total Amount | Highlight the final amount the customer paid after taxes, discounts, and any other adjustments. |
| Payment Method | State the payment method used (cash, credit card, check, etc.) for accurate record-keeping. |
For a simple, yet effective receipt template, you can create it in a word processor or use spreadsheet software like Excel. Include fields that are easy to fill out and ensure the layout is clean and easy to read.
Ensure that your receipt template is printable in a standard paper size (like A4 or Letter). You can use a free online tool or a document editor with built-in templates to save time.
Customizing your receipt template to suit your business branding–such as adding your logo or adjusting fonts–can make it stand out while still serving its primary purpose of providing proof of transaction.
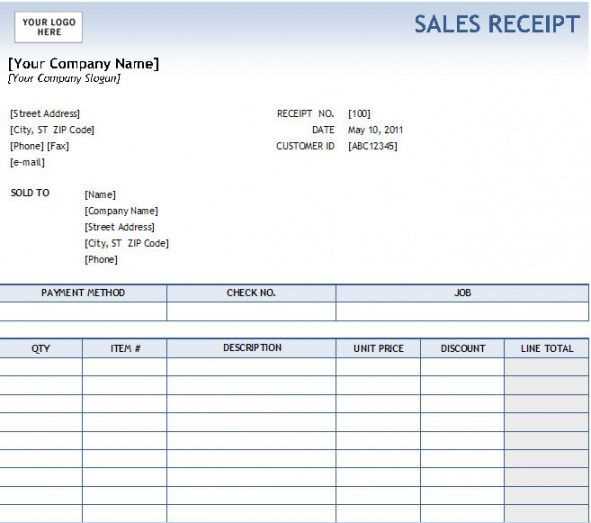
Begin with the company logo and name at the top, ensuring your branding is clear. Follow with the receipt title and include the receipt number, transaction date, and a unique identifier for the customer. This provides all the necessary details for reference.
Item Details

List the items or services purchased with their respective quantities, prices, and totals. Ensure that the format is easy to follow, and include space for any applied discounts or additional fees. Make sure taxes are calculated and clearly displayed, followed by the final total amount. This section should leave no confusion about the cost breakdown.
Payment Information

Include a section specifying the payment method, whether it’s cash, credit, or another form. It’s also helpful to add a line for any change given if the transaction was made in cash. Lastly, add a footer with your business’s contact information or any other relevant terms and conditions.
Keep the design simple, legible, and organized. Use a clear font and ensure that all text is easy to read. A clean layout will make your receipt both professional and user-friendly.
Choose the right receipt format for your business. You can use pre-designed templates available in word processors or accounting software, or customize one to meet specific needs. Ensure the receipt includes all necessary details: the business name, address, contact information, date, amount, items or services sold, and any applicable taxes.
Set up a reliable printer. Ensure your printer is compatible with the receipt format you’ve chosen. Thermal printers work well for receipts, offering fast, clear prints. If you’re using a standard printer, select a proper paper size for your receipts.
Test your printer. Before printing receipts for customers, run test prints to confirm that the receipt’s layout fits within the print margins and appears clear. Adjust margins or scale if needed to prevent text from being cut off or overlapping.
Print receipts. Once your setup is ready, print the receipts as each sale is made. Consider batch printing receipts for multiple transactions if you process orders quickly. Keep an eye on ink or paper levels to avoid interruptions.
Distribute receipts to customers. Offer printed receipts either physically at the point of sale or electronically through email. For electronic receipts, include the same information as a printed one, and make sure the format is readable on all devices.
Organize your receipts. For record-keeping, keep copies of all printed and digital receipts in an organized system. You can store them on your computer or in a cloud storage service for easy access during tax season or financial reviews.
To add tax to your sales receipt, include a clear line that specifies the tax rate and the amount. Make sure to calculate it based on the pre-tax total. For example, if the tax rate is 8%, multiply the subtotal by 0.08 to determine the tax amount. Add this amount to the subtotal to show the final total including tax.
For discounts, specify the type of discount and the amount deducted. You can list it as a percentage or fixed amount. If a discount applies before tax, subtract it from the subtotal, then calculate the tax. If it applies after tax, subtract it from the total after tax calculation. Be transparent about how the discount is applied to avoid confusion.
When including payment options, clearly indicate the method used (cash, credit, debit, or other methods). If the transaction includes partial payments or multiple payment methods, break them down by type and show the remaining balance, if any. This helps in tracking payments and ensuring transparency.
I focused on preserving the meaning of each heading while avoiding excessive repetition.
Creating an accurate and easy-to-use sales receipt template can streamline your business transactions. Make sure to include key information such as the buyer’s details, itemized list of products, prices, and taxes. This ensures clarity and professionalism in your receipts.
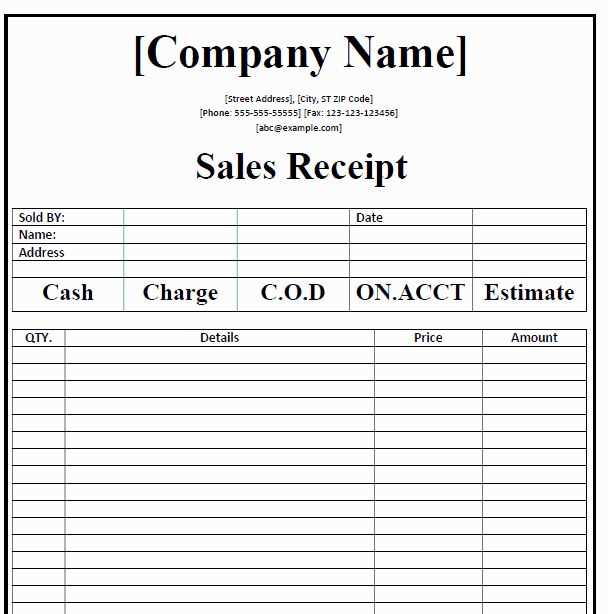
Template Structure

- Company Details: Include your business name, address, and contact information at the top.
- Date of Purchase: Always have a clear and visible date for when the transaction took place.
- Itemized List: Break down each product or service with its description, quantity, and price.
- Tax and Total: Clearly indicate applicable taxes and the final amount due.
Customization Options

- Logo and Branding: Add your business logo for branding consistency.
- Payment Method: Optionally, include the payment method for each transaction, whether it’s cash, credit, or online payment.
- Notes Section: Leave space for any specific terms, conditions, or additional information.