When designing a restaurant bill receipt, clarity is key. A well-structured template not only ensures accurate billing but also enhances the customer experience. Start by including the restaurant’s name and contact details at the top. This helps customers identify the source of the receipt quickly and easily.
Itemized details should be listed clearly, showing each menu item with corresponding prices. Use a clean format with sufficient spacing to make it easy for customers to review their purchases. For added convenience, include a subtotal section before taxes and tips, so the breakdown is transparent.
Always include tax and tip calculations based on local regulations or the customer’s preference. Clearly state whether the tip is included in the total or if it’s an optional addition. This transparency builds trust and reduces confusion when customers review the charges.
Finally, ensure your receipt has a thank you message or invitation for feedback. A polite closing note creates a positive impression and encourages repeat business.
Here’s the corrected version:
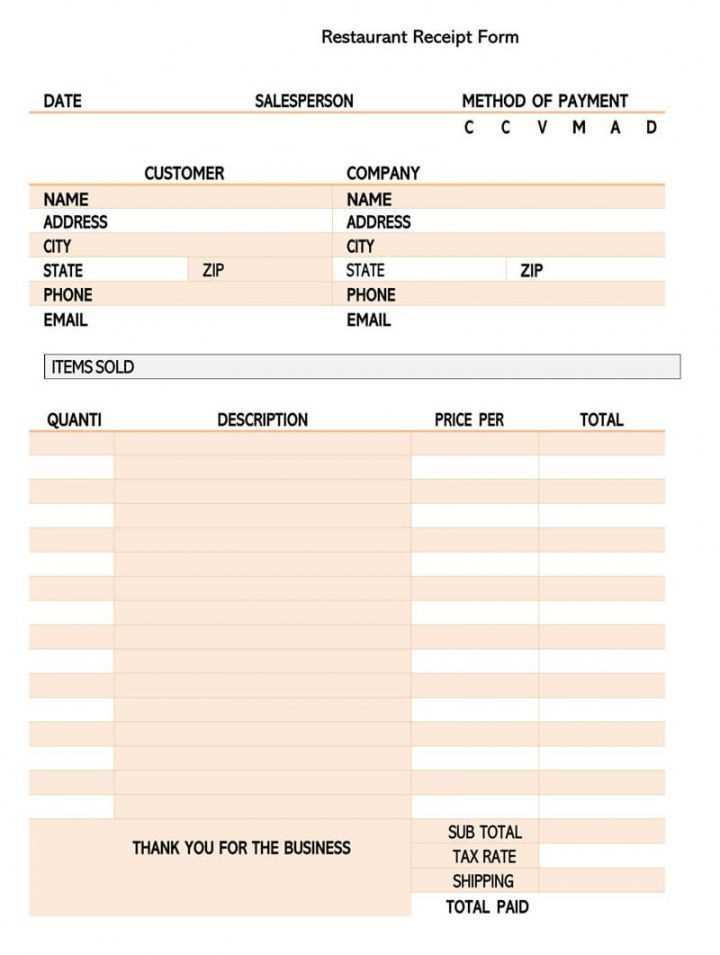
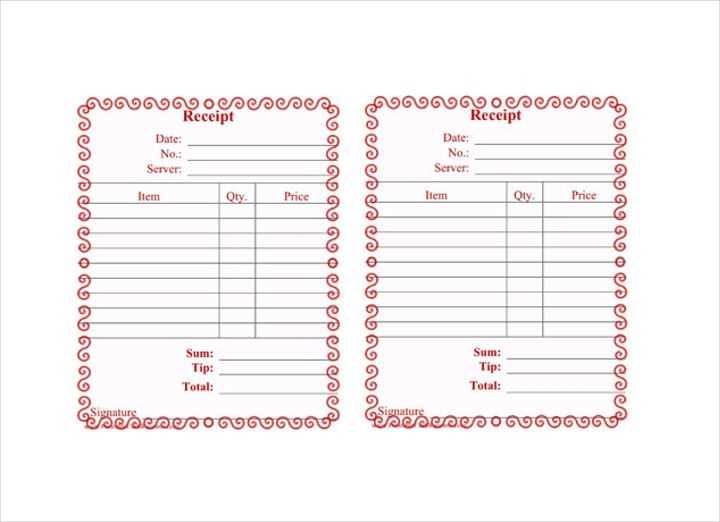
Ensure your restaurant bill receipt template includes clear sections for itemized charges. Each item should be listed with the correct description, quantity, and price. Add a subtotal before tax and any additional fees. Provide a clear breakdown of the taxes and the total amount due, with clear labels for each. Make sure the receipt includes the restaurant’s name, address, and contact details for easy reference. Also, include a section for payment method and a space for the date and time of the transaction. This will enhance clarity and streamline the process for both customers and staff.
- Restaurant Bill Receipt Template
To create a clear and professional restaurant bill receipt, focus on accuracy and simplicity. The template should include the following key sections:
- Restaurant Information: Include the name, address, and contact details of the restaurant at the top. This ensures the customer knows where the receipt is from and how to reach you for inquiries.
- Date and Time: Provide the exact date and time of the transaction. This helps both the restaurant and the customer reference the specific visit.
- Receipt Number: Assign a unique receipt number to each bill. This number makes tracking and organizing receipts easier.
- Itemized List: List all ordered items, their individual prices, and quantities. Customers appreciate transparency in the breakdown of their charges.
- Subtotal: Include a subtotal that adds up all individual item prices before any discounts or taxes.
- Taxes: Clearly display applicable taxes. Separate the tax amount from the subtotal to make it easily visible to the customer.
- Discounts (if applicable): If any discounts are applied, mention the type (e.g., promotional, loyalty, or coupon) and the discounted amount.
- Total Amount: Display the final amount to be paid. Ensure this is clearly visible, and include any additional charges such as service fees or tips.
- Payment Method: Indicate the payment method used, whether it’s cash, card, or other payment options.
- Tip (if applicable): If a tip was provided, show the amount and, if relevant, the tip percentage.
- Thank You Message: End the receipt with a friendly thank-you note or message encouraging the customer to return.
A clean, well-structured receipt builds trust with your customers and helps streamline your accounting process.
A well-structured bill format can make a significant difference in how customers perceive their dining experience. Start with clear itemization of the food and beverages ordered. Each item should be listed with a corresponding price, leaving no room for confusion. Use bold fonts or different text sizes to distinguish the total amount from individual prices.
Ensure Readability

Choose a font style and size that are easy to read. Avoid cluttering the bill with unnecessary details. Stick to a simple layout where the food items, taxes, and service charges are clearly separated. Provide a clear subtotal and highlight the final total in a larger, bold font. This makes the bill easier to review quickly.
Incorporate Branding Elements
Incorporate the restaurant’s branding by using logo placement and matching color schemes. This adds a professional touch without overwhelming the customer. Avoid excessive graphics or decorative elements that may distract from the key information.
Include details such as the date, time, and server’s name to make the bill feel personal and organized. Transparency in pricing and taxes builds trust, so ensure that all charges are clearly outlined. A clean, professional bill format will leave a positive lasting impression on your guests.
Include the date and time of the transaction. This helps both the customer and the restaurant track purchases for reference or returns.
Itemized List of Purchases

Break down each item ordered, including individual prices. This transparency helps customers verify charges and improves trust.
Tax and Tip Breakdown

Clearly list the tax and any gratuities. Indicate the tax rate and total amount for clarity. If a tip is included, specify the percentage and amount.
The total amount due should be prominently displayed, ensuring no confusion about the final price.
Include the restaurant’s name, address, and contact details at the top. This is vital for customers who may need to reach out for inquiries or requests.
For receipts involving payment, mention the method used (cash, card, etc.), and if applicable, provide the last four digits of the card for identification purposes.
Lastly, a unique transaction or receipt number allows customers to reference the purchase easily, especially in cases of returns or disputes.
Start by integrating your restaurant’s logo and color scheme into the bill template. These visual elements create consistency across customer touchpoints. You can easily match fonts, colors, and layouts to reflect your restaurant’s identity. Ensure the design complements the atmosphere of your establishment–whether it’s sleek and modern or warm and rustic.
Optimize for Clarity

When customizing the bill, prioritize clarity. Organize the items in a logical order and highlight key details such as subtotal, taxes, and tips. Use bold fonts for total amounts to avoid any confusion. A well-structured bill improves the customer experience and reduces the likelihood of disputes.
Incorporate Functional Features

Add interactive elements to enhance functionality. For example, including QR codes that link to your online menu or loyalty programs can increase customer engagement. A short, friendly message or a discount offer can be placed at the bottom of the bill to encourage return visits.
By customizing bill templates, you ensure that both branding and functionality serve to reinforce a cohesive customer experience while maintaining operational efficiency.
Ensure clarity and professionalism when creating a restaurant bill receipt template. Begin by organizing key details in a simple, easy-to-read layout. This helps customers quickly review their charges and make payments without confusion.
Details to Include
The receipt should clearly list the following:
- Restaurant name and contact details
- Date and time of the transaction
- Itemized list of purchased items with quantities and individual prices
- Subtotal and applicable taxes
- Total amount due
- Payment method (cash, credit card, etc.)
- Optional: Tip amount and total with tip included
Formatting Tips
Maintain a clean, organized structure by using sections for each piece of information. For example:
| Item | Price |
|---|---|
| Dish Name | $12.00 |
| Drink | $3.50 |
| Subtotal | $15.50 |
| Tax (8%) | $1.24 |
| Total | $16.74 |
This structured format enables the customer to quickly verify each charge, ensuring a smooth and transparent experience.