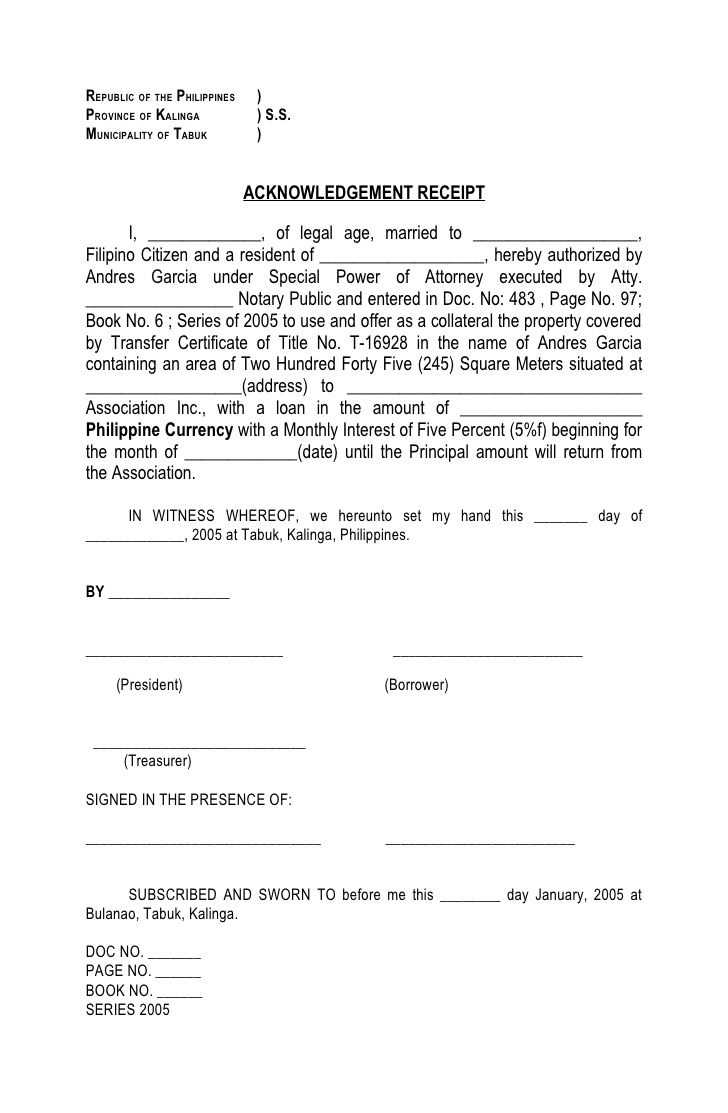
Creating a receipt template is simple yet highly practical for both businesses and individuals. A well-organized receipt can provide clarity and ensure smooth transactions. Focus on key details such as the item or service purchased, date, price, and payment method. These elements are vital for record-keeping and financial transparency.
Start by clearly stating the transaction’s date and include both the seller’s and buyer’s information. This prevents confusion and establishes accountability. Next, itemize the products or services provided along with their corresponding costs. A breakdown is helpful for both parties to verify the transaction’s accuracy.
Always specify the total amount paid, including taxes if applicable. This shows the full cost of the transaction and avoids future misunderstandings. If relevant, add the payment method used–whether it’s cash, credit card, or other forms–so that there’s a clear record of how the payment was processed.
Keep the format simple and easy to read. This ensures that anyone reviewing the receipt can quickly find the information they need. A consistent layout will help both customers and businesses manage their finances with confidence.
Here’s a detailed plan for your article on “Receipt Template” with six practical headings:
1. Choosing the Right Template: Select a template that suits your business style and needs. Consider whether a basic or more detailed design is necessary. Keep in mind the type of transaction and whether the receipt needs to accommodate specific fields like taxes or discounts. Choose a format that can be easily edited if needed.
2. Required Information: Include essential details such as the business name, contact information, transaction date, itemized list of purchased goods or services, and total amount. Make sure all these data points are clearly visible for both the customer and your records.
3. Customizing the Template: Tailor the receipt to match your brand. Add your logo, colors, and any other branding elements to give it a professional look. Customize fonts and layout to align with your business style while maintaining readability and clarity.
4. Legal and Tax Requirements: Ensure that the receipt includes all necessary tax information, including tax rates and any applicable exemptions. Different regions may have different regulations, so verify the required fields for receipts in your location.
5. Digital or Paper Receipts?: Decide if you want to issue physical receipts, digital receipts, or both. For digital receipts, make sure the template is optimized for email or printing. For paper receipts, choose a layout that fits standard printer sizes and is easy to read.
6. Saving and Managing Templates: Store your receipt templates in a safe location for easy access. Consider using cloud storage or a document management system to ensure you can retrieve and update templates quickly when needed. Regularly update your template to reflect any changes in your business or legal requirements.
- Creating a Basic Receipt Template
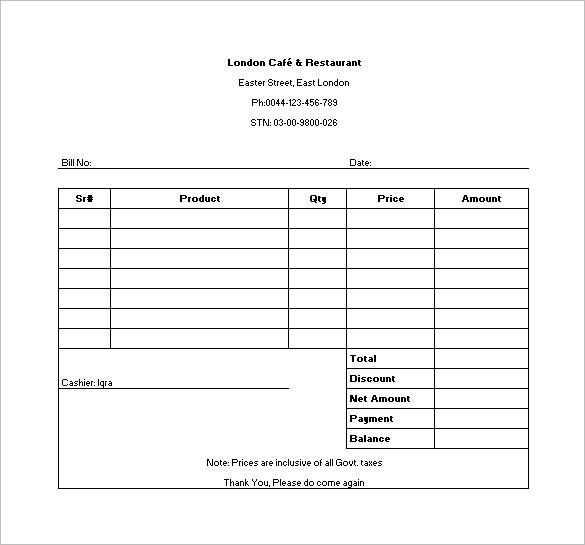
Designing a basic receipt template involves structuring the layout to clearly present necessary transaction details. Begin by establishing a clean header section, which typically includes your business name, address, and contact details. Include a space for a unique receipt number and transaction date for identification.
Next, allocate space for the buyer’s details, such as name and address, followed by a table listing items or services purchased. Each row should contain the item description, quantity, unit price, and total cost. The last row should show the subtotal, any taxes applied, and the final amount due.
| Item Description | Quantity | Unit Price | Total |
|---|---|---|---|
| Product A | 2 | $10.00 | $20.00 |
| Service B | 1 | $50.00 | $50.00 |
| Subtotal | $70.00 | ||
| Tax (10%) | $7.00 | ||
| Total | $77.00 | ||
Lastly, ensure there’s space for payment details, including the method of payment (cash, card, etc.), and a thank-you note or return policy statement at the bottom of the receipt.
For a receipt template to be effective, tailor it to the specific needs of each industry. The layout and information displayed should align with industry standards while also meeting customer expectations.
In retail, include itemized lists of products with prices, tax rates, and total cost. For food services, you may want to add sections for gratuity or service charges. For healthcare or legal industries, ensure that patient or client details, service descriptions, and payment breakdowns are clearly outlined.
Customization is key. Modify fields such as business name, contact details, and logo to represent your brand. For construction or project-based industries, consider including invoice numbers or job site identifiers to help with project tracking.
In some sectors, like education or non-profits, receipts may need to be structured to accommodate donations or grants. Be sure to include a donation breakdown or funding source, along with relevant tax exemption details.
Adapting your receipt template for each industry streamlines both customer experience and accounting processes. Aim for clarity, accuracy, and simplicity to ensure that each receipt fulfills its purpose effectively.
When creating a receipt, include the following key details for clarity and accuracy:
- Business Name and Contact Information: Clearly display the name of the business, its address, phone number, and email address.
- Date and Time of Transaction: Ensure the date and time of the transaction are clearly stated for record-keeping purposes.
- Receipt Number: A unique receipt number helps track the transaction and manage inventory or services provided.
- Itemized List of Purchases: List each item or service purchased with its price, quantity, and any applicable taxes.
- Total Amount Paid: Clearly show the total amount paid, including taxes, discounts, and shipping fees if applicable.
- Payment Method: Indicate how the payment was made (e.g., cash, credit card, or digital payment).
- Sales Tax Information: Display the percentage and amount of tax charged on the purchase, if applicable.
- Return and Refund Policy: Mention any policies related to returns or refunds, or refer to where the policy can be found.
Ensure these details are accurate to avoid confusion and make future reference easier for both customers and businesses.
To effectively incorporate branding into a receipt template, focus on key elements like your logo, color scheme, and font choices. Place your logo at the top of the receipt for maximum visibility. Ensure that it is high quality, but not too large, so it doesn’t dominate the page.
Customize Colors and Fonts
Select colors that align with your brand’s identity. Use your primary brand color for headers or borders, and opt for secondary colors for smaller details. Stick to 1-2 font styles to keep the design clean and readable. Ensure the fonts are web-friendly and easy to read on both digital and printed versions.
Include Brand Messaging

Add a short tagline or slogan beneath the logo or in the footer. This reinforces your brand’s identity without overwhelming the receipt. Keep the message concise and ensure it’s relevant to the transaction.
For optimal receipt formatting, prioritize clarity and practicality. The format should align with the transaction type and fit the needs of both the business and the customer. Consider these key points when selecting the format:
Text-Based vs. Graphical Formats

Text-based receipts are quick and easy to generate, often ideal for smaller transactions or simple services. They are lightweight and easy to store digitally. Graphical formats, on the other hand, provide a branded touch and can enhance customer experience with logos, product images, or detailed breakdowns.
Customization and Compatibility

- Ensure the receipt format is compatible with your printer or POS system.
- For businesses with high-volume transactions, a simple text format may be more efficient.
- If branding is a priority, consider using graphical formats that allow more customization and design elements.
The right choice depends on your specific needs and the complexity of the transaction process. Opt for a format that maintains professionalism and enhances clarity for your customers.
Ensure your receipts are clear and accurate before printing or sending them. A well-organized receipt includes the transaction details such as date, items purchased, price, taxes, and the total amount. Double-check for any typos or mistakes to avoid confusion.
For printing receipts, choose a reliable printer and high-quality paper to prevent fading. Opt for thermal printers for fast, smudge-free output, especially if your business deals with high volumes. Set up your printer correctly, adjusting margins and ensuring the receipt size fits the paper properly.
When it comes to sending receipts electronically, offer clear instructions for customers to easily access their receipts. Provide a download link in a user-friendly format such as PDF or a secure, automated email that contains all the transaction information. This saves paper and ensures customers have an easy way to store their receipts digitally.
Ensure that the sending method is secure. Use encrypted emails or secure file-sharing platforms to protect sensitive data. Avoid sending receipts via unencrypted methods to safeguard your customers’ personal information.
Lastly, track all sent receipts to keep records organized. This will help with both customer inquiries and accounting purposes. Consider using receipt management software to streamline this process and keep everything in one place.
Ensure the receipt includes a clear and simple breakdown of the purchased items or services. Organize the information with item names, quantities, and individual prices. This structure helps users quickly identify what they are being charged for.
Item Descriptions: Provide concise but descriptive names for the purchased items. Avoid abbreviations or vague terms that might confuse the recipient. This adds clarity to each entry.
Dates and Time: Always include the date and time of the transaction. This will help both the customer and business track purchases over time.
Payment Details: Clearly state the method of payment, whether it’s cash, card, or other methods. Mention any relevant payment references or transaction IDs for easier tracking.
Total Amount: Make sure the total amount is prominently displayed at the bottom of the receipt. Include any taxes or discounts applied, with each component broken down if necessary.
Additional Notes: If applicable, include any return or refund policies or other relevant information to clarify how customers can address any issues post-purchase.