Creating a clear and organized purchase receipt can streamline transactions and provide both the buyer and seller with important records. A well-structured template ensures all necessary details are captured, preventing confusion and making future reference easy. Include key elements like the purchase date, product descriptions, quantity, prices, and payment method to keep it simple and effective.
Start with a section for the buyer’s information, such as their name and contact details. This is particularly useful for businesses that track repeat customers. Next, add a list of items purchased, including the description, unit price, and total price. This provides transparency and helps avoid misunderstandings.
Ensure that your payment details are clearly stated, such as the total amount paid, taxes, and method of payment. If the purchase was made through a credit card or another electronic method, it’s helpful to note the last four digits of the card or transaction number for verification purposes.
Lastly, consider adding a space for a thank you message or business contact information. This small touch makes the transaction feel personal while reinforcing your business’s brand. Make sure the template is easily customizable to accommodate different transaction types or formats.
Here’s the revised version:
For a streamlined and clear purchase receipt, make sure to include the following key components:
Date of Purchase: Always display the exact date and time the transaction took place. This helps both the customer and the vendor keep track of purchases.
Product Details: List the items with brief descriptions, quantities, and their individual prices. This section provides transparency and minimizes any misunderstandings regarding what was purchased.
Total Amount: Clearly display the total sum, including taxes, shipping, and any other additional charges. Customers should never be left guessing the final cost.
Payment Method: Indicate whether the purchase was made with a credit card, cash, or another method. This ensures there is no confusion over payment method.
Vendor Information: Include the business name, contact details, and address. This gives the customer easy access to reach out for returns, support, or other inquiries.
Receipt Number: Assign a unique number to each receipt for easy tracking and reference. This can simplify returns, exchanges, or any customer service requests.
Return Policy: If applicable, add a brief note on the return or exchange policy. This can save time and clarify the process if the customer decides to return an item.
Basic Purchase Receipt Template: A Practical Guide

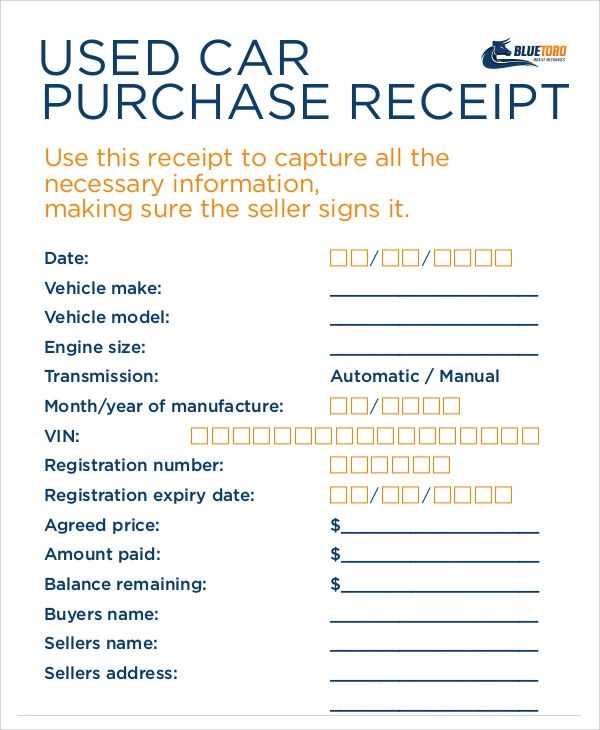
To create a clear and functional purchase receipt template, begin by including the seller’s name, address, and contact details. Make sure to add the buyer’s name and address as well. The date of the purchase and a unique receipt number should follow to help with future reference.
List all the items or services purchased. Include the name, quantity, price per unit, and the total cost for each item. After this, provide a subtotal before applying any taxes or discounts. For taxes, indicate the rate and total tax applied to the purchase. Include any discounts or promotional offers, if applicable.
Clearly display the total amount due after taxes and discounts. If payment has been made, note the method of payment (e.g., credit card, cash, or online transfer). Lastly, add a space for any additional comments, such as return policies or warranty information, to avoid confusion later.
This format ensures transparency, helps with record-keeping, and provides a smooth experience for both the seller and the buyer.
A simple receipt should be clear, organized, and easy to read. To structure it effectively, include the following key components:
1. Seller Information
Start with the seller’s name, address, and contact details. This provides the buyer with clear information on where the transaction occurred. Include the business name and any relevant registration details if applicable.
2. Purchase Details
List the items or services purchased, along with their quantities and prices. For clarity, break down the amounts before and after any applicable taxes or discounts. Include a brief description of each item for better understanding.
| Item | Quantity | Price | Total |
|---|---|---|---|
| Product A | 2 | $10.00 | $20.00 |
| Service B | 1 | $50.00 | $50.00 |
3. Total Amount

Clearly state the total amount due, including tax, fees, and any applicable discounts. Break it down into sections to avoid confusion.
4. Payment Method

Specify the payment method used, whether it’s cash, credit card, or another form of payment. This helps both parties keep track of the transaction.
5. Date and Receipt Number

Include the transaction date and a unique receipt number for reference. This is useful for both the seller and the buyer in case of any future inquiries or returns.
By following these steps, you can create a clear and professional receipt that serves both administrative and customer service purposes.
Select a format that is easy to read and ensures all necessary details are clear. Different transaction types may require different formats, so consider the following:
- Paper Receipts: Best for in-store purchases, these receipts should include a simple layout with clear labels for item names, quantities, prices, and totals. Avoid unnecessary text or decoration that could clutter the receipt.
- Digital Receipts: Ideal for online transactions or businesses that need to offer eco-friendly options. Use a clean, organized layout that includes the same essential details as paper receipts. PDFs or emailed receipts are common formats. Ensure they are easily accessible and printable if needed.
- Customizable Receipts: If branding is important, you can add logos or custom colors. Ensure the branding does not overshadow the important details like prices and taxes. Stick to a clean, minimal design with added branding elements as secondary.
Choose a format that suits your business and customer needs, making sure it’s practical for both immediate use and future reference. The format should prioritize clarity and ensure no critical information is left out.
Ensure that all item prices are accurate and clear. Small mistakes in pricing can cause confusion or dissatisfaction. Check tax calculations and apply any discounts properly to avoid discrepancies.
Clearly list the purchased items with enough detail. Include specifics like quantity, size, or model if necessary. Vague descriptions can lead to misunderstandings and frustration for both customers and businesses.
Don’t skip including your business contact details. Make it easy for customers to reach out for support, returns, or questions. Add your email, phone number, and business address if relevant.
Make sure the total amount paid, including taxes, is easy to find and read. Incorrect totals or unclear tax breakdowns can cause confusion and issues during returns or refunds.
Avoid clutter. Keep the receipt neat and concise, focusing on the most important information. Too much text or irrelevant details can overwhelm the customer.
Test your receipt format regularly. Ensure it prints correctly on all devices and looks professional. Misaligned text or incomplete information can damage your brand’s reputation.
When designing a basic purchase receipt template, organizing items into a clean list can simplify the process for both customers and businesses. Begin by creating a structured unordered list (
- ) to display each item clearly. Use the
- tag for each product or service purchased, ensuring each entry includes the product name, quantity, and price. This approach enhances readability and helps prevent confusion.
Ensure that the total amount is clearly visible at the bottom of the list. You can add the
- tag to calculate taxes, discounts, and any other fees. Each entry should be concise but detailed enough to reflect the transaction accurately. A clear separation between items and totals allows for easy verification and understanding of the purchase.
Finally, include a note section below the list for any additional information such as payment methods, store policies, or promotional codes. This will make the receipt more useful without overloading the customer with information.