Looking for a free general contractor receipt template? You can save time and effort with a ready-to-use option that fits your needs. These templates are designed to streamline the process of issuing receipts to clients, ensuring clarity and professionalism in every transaction.
A simple, well-organized receipt template should include key details like the contractor’s name, the client’s information, a description of services provided, and the payment amount. Including the date of the transaction and any terms or conditions will help avoid confusion down the road.
Using a pre-made template allows contractors to stay organized and avoid errors when documenting payments. It also helps clients understand exactly what they are paying for, making the receipt more transparent and reliable for both parties.
Here’s a version with repetitive elements removed, preserving meaning and structure:
To create a clean and functional receipt template for a general contractor, focus on these key elements:
- Header: Include your company name, logo, contact information, and receipt number for easy tracking.
- Date: Ensure the date of issue is clearly stated to keep records organized.
- Client Information: List the client’s name, address, and contact details for reference.
- Project Details: Include a brief description of the project or work completed, outlining specific services provided.
- Payment Information: Specify the total amount charged, any taxes, and the payment method used (e.g., check, credit card, cash).
- Signature Line: Leave space for both parties to sign, confirming receipt of payment.
Additional Tips:

- Consider using a simple layout that makes it easy for both you and your client to read.
- Ensure that the receipt reflects all services rendered to avoid confusion later on.
- For future-proofing, provide a reference or invoice number for any follow-up communications.
By organizing these elements, you’ll produce a straightforward receipt that can be customized for each job without unnecessary repetition.
General Contractor Receipt Template Free
A free general contractor receipt template streamlines the process of documenting payments, services rendered, and job completion. By using a clear and structured receipt template, contractors can ensure all the necessary details are captured, reducing confusion and enhancing professionalism.
Key Elements of a General Contractor Receipt

When creating a general contractor receipt, make sure it includes the following key details:
- Contractor Name and Contact Information: Include full legal name, address, phone number, and email.
- Client Name and Contact Information: Clearly specify the client’s details for accurate record-keeping.
- Invoice Number: Assign a unique invoice number to track payments efficiently.
- Date of Service: Clearly state the service dates to avoid ambiguity.
- Description of Services: Itemize all the services performed, including materials and labor.
- Total Amount Paid: Ensure the total amount is clearly stated, including taxes and fees if applicable.
- Payment Method: Indicate whether payment was made by cash, check, or credit card.
- Signature Lines: Include spaces for both contractor and client signatures, confirming the completion of services and payment.
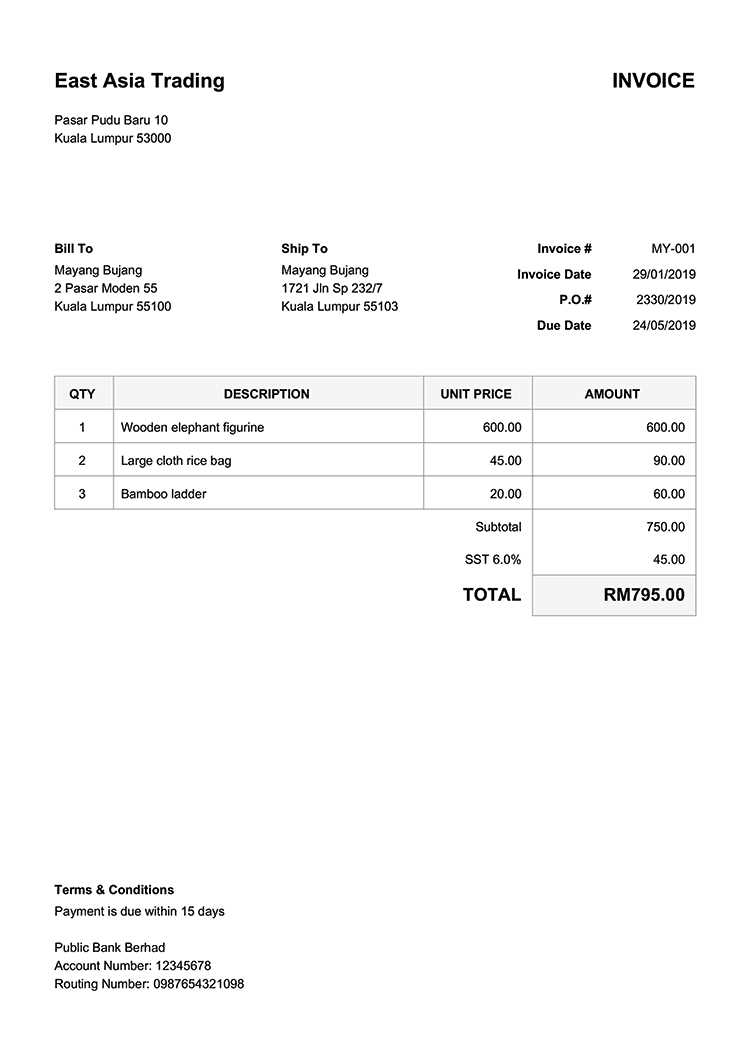
Sample General Contractor Receipt Template

| Field | Details |
|---|---|
| Contractor Name | John Doe Construction |
| Contractor Contact | 1234 Main Street, City, State, Zip – (123) 456-7890 |
| Client Name | Jane Smith |
| Client Contact | 5678 Oak Avenue, City, State, Zip – (987) 654-3210 |
| Invoice Number | 00123 |
| Date of Service | February 10, 2025 |
| Description of Services | Installation of new kitchen cabinets, electrical work, and plumbing. |
| Total Amount Paid | $5,000.00 |
| Payment Method | Credit Card |
| Contractor Signature | _________________ |
| Client Signature | _________________ |
Using a well-organized receipt template ensures that both the contractor and client have clear documentation of the work completed and payment made. It’s an essential tool for maintaining transparency and professionalism in business transactions.
Choose a free receipt template that matches your business needs and is easy to customize. Look for templates that include all the key details: your business name, client’s information, services provided, costs, and payment status. The layout should be clear and simple to ensure professional presentation.
Step 1: Customize the Template
Download the template and input your company’s name, address, and contact details at the top. Include the client’s name and contact information below. For each service provided, list a brief description and its cost. This helps the client understand exactly what they are paying for.
Step 2: Add Payment and Terms
Specify the total amount due, including taxes or additional fees. Clearly state the payment method (e.g., cash, credit card) and any relevant payment terms. If the full payment hasn’t been made, note the outstanding balance and the due date. This ensures that everything is transparent and avoids confusion.
Finally, review the receipt to ensure that all information is accurate. Save or print it in a format that’s easy for both you and your client to access. A well-done receipt builds trust and keeps records organized for future reference.
To tailor your receipt template for a specific project, start by including project-specific details such as the location, scope, and unique terms agreed upon with the client. Adjust the service description section to match the type of work you’re doing, whether it’s construction, renovation, or any other specialized task. This ensures the receipt reflects the work performed accurately and avoids confusion.
Modify line items based on the materials or labor involved. For instance, if you’re working on a custom build, list each material or service as a separate entry with precise quantities and prices. For labor-intensive projects, break down hours worked and the corresponding rates to keep it clear for both you and your client.
Consider adding custom fields for project milestones or payment terms. If the project is being completed in phases, you can include a section detailing the amount due for each phase, making the financial side transparent and organized. This is especially helpful when working on long-term projects where payment schedules may vary.
Lastly, ensure that your template includes room for project-specific notes. Whether it’s warranty information, future maintenance plans, or a reminder of agreed-upon deadlines, this helps keep everyone on the same page. Customize your receipt template to reflect the unique nature of each project, making it a useful reference for both parties.
Check out the free contractor receipt templates available at Template.net. These are easy to download and can be customized to fit your project details. You can find a variety of styles suitable for different kinds of contracting work, ready to use in PDF, Word, or Excel formats.
Additional Resource: Vertex42
Another great option is Vertex42. They offer free Excel-based templates that are simple to customize. You can adjust the layout, add your company’s logo, and modify payment details quickly, making it perfect for fast transactions.
How to Personalize the Template
Once you download your chosen template, open it in Microsoft Word or Excel to tailor the receipt. Input your client’s details, project name, and payment amount, then save or print it for your records.
How to Use a General Contractor Receipt Template
Download a free general contractor receipt template from a trusted source to simplify your invoicing process. Fill in the essential fields such as contractor name, contact details, client information, project description, and amounts. Ensure you include a breakdown of materials, labor, and any additional charges. List payment terms clearly and indicate the total due. Save the document as a PDF for professional presentation.
Ensure accuracy in the payment section. Specify the payment method, whether it’s cash, check, or credit. If a deposit was made, mention the amount paid and the remaining balance. This clarity helps in avoiding disputes and ensures a smooth transaction process.
For legal protection, consider including a small disclaimer stating that payment is due within a specified period, typically 30 days. This reminder reinforces the urgency of settling the invoice. Customizing your template for each project allows for consistency while meeting specific client needs.
Review the completed receipt before sending it. A clear and detailed invoice improves professional relationships and streamlines future dealings.