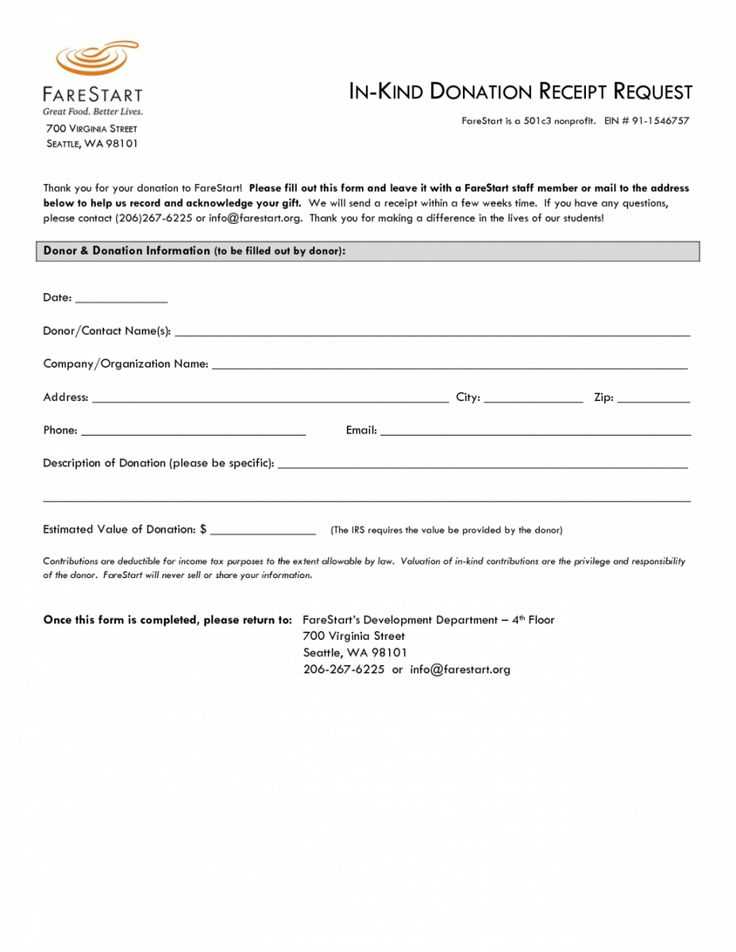
If you’re looking for a straightforward way to create a donation receipt, the DF template is a great starting point. This template includes all the necessary fields that make tracking charitable contributions simple and clear for both the donor and the organization.
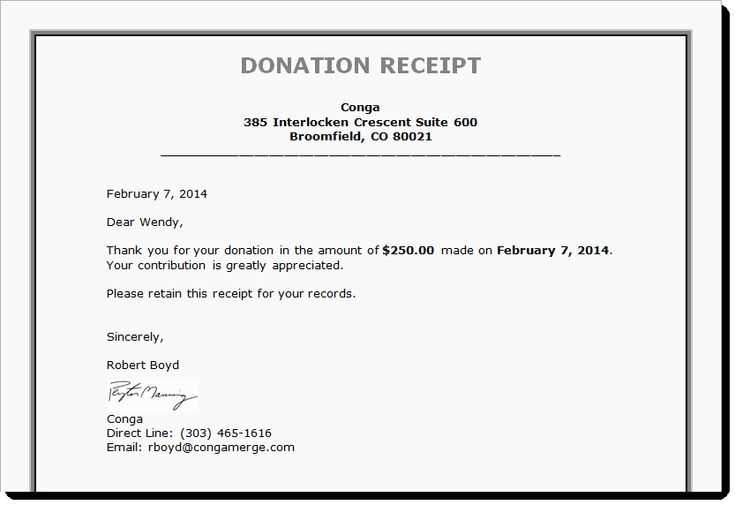
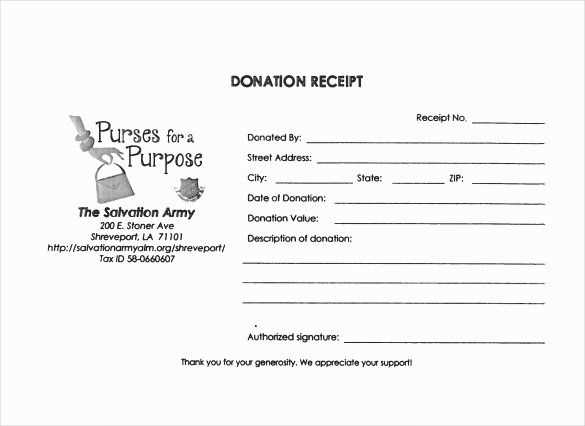
The receipt should clearly state the donor’s name, date of donation, and amount donated. In addition, it must specify whether the donation was in cash or in kind. This transparency helps the donor to keep accurate records for tax purposes, while also providing the charity with a reference point for future inquiries.
Make sure to include a tax-exempt status statement for your organization, if applicable. This not only helps clarify the donor’s eligibility for tax deductions but also shows the charity’s compliance with regulations. A brief note or reminder about the donation’s purpose can further personalize the receipt and demonstrate the impact of the donor’s contribution.
With this template, you will have all the details you need to issue a clear and professional donation receipt. It’s an easy-to-use format that reduces errors and ensures proper documentation for both parties.
Here’s an enhanced version of the text:
To create a donation receipt template, start with clear and concise headers to specify the essential details. Include the organization’s name and contact information at the top. The donor’s name and donation amount should be prominently listed, with the donation date right below it. If applicable, specify if the donation is tax-deductible.
Key Elements to Include

List the donor’s contact details, including address and email. For transparency, indicate if the donation was in-kind (goods or services) instead of monetary. If the donation is for a specific cause or project, make sure this is clearly stated. Be sure to include a unique receipt number for easy tracking and reference.
Final Steps

Ensure the template allows for easy printing or digital distribution. Keep the design simple, focusing on readability. Provide a thank-you note that expresses gratitude and acknowledges the donor’s contribution.
- Donation Receipt Template DF
For creating a reliable donation receipt template, focus on including all required details to ensure compliance with legal standards. Start by clearly stating the name and address of the organization receiving the donation, along with the donor’s full name and contact information. Include the date of the donation and specify the type of contribution–whether monetary or in-kind.
Key Elements to Include
Make sure to document the amount of money or value of the donated goods. If it’s a monetary donation, include the exact sum. For in-kind donations, describe the item(s) donated and give an estimated value. Add a clear statement that no goods or services were provided in exchange for the donation, if applicable.
Tax Deductibility Information

Include a statement regarding the tax-deductible nature of the donation, confirming the organization’s status as a recognized charity. This allows the donor to properly claim tax deductions. Always remember to provide a unique receipt number for record-keeping and tracking purposes.
To tailor a receipt template for individual donor details, begin by including fields that directly relate to the donor’s information such as name, address, donation amount, and the date of donation. Ensure the receipt clearly identifies the donor, with spaces for first and last name, contact information, and a unique donor ID if applicable. This personalization will help with record-keeping and enhance the donor’s experience.
Next, adjust the template to accommodate different types of donations, such as monetary or in-kind gifts. For monetary donations, add fields for donation amount, payment method, and any applicable transaction fees. If the donation is non-monetary, include a description field for the item donated, its estimated value, and any relevant notes, such as restrictions or conditions.
Additionally, make sure the template provides a space for the donor to include any specific instructions or preferences related to the donation, such as designated fund allocation or campaign support. This ensures clarity and reduces potential misunderstandings about how the funds will be used.
Customize the template’s formatting to align with your organization’s branding, such as using the official logo, colors, and font style. This gives the receipt a professional look while helping donors easily identify your organization. Include contact details for support or further inquiries, along with any tax-related disclaimers necessary for the donor’s records.
Finally, consider integrating an automated system that populates the donor information directly into the template. This will save time and ensure consistency across all receipts, especially when managing multiple donors at once.
Each jurisdiction has specific guidelines for donation acknowledgments, particularly when tax deductions are involved. In the United States, the IRS mandates that nonprofits provide written acknowledgment for donations over $250. This acknowledgment must include the donor’s name, the donation amount, and a statement confirming that no goods or services were provided in exchange for the contribution. For gifts of goods, the nonprofit must also describe the property donated.
In the UK, charities must issue receipts for donations of £250 or more. These receipts must clearly state the amount donated and whether the donor has agreed to Gift Aid, a tax relief program. If goods or services are provided in exchange, this must also be noted.
In Canada, a tax receipt is required for donations of $20 or more. The receipt must include the name and address of the charity, the date and amount of the donation, and the charitable registration number of the organization. If any goods or services are provided in return, their fair market value must be deducted from the donation amount.
Australia’s regulations specify that donors must receive a receipt for donations exceeding $2, with the charity’s name, ABN (Australian Business Number), and the donation amount clearly stated. If the donation involves a benefit, it must be reported, and the amount eligible for a tax deduction adjusted accordingly.
In all cases, failure to comply with these requirements can result in the loss of tax benefits for the donor and potential penalties for the nonprofit. It’s essential to stay informed about the legal standards in each region to ensure compliance.
Organizing and managing acknowledgment receipts requires precision. Start by ensuring all receipts are stored securely in a centralized system, such as a cloud-based platform or secure file server. This allows for easy retrieval and keeps records intact in case of an audit or donor inquiry.
1. Categorize Receipts by Date and Donor

- Sort receipts chronologically to streamline future access.
- Tag receipts with donor names or IDs to quickly locate specific donations.
- Use clear file naming conventions to avoid confusion during retrieval.
2. Set Up a Distribution Process
- Automate the sending of digital receipts immediately after donations are made.
- For physical receipts, set up a mailing schedule that aligns with your organization’s operations.
- Ensure receipts are personalized with the donor’s name, amount, and tax information for transparency.
3. Back-Up Your Data Regularly
- Implement a backup system that saves your receipt records weekly or monthly.
- Store backups in different physical or digital locations for safety.
4. Maintain Confidentiality and Privacy
- Limit access to the receipt storage system to authorized personnel only.
- Ensure that any email or physical address data is encrypted or hidden from unauthorized views.
5. Keep a Clear Audit Trail

- Document who handles the receipts and when, creating an audit trail for future reference.
- Track the status of receipt distribution (e.g., whether sent digitally or via post).
I have modified repetitive phrases, maintaining the general meaning.
To make your donation receipt template more effective, focus on removing redundancy and presenting key information clearly. Replace phrases like “donor donation” with “donor contribution” to keep it concise. Streamline wording by removing unnecessary adjectives that don’t add clarity. For instance, instead of saying “kind and generous contribution,” simply use “contribution.” Also, ensure that the format follows a logical order: donor name, amount donated, date, and purpose of donation. This keeps the receipt organized and professional.
Consider including a brief thank-you note that acknowledges the donor’s generosity without being overly wordy. It’s a simple gesture that can make a difference, but be careful not to repeat similar phrases or phrases that don’t serve the purpose of a formal receipt.