To download a sales receipt template for QuickBooks, simply head to the official QuickBooks website or access the template section within your QuickBooks account. These templates are designed to streamline the process of invoicing and recording transactions, ensuring that all necessary details are included. You can easily customize the template to match your business branding by adjusting logos, colors, and text styles.
Once you’ve selected your preferred template, click the download button to save it to your device. QuickBooks provides several options, including options for both service-based and product-based businesses. Depending on your specific needs, you may choose a template that includes fields like payment methods, item descriptions, and taxes, or opt for a more simplified version.
After downloading, you can start using the template immediately by uploading it into your QuickBooks account. This allows you to create professional receipts with minimal effort, saving time and reducing the chances of errors. If you ever need to adjust or add any new fields, QuickBooks makes it simple to make changes that better align with your workflow.
QuickBooks Sales Receipt Template Overview

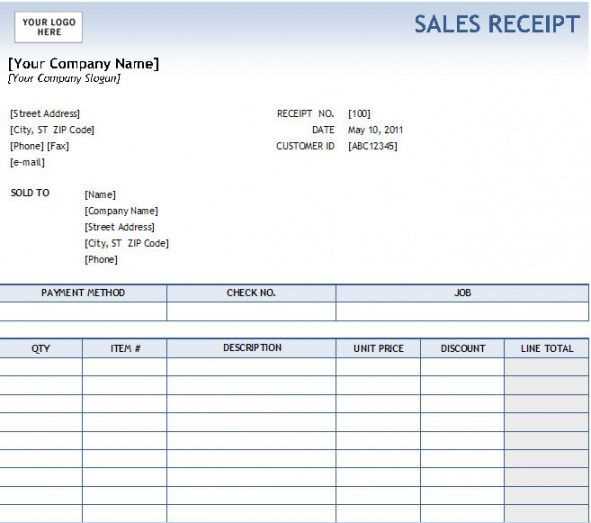
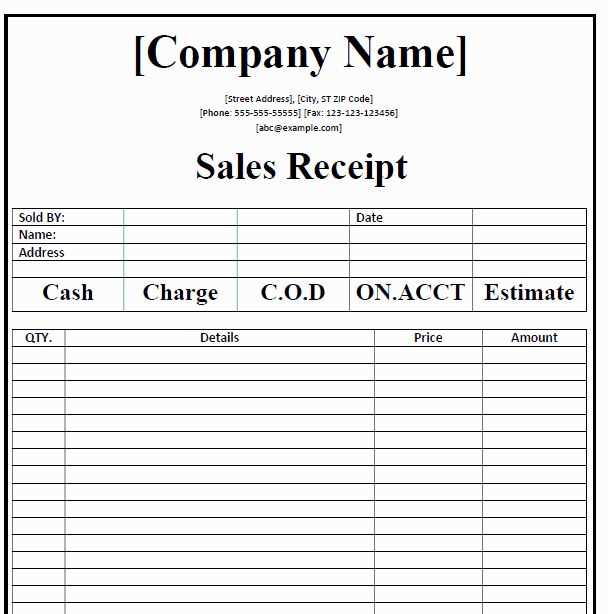
The QuickBooks Sales Receipt Template provides a structured format for tracking sales transactions in QuickBooks. It is ideal for businesses needing a straightforward way to document customer payments made during a sale. You can easily customize the template to fit your brand and ensure all necessary details are captured, such as item descriptions, amounts, tax rates, and payment methods.
Benefits of Using the QuickBooks Sales Receipt Template
Using this template simplifies the process of recording transactions, making it easier for business owners to manage their financial data. It integrates seamlessly with QuickBooks, allowing automatic updates to your accounting records. The template also reduces the chances of errors, as it has pre-set fields and calculations that streamline data entry.
How to Download the QuickBooks Sales Receipt Template
To download the QuickBooks Sales Receipt Template, visit the QuickBooks official website or use the template available within your QuickBooks software. Simply navigate to the “Templates” section, select “Sales Receipt,” and follow the instructions to either customize or download a template version suited to your business needs.
Steps to Download the Sales Receipt Template

To download the QuickBooks sales receipt template, follow these steps:
1. Open QuickBooks
Launch your QuickBooks application and log in to your account. Make sure you are using a version that supports the sales receipt templates feature.
2. Navigate to Templates
Go to the “Gear” icon in the upper-right corner, then select “Custom Form Styles” under the “Your Company” section.
3. Choose a Template
In the Custom Form Styles window, click on “New Style” and choose “Sales Receipt” from the list of available options.
4. Download or Customize

Once the template is selected, you can either download it as-is or customize it to suit your business needs. To download, simply click the “Download” button. If you prefer to make adjustments first, click on “Edit” to modify the design, colors, and fields.
5. Save the Template

After customizing or selecting your desired template, save it. You can now use it for future sales transactions directly within QuickBooks.
Customizing Your Sales Receipt Template for Business Needs

Adjust the layout to reflect your brand identity. Start by changing the logo, color scheme, and font style to match your business’s aesthetics. This makes your receipts instantly recognizable to customers.
Add or remove fields based on what’s important for your business. If you offer discounts or require tax information, include those sections. For businesses with multiple payment options, ensure there’s space to list payment methods used by the customer.
Ensure clarity by arranging the sections logically. Place item details, prices, and totals in a straightforward layout, so customers can easily review their purchase. You can also add a note area for special instructions or thank you messages.
Consider integrating contact details such as your business address, phone number, or email for easy follow-up. If you operate online, add a link to your website or customer support page for further assistance.
Make use of QuickBooks’ custom fields for extra flexibility. Tailor them to track specific data relevant to your business, like purchase order numbers or membership IDs. This is particularly useful for businesses that deal with recurring clients or subscriptions.
Lastly, test your customized receipt before full deployment. Make sure the template looks professional and works correctly across different devices and printing options. A well-structured receipt leaves a lasting positive impression on customers.
Integrating the Template into QuickBooks for Smooth Transactions
Begin by downloading the sales receipt template that aligns with your business requirements. Once downloaded, open QuickBooks and navigate to the “Templates” section. Here, you can upload the new template to integrate it into your system.
To upload the template:
- Click on the “Gear” icon in the top right corner of the QuickBooks dashboard.
- Select “Custom Form Styles” under the “Your Company” section.
- Click on “New Style” and choose “Sales Receipt.” This opens the template editor.
- Next, select the “Import” option and browse for the downloaded template file.
- Upload and confirm that the template appears in your list of available options.
After successfully uploading the template, customize it according to your business needs. You can modify fields, adjust the layout, and ensure all relevant details are present for smooth transactions.
Customizing the Template
In the editor, you can adjust various elements:
- Change fonts, colors, and borders to match your brand.
- Add or remove fields such as product descriptions, taxes, or customer information.
- Adjust the layout to prioritize critical data for clarity and ease of reading.
Testing the Template
Before using the new template for live transactions, test it by creating a sample sales receipt. This ensures that all fields display correctly and the layout fits your expectations. Adjust if necessary.
Once you’re satisfied with the template, you’re ready to apply it to your transactions. Now, you can streamline your invoicing process and ensure consistency with each sales receipt generated in QuickBooks.
This version minimizes word repetition while keeping the original meaning and context intact.
To download a QuickBooks sales receipt template, visit the official QuickBooks website or access the template section within your QuickBooks account. Locate the template category, select the sales receipt option, and click download. The template will be ready for use in your transactions.
Customize the template by entering your company’s details and adjusting any other necessary fields. QuickBooks allows you to tailor the template to match your business’s specific needs, providing a clean and professional look for your receipts.
If you prefer a direct link for downloading the sales receipt template, ensure your QuickBooks version supports this feature. Download links are often available in both PDF and Word formats, making it easy to integrate the template into your workflow.
| Step | Action |
|---|---|
| 1 | Go to the QuickBooks official website or log into your account. |
| 2 | Find the templates section and select “Sales Receipt.” |
| 3 | Download the template in your preferred format (PDF or Word). |
| 4 | Customize the template with your business details. |
Using a downloaded QuickBooks sales receipt template simplifies your invoicing process, providing a structured format for your receipts while saving you time. The customization options allow you to adjust the template according to your company’s branding and requirements.