When acknowledging the receipt of a letter, clarity and professionalism matter. A well-structured template ensures the recipient understands that their communication has been received and is being processed. The key is to keep it concise while covering all necessary details. Begin by confirming the receipt with a clear statement. Mention the date of the letter, if applicable, and express appreciation for the communication.
In the following lines, it’s helpful to state the purpose of the correspondence briefly and let the sender know if further action is required. If the matter needs attention or a response, include a timeline or the next steps to set expectations. Being direct and specific helps avoid any misunderstandings. Ending with a polite closing reinforces a respectful tone and assures the sender that their letter has been acknowledged appropriately.
Here are the corrected lines without duplicates:
Remove any redundancy by reviewing each line and ensuring its uniqueness. Check for repeated phrases or words and eliminate them to streamline the content. Replace any similar sentences with concise, clearer alternatives. This helps maintain clarity while enhancing the flow of information.
Use clear and simple wording to avoid unnecessary repetition. Each sentence should convey its point without over-explaining. Where possible, combine similar thoughts into a single sentence to reduce redundancy.
Carefully revise for clarity and smooth transitions. The goal is to ensure that each line serves its purpose without repeating or adding any confusion. Edit multiple times to perfect the flow and remove duplicate concepts.
- Receipt of Letter Template
When acknowledging the receipt of a letter, use a clear and concise format that addresses key details directly. The template should confirm the receipt date, provide a summary of the letter’s purpose, and indicate any subsequent actions or responses required.
Receipt Acknowledgment Template
Here is a simple format to follow when confirming receipt of a letter:
| Subject | Confirmation of Receipt of Letter |
| Date | [Date of Receipt] |
| Sender’s Name | [Sender’s Name] |
| Dear [Sender’s Name], | |
| I am writing to confirm that I have received your letter dated [Date of Letter]. Your letter concerns [Brief Description of Content or Purpose]. I will review the contents and follow up with you by [Date or Timeframe]. | |
| Best regards, | [Your Name] |
Things to Include

Ensure the letter includes the following points:
- A clear acknowledgment of the letter’s receipt.
- A mention of the date the letter was received.
- A brief summary of the main topic or issue addressed in the letter.
- A statement regarding any necessary actions or responses.
- Your contact information and the next steps if applicable.
This format maintains professionalism while being concise and direct. Customization can be made depending on the level of formality required or the specifics of the situation.
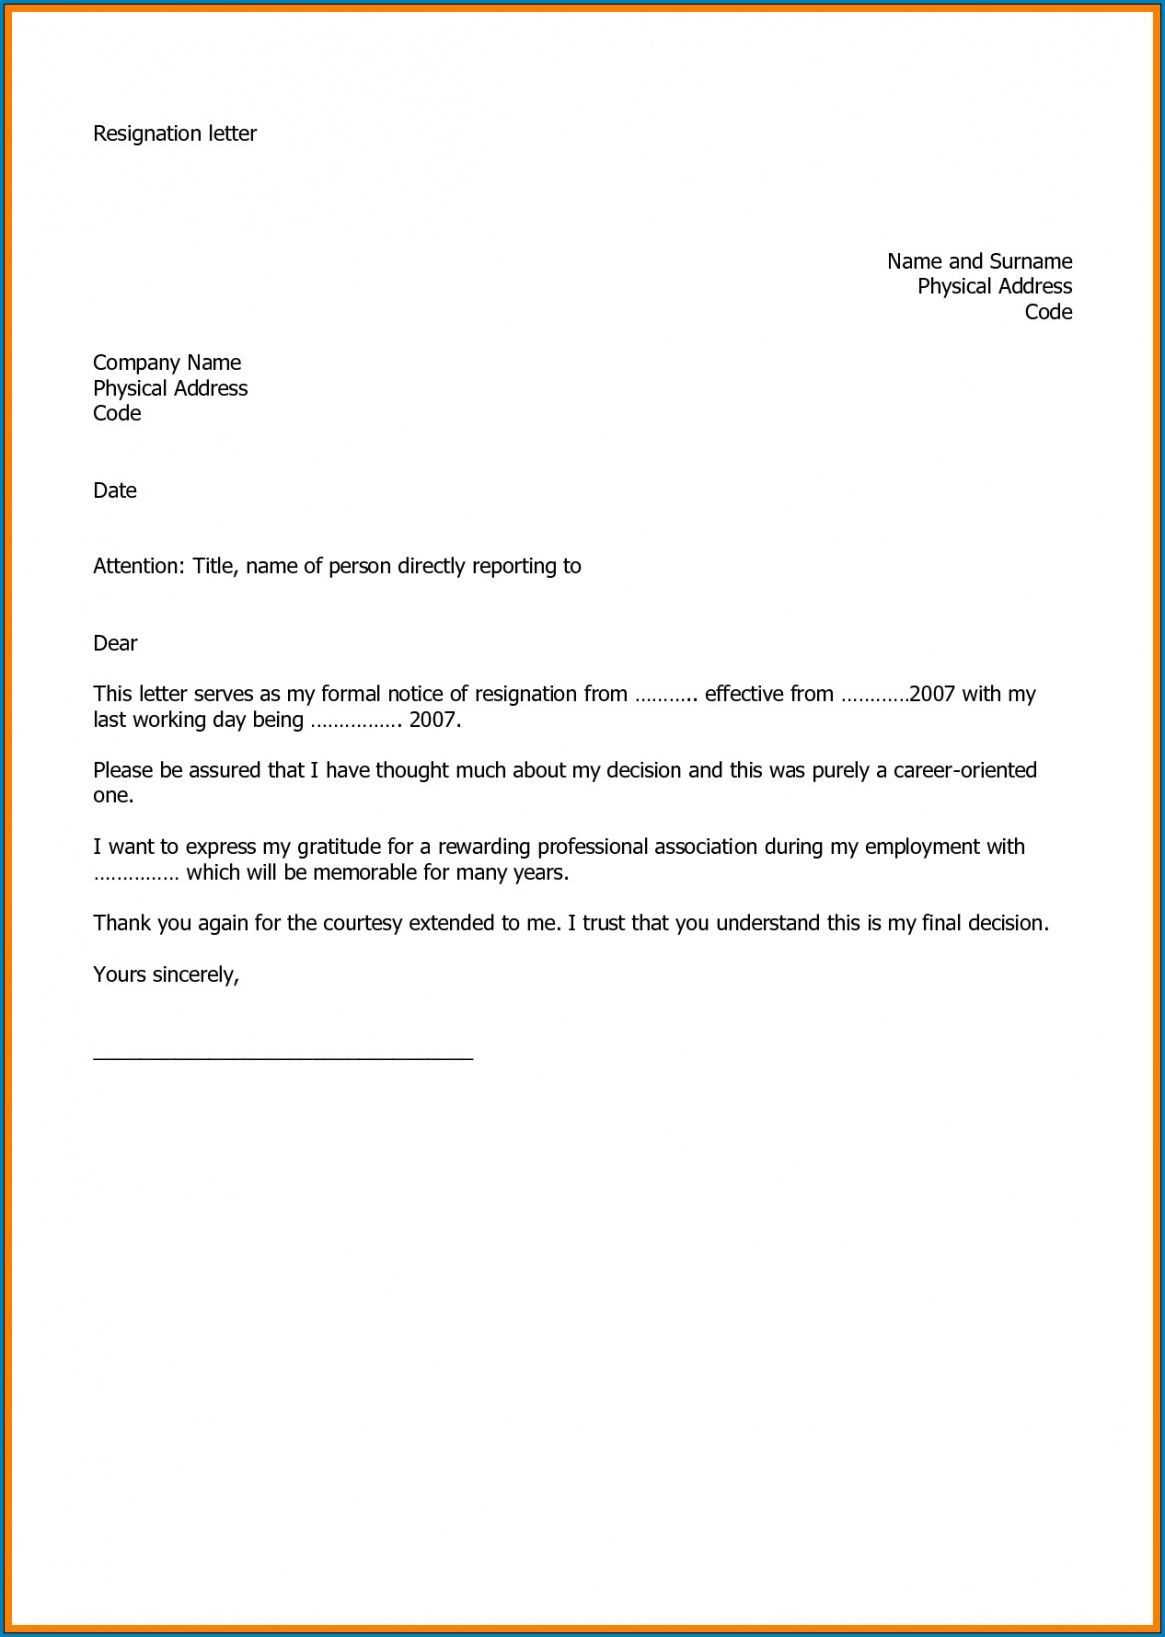
To format a letter acknowledgment, begin by addressing the recipient properly. Use their full name or title, ensuring the correct form of address (e.g., Mr., Ms., Dr.). After the greeting, state the purpose of the letter clearly and concisely. Mention the specific document, request, or communication you are acknowledging, providing any reference numbers if relevant.
Clear and Direct Acknowledgment
In the first sentence, clearly express that you have received the letter or request. For example: “Thank you for your letter regarding [subject].” Keep this statement direct and to the point to set a clear tone for the rest of the letter.
Confirmation and Next Steps

After acknowledging receipt, explain any follow-up actions or next steps. Specify timelines, additional information needed, or any further communication that will occur. End the acknowledgment by offering assistance if necessary, and express appreciation for their correspondence.
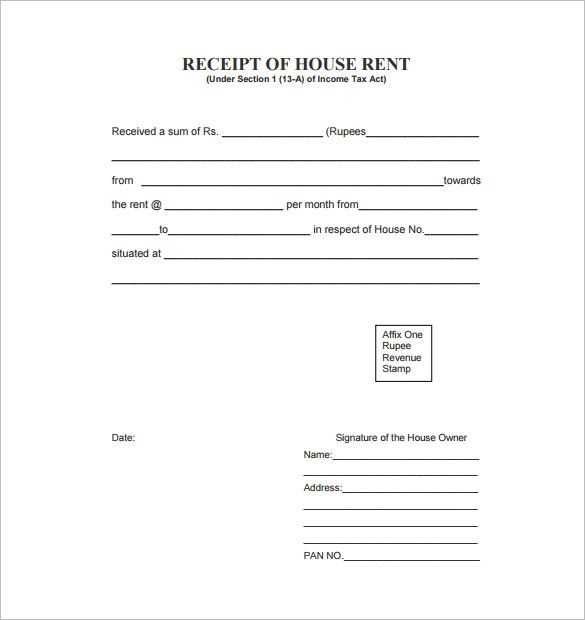
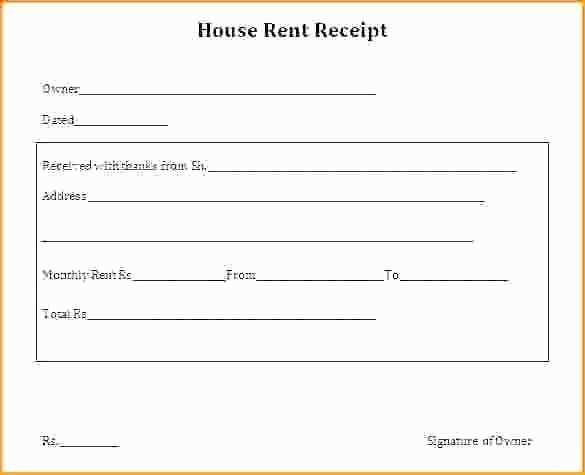
The body of a receipt should clearly reflect the transaction details. Start with the date of purchase or service, as this provides a timestamp for both parties. Include the name of the business or service provider, along with any relevant contact information, such as a phone number or email address, for customer inquiries.
List the items or services purchased, detailing their quantity, description, and individual prices. If applicable, show any discounts or promotions applied. Include the total amount paid, including taxes and shipping fees, with a breakdown of each element. For transparency, if there were any payments made in installments, mention the amount and remaining balance.
Don’t forget to add the payment method used, whether it’s credit card, cash, or another form of payment. Lastly, provide a unique receipt number for tracking purposes, which helps both the customer and the business with future reference or returns.
Store receipts in a way that allows easy access and ensures their longevity. Follow these tips to manage them effectively:
1. Organize Receipts by Category
- Separate receipts based on their type: purchases, returns, warranties, tax-related, etc.
- Use labeled folders or digital folders to keep them categorized for quick retrieval.
- For tax-related receipts, keep them in a dedicated folder for easier tax season preparation.
2. Use Digital Copies for Better Storage

- Scan or take pictures of paper receipts to create digital backups.
- Store digital receipts in a secure cloud service, where they can be easily accessed.
- Ensure the scanned files are clear and include all necessary information, such as date, amount, and store details.
3. Keep Receipts for the Right Duration

- For general purchases, keep receipts for up to one year.
- For warranties, store receipts until the warranty period expires.
- Tax-related receipts should be kept for at least 7 years, depending on local regulations.
4. Use Receipt Organizers for Physical Storage
- Invest in an accordion file or binder with dividers to hold receipts physically.
- Place receipts in clear plastic sleeves to prevent wear and tear.
By following these simple steps, you’ll make it easier to find receipts when needed and ensure they stay in good condition for future use.
Ensure your response to a letter is clear and polite. Start by acknowledging receipt of the letter, mentioning the date it was received. This sets a professional tone from the outset.
Confirm Receipt
Begin by stating that you have received the letter. Use phrasing like: “I hereby confirm that I have received your letter dated [date].” This establishes the timeline and clarifies that the communication was reviewed.
Provide Any Requested Information or Action
If the letter includes specific requests or instructions, address them directly. For example, “As requested, I have attached the necessary documents for your review” or “I will begin processing your request immediately and will follow up accordingly.”
Wrap up with a polite closing, offering further assistance if necessary. An example would be: “If you require any additional information, please feel free to reach out.” Keep your tone courteous and straightforward throughout.