Finding a free receipt template for MS Word is straightforward. Simply browse reputable websites offering downloadable templates. Many platforms provide these templates at no cost, allowing you to save time and customize them to fit your needs.
The key advantage of using an MS Word template is flexibility. You can easily adjust the content, font, and layout to match your business or personal style. The receipt templates available often include standard fields like item descriptions, prices, taxes, and total amounts, which you can personalize quickly.
Once you download the template, simply open it in MS Word and start entering the necessary information. You can even save the template for future use, making the process faster for recurring transactions. It’s a practical and professional solution for keeping track of payments and ensuring clear communication with your clients.
Here’s a detailed plan for an article on “Ms Word Receipt Template Free” with 3 distinct headings in HTML:

The first step in using a free MS Word receipt template is selecting the right one for your needs. Start by searching for templates specifically designed for your business or personal requirements. Many templates are available for various types of transactions, such as service-based or product sales. Choose one that clearly represents the details you need to capture, such as item descriptions, payment amounts, and buyer details.
Next, customize the template by replacing the placeholder text with your specific transaction details. MS Word allows easy editing, so you can add or remove fields, adjust formatting, and ensure all necessary information is included. Pay attention to details like company name, contact information, date, and total cost, ensuring these are accurate for each receipt issued.
Finally, save the customized receipt template for future use. Once you’ve tailored the template to fit your needs, save it as a master copy. This will allow you to reuse it for each new transaction without having to start from scratch. You can also convert the file into PDF format for secure sharing or printing, maintaining consistency for all receipts you issue.
- How to Download Free Receipt Templates in MS Word
To access free receipt templates in MS Word, visit Microsoft’s official website or search directly in Word itself. Within Word, go to the “File” tab and select “New.” In the search bar, type “receipt” and browse through available templates. You can filter the results by design or type to find one that best suits your needs.
Alternatively, explore free template resources on other websites such as Template.net or Vertex42. These sites offer a variety of formats compatible with Word, allowing you to download and customize templates easily. Choose a template, download it, and open it in Word to begin editing.
Customizing Your Template
Once you’ve downloaded your template, make adjustments to fit your specific requirements. Add your business name, logo, and contact details where appropriate. Most templates are designed with editable fields, so you can quickly update client information, item descriptions, and pricing.
Saving and Printing
After completing your edits, save the document on your computer. If needed, you can print the receipt directly from Word or save it as a PDF for electronic delivery.
To customize your MS Word receipt layout, focus on adjusting key elements like fonts, margins, and alignment. Begin by opening a blank document and setting up the page layout according to your preferred dimensions. Use the “Page Layout” tab to adjust margins, which helps in creating a clean, organized look.
Fonts and Text Styles

Select clear, professional fonts that are easy to read. Common choices for receipts include Arial or Calibri, as they maintain clarity. You can modify font size and weight for headings, ensuring that they stand out. Adjust the text alignment for the company name, date, and transaction details to make them visually distinct.
Adding Tables for Clarity

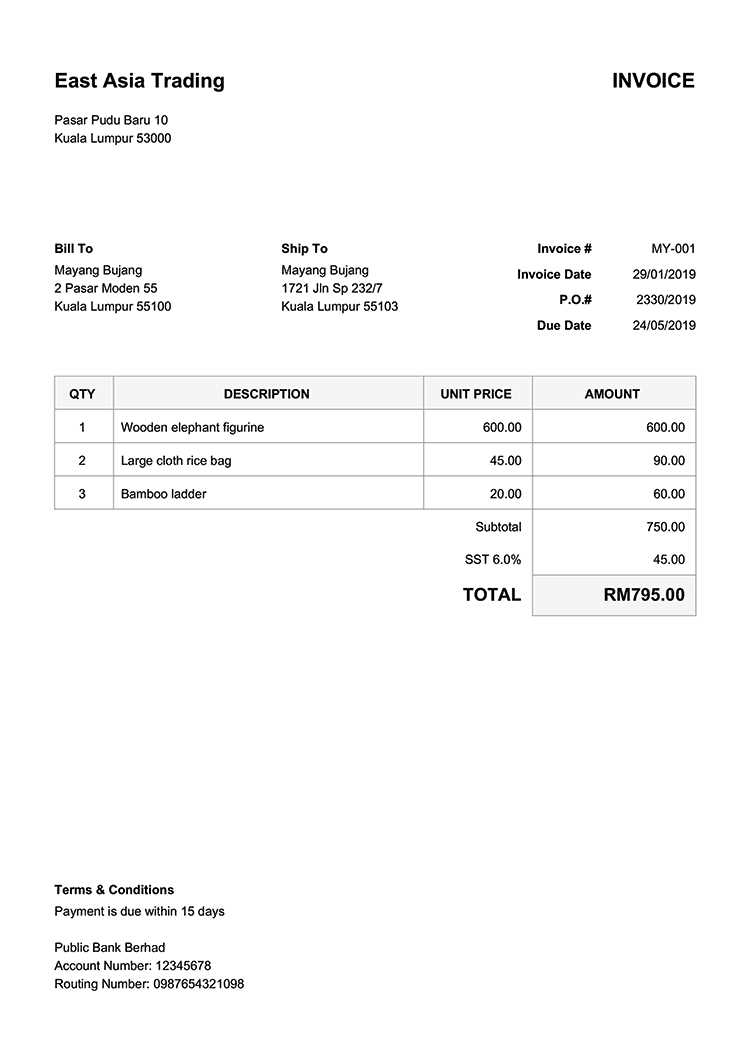
Inserting a table helps organize information such as item descriptions, quantities, and prices. To do so, go to the “Insert” tab, choose “Table,” and select the desired number of rows and columns. This ensures your receipt remains structured and easy to follow.
| Item | Quantity | Price | Total |
|---|---|---|---|
| Product A | 1 | $10.00 | $10.00 |
| Product B | 2 | $5.00 | $10.00 |
| Subtotal | $20.00 | ||
| Tax | $2.00 | ||
| Total | $22.00 | ||
After inserting the table, tweak the borders, shading, and spacing for a professional appearance. Ensure all data fits neatly within each cell by adjusting the row height and column width. This approach improves readability and enhances the overall look of your receipt.
One common issue with MS Word templates is incorrect formatting, especially when the document appears cluttered or uneven. To fix this, check the paragraph and line spacing settings. Ensure the margins and layout are uniform, and adjust the font sizes to match the template’s original design.
Another problem is images not appearing correctly. This typically happens when the image is inserted incorrectly or linked rather than embedded. To resolve it, right-click on the image and select “Format Picture” to adjust its placement or try re-inserting the image from a local source rather than linking it.
Users sometimes face difficulty with template compatibility across different versions of MS Word. If a template doesn’t display correctly, ensure that the template is saved in a format compatible with the version of Word you are using. For older templates, consider saving them as a “.dotx” file to ensure broader compatibility.
- Headers and Footers Issues: If headers or footers are not displaying properly, check the page layout settings. Ensure that the header/footer is enabled for the entire document and not just specific sections.
- Template Not Loading: If the template doesn’t load or display properly, it may be corrupted. Try creating a new template or downloading a fresh copy.
- Incorrect Fonts: Sometimes, the fonts in the template are missing on the computer. Install the necessary fonts or replace them with available alternatives.
Lastly, users may encounter issues with table formatting, where rows or columns misalign. Adjust the table’s properties by selecting it and choosing “Table Properties” to tweak column widths, row heights, and text alignment to restore proper structure.
For those seeking a simple yet functional MS Word receipt template, explore the variety of free resources available. Start by browsing online template libraries, where options range from basic designs to more intricate layouts. This allows for customization while saving time in creating receipts from scratch.
Customizing Templates for Your Needs

Adjusting a template to fit your requirements is straightforward. Modify the fields to include necessary transaction details like date, item description, and total price. Ensure the template aligns with your branding by adding your logo or adjusting font styles and colors. This way, the template serves both your practical and aesthetic needs.
Saving Time with Pre-Formatted Templates

Using a pre-formatted template speeds up the process, making it ideal for frequent use. Simply open the template, enter transaction details, and save or print the receipt. By eliminating repetitive formatting tasks, you can focus on the content that matters most.