To create a professional and clear official receipt, focus on including key details like the transaction date, business name, and amount paid. Make sure to format the receipt clearly for both parties to understand. A receipt serves as proof of payment and helps avoid misunderstandings in future transactions.
Start by including your business’s name, address, and contact information at the top of the receipt. This establishes authenticity and allows for easy communication if there are any issues with the payment. Below, include the customer’s details, such as their name or company name, and the transaction specifics.
Next, clearly list the items or services provided along with their prices. The total amount paid should be prominently displayed, with a breakdown of taxes or additional fees if applicable. Don’t forget to add a unique receipt number for tracking purposes, ensuring each receipt is easily identifiable for reference.
Finally, sign off with a thank you note or a simple “Paid in full” statement, along with the signature of the person processing the payment. This creates a polished and trustworthy appearance, ensuring both the customer and business are aligned on the transaction details.
Here is the revised version:
Ensure that the receipt clearly states the name of your business or organization, along with contact details like the address and phone number. This provides recipients with a way to reach out if needed.
Receipt Details
Clearly mention the transaction date, unique receipt number, and payment method used. This information helps both parties track the transaction and avoid confusion in the future.
Itemized Breakdown

List all products or services with corresponding prices. Include quantities, unit prices, and any applicable taxes or discounts to make the transaction transparent.
End the receipt with a thank-you message or a note of appreciation to show goodwill. It’s a simple but effective way to enhance the customer experience.
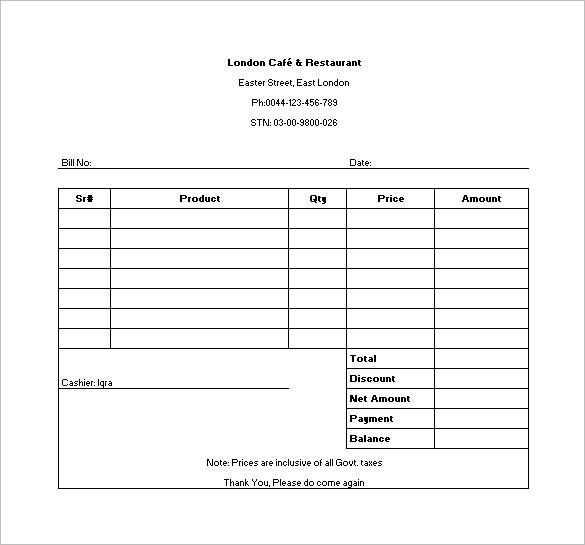
Sample Official Receipt Template
Design a clear and professional official receipt template by including these key elements:
- Business Name & Logo: Position your business name and logo at the top for easy identification.
- Receipt Number: Assign a unique receipt number to each transaction for record-keeping.
- Date of Transaction: Include the exact date of the payment or purchase.
- Details of Items/Services: List the purchased items or services with descriptions, quantities, and prices.
- Total Amount: Clearly display the total amount paid, including any taxes.
- Payment Method: Indicate how the payment was made (e.g., cash, credit card, bank transfer).
- Contact Information: Provide your business’s contact details for customer support.
For a basic receipt design, use a clean and simple layout with ample white space to ensure readability. A standard font like Arial or Times New Roman is appropriate. Organize information in a logical flow to make it easy for the customer to read.
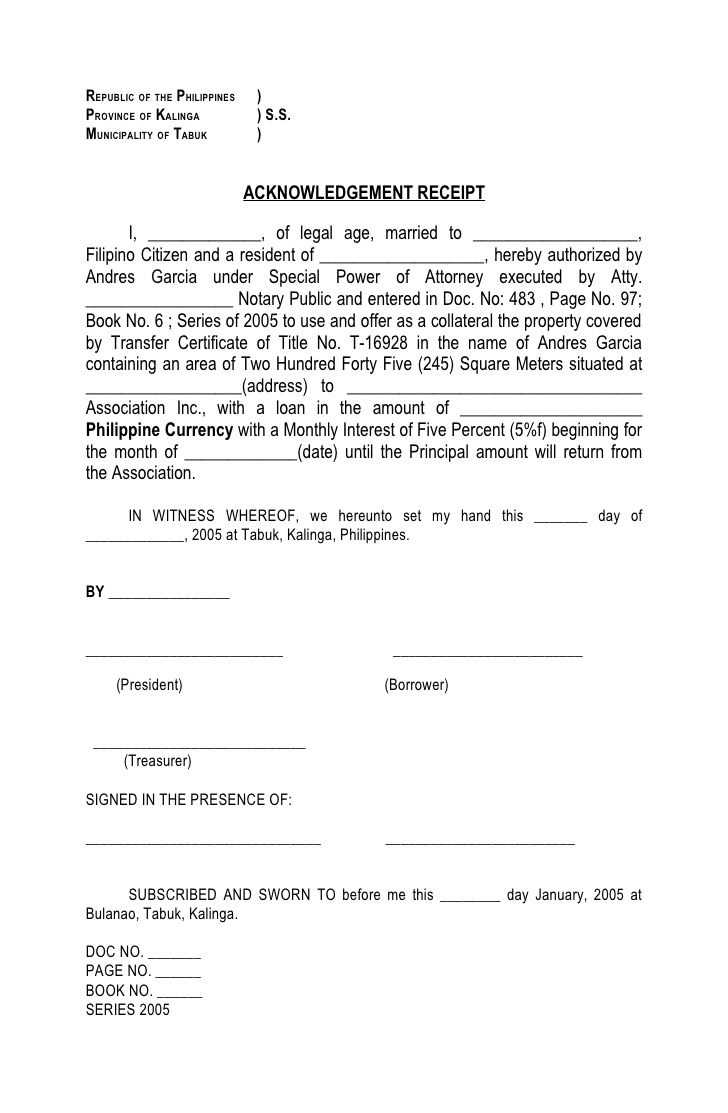
Key Legal Requirements for an Official Receipt

Each country may have its own regulations, but certain elements are generally required for a receipt to be legally valid. These often include:
- Business registration number and VAT details (if applicable).
- Clear indication that it is a receipt (not an invoice).
- Signature or authorization stamp, depending on local laws.
- Conformance with tax authorities for compliance with income and VAT reporting.
Ensure that your template meets local requirements by consulting legal or accounting professionals in your region.
How to Customize Your Receipt Template for Different Business Types

To suit various business needs, customize your receipt template with relevant details:
- Retail: For retail businesses, include itemized product details, and if applicable, provide refund policies.
- Service Industry: If you’re in the service industry, break down the service rendered, including hours worked or services provided.
- Freelancers: Freelancers should add their personal tax ID and clearly outline the terms of payment (e.g., deposits, late fees).
- Online Stores: Online stores should include shipping details, along with product descriptions and any relevant order numbers.
Adjust your template’s layout, language, and required fields based on the nature of your business. This ensures that the receipt reflects the transaction clearly and professionally.