Use this receipt template to acknowledge payment or a gift you have received. It serves as a formal document confirming the exchange, ensuring both parties have a record of the transaction. Personalize the template by filling in key details such as the recipient’s name, date, and amount received.
The template should be clear and straightforward, providing all the necessary information without excess. Include the method of payment or delivery, as well as any additional terms or notes related to the transaction. This keeps everything transparent and accessible.
For simplicity, ensure the formatting is easy to read and follow. Keep the language neutral but precise, so that it can be understood by both parties. When creating your own template, consider adding a space for the signature to authenticate the document.
Received with Thanks Receipt Template

Use a straightforward and clear template to acknowledge received payments or goods. Begin with a heading that clearly states the purpose of the receipt, such as “Received with Thanks,” followed by the details of the transaction.
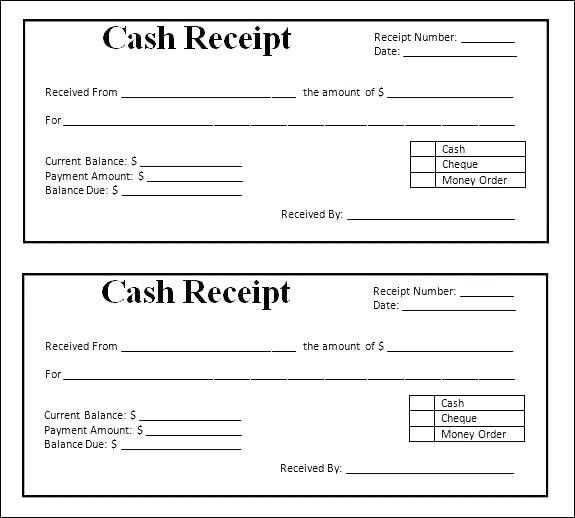
Ensure the receipt includes the following sections:
- Receipt Number: Assign a unique identifier for reference.
- Date: Include the date when the transaction took place.
- Recipient’s Name: Clearly mention who received the payment or goods.
- Amount or Description: State the total payment amount or provide a brief description of the goods or services received.
- Payment Method: Indicate whether the payment was made in cash, by check, or using another method.
- Signature: Include space for the recipient’s signature to confirm receipt.
For clarity, the template should be structured simply, with labels for each section. Make sure the language is unambiguous and easy to understand. Use bullet points for clarity, especially for larger transactions involving multiple items or amounts.
After completing the template, always provide a copy to the individual making the payment or delivering goods. Keeping a duplicate for your records is a good practice as well.
How to Structure a Professional Receipt
Include these key elements to create a clear and professional receipt:
- Header: Place your business name, logo, and contact details at the top for easy identification.
- Receipt Number: Assign a unique number for each transaction to help with organization and tracking.
- Date: Always add the date of the transaction, showing when the payment was received.
- Recipient Details: Include the customer’s name, address, or other contact details, depending on your business requirements.
- Transaction Details: List the items or services provided, including quantities, unit prices, and the total cost. Ensure the details are easy to read.
- Payment Method: Specify how the payment was made (cash, credit card, bank transfer, etc.).
- Total Amount: Clearly display the total amount paid, including taxes or any additional fees if applicable.
- Footer: Add a polite thank you message or any other relevant information, like return policies or business hours.
Each element should be laid out in a straightforward manner, ensuring that all important information is easily accessible for both you and the customer.
Customizing Your Template for Different Transactions

Adjust your receipt template based on the type of transaction. For sales, include product details, quantities, and prices. Add a section for taxes and discounts if applicable. For services, list the services provided, including time and hourly rates if relevant.
Including Payment Methods

For payments made via different methods, update your template to reflect this. If a transaction is paid via credit card, note the card type and last four digits. For cash transactions, simply mark the amount paid in full. For bank transfers, include the reference number or transaction ID.
Customizing for Returns or Refunds

Modify the template for returns by adding a section for the original transaction details, including the reason for the return. For refunds, clearly state the refunded amount and reference the original transaction number for easy tracking.
Adaptability is key when customizing your receipt template. Ensure you adjust fields and sections to reflect the specific details of each transaction type. This will enhance clarity for both you and your clients, and prevent confusion in future interactions.
Key Information to Include for Legal Compliance
Clearly state the full legal names of both parties involved in the transaction. Include the address of the sender and the recipient. This helps confirm the identities and locations of all parties, preventing misunderstandings or disputes.
Indicate the date the receipt was issued. This ensures there’s no ambiguity about the timing of the transaction and can support tax or legal documentation requirements.
Provide a detailed description of the goods or services provided. This should be specific and unambiguous to avoid confusion or potential legal issues regarding what was exchanged.
List the payment amount in clear terms, including the currency used. If applicable, include taxes or any additional fees. This transparency can help in case of future claims or audits.
If the payment was made electronically, provide transaction details, such as confirmation numbers or reference codes, to offer a traceable record of the payment.
Include a statement that acknowledges the receipt of the payment. Use clear language such as, “Received with thanks,” or similar, to indicate the transaction is complete.
If applicable, mention any return or refund policy. Having this information in the receipt can protect both parties and ensure there is no ambiguity about potential claims in the future.
Incorporate a disclaimer or legal notice if needed. Depending on the nature of the transaction, certain legal clauses or disclaimers may be necessary to clarify responsibilities or liabilities.