A clear and accurate bank deposit receipt template helps ensure that both parties involved in a transaction are on the same page. It provides all necessary details, such as the deposit amount, date, and the relevant account numbers, which are crucial for future reference and record-keeping. Using a template allows you to standardize this process and reduce any chances of error, streamlining financial activities.
Start by including fields for the depositor’s name, the account number, and the type of deposit being made. It’s also essential to add a section for the bank’s confirmation number or transaction reference, which can act as a unique identifier for the deposit. These elements should be placed in easily accessible spots on the form for quick scanning and validation.
Ensure that the template is simple to fill out and contains all the necessary information to avoid confusion. If a receipt is handed over to a customer or client, include a space for their signature, confirming the transaction. A well-organized receipt will save time when you need to verify or track the deposit in the future.
Here’s the revised version without word repetitions:
Ensure your bank deposit receipt template is clear and precise. Each section must contain only the relevant information, such as the deposit amount, the account holder’s name, and the transaction date. Avoid adding redundant phrases or repeating the same details in multiple places. Use distinct fields for key information, and make sure to format the receipt in a way that makes it easy to scan and understand.
For example, when detailing the deposit amount, list it clearly as “Deposit Amount: $X” rather than repeating it in the body of the receipt. This maintains a professional and clean structure. Be consistent with your wording and avoid unnecessary elaboration. Each section should contribute to the clarity of the document, helping the reader access necessary information quickly.
Additionally, ensure the terms used are straightforward. Avoid technical jargon unless it is necessary and well understood by the recipient. If there are multiple deposit types (e.g., cash, check), specify each type in separate lines to enhance readability. Remember to leave space for signatures at the bottom to confirm the transaction, making the process more secure.
By following these guidelines, you’ll create a bank deposit receipt template that is both effective and user-friendly.
- Bank Deposit Receipt Template: A Practical Guide
For a smooth transaction, a bank deposit receipt should include clear details about the deposit. Make sure to include the deposit date, the deposit amount, the account number involved, and the type of deposit (e.g., cash, check, or transfer). Specify any fees deducted from the deposit and provide a unique reference number for tracking purposes. This will ensure that both the depositor and the bank have a mutual record of the transaction.
Use a simple format that is easy to read and understand. Begin with the bank’s name and address at the top, followed by the depositor’s information and the transaction specifics. Clearly separate the amounts deposited and any fees charged, if applicable. Always include a confirmation section where the deposit is acknowledged with a signature or a digital verification, depending on your system.
If you are using a template for this purpose, adjust it to fit the specific needs of your bank or business. Customize sections such as deposit type, reference number, and the addition of any other custom fields that align with internal procedures. Make sure all required fields are filled in to avoid discrepancies in future references or audits.
Lastly, storing these receipts securely is important. A digital format should include encryption, while physical copies should be stored in a safe place for future reference. Always ensure that these receipts are accessible when needed for financial reconciliation or other purposes.
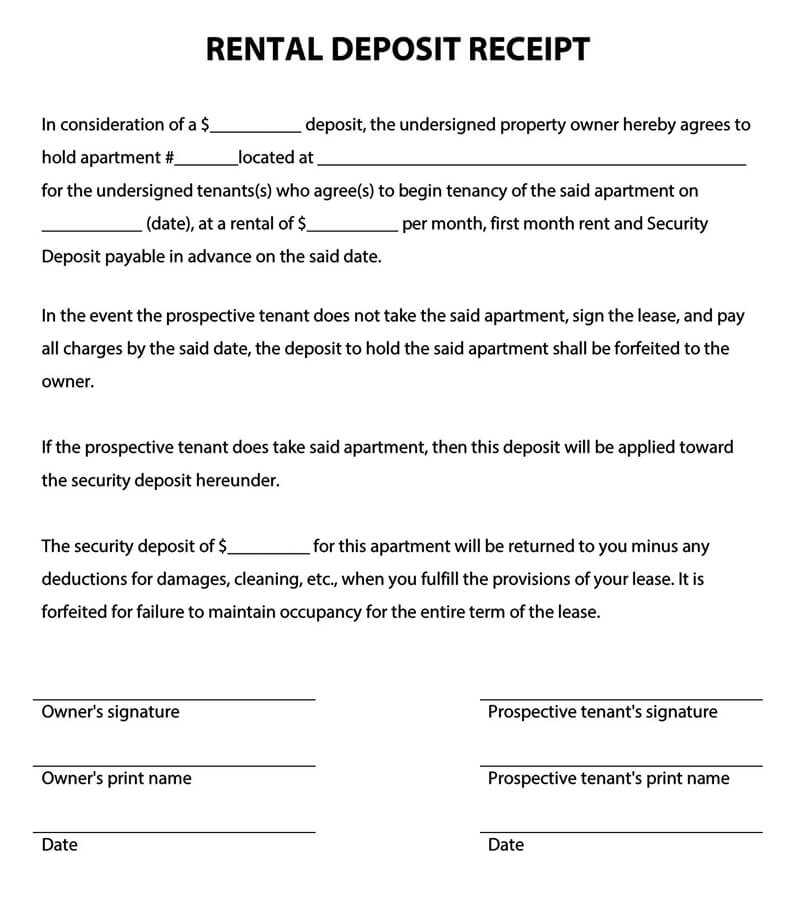
To create a legally valid deposit receipt, ensure that the document includes key details such as the deposit amount, date, and the identities of both parties. Be clear about the transaction terms and ensure all necessary legal requirements are met to avoid potential disputes. Follow these steps to make your deposit receipt straightforward and legally sound.
1. Include Clear Transaction Details
The first step is to list the deposit amount accurately, along with the currency type. Specify the date the deposit is made, and if applicable, the due date or any payment schedule. Clearly state what the deposit is for, whether it’s for rent, a purchase, or another service. This helps avoid confusion later.
2. Identify the Parties Involved
Include the full legal names of both the depositor and the recipient. This ensures that both parties are clearly identified in the transaction. If applicable, include their contact information, such as address or phone number, to make it easier to contact the relevant party in case of future issues.
3. Specify the Terms and Conditions

State the terms under which the deposit is made. For example, mention if the deposit is refundable or non-refundable, and any conditions under which it may be returned or forfeited. Include any relevant clauses regarding late fees, cancellation, or adjustments to the deposit.
| Detail | Example |
|---|---|
| Deposit Amount | $500 |
| Date of Deposit | March 15, 2025 |
| Parties Involved | John Doe (Depositor) & ABC Property Management (Recipient) |
| Purpose | Security deposit for apartment rental |
| Refundability | Refundable after inspection |
4. Signatures for Validation

Both parties must sign the deposit receipt. Include a space for each party’s signature, printed name, and date of signing. This confirms that both parties agree to the terms outlined in the document and serves as proof in case of future disagreements.
5. Keep Copies

Ensure that both parties receive a signed copy of the deposit receipt. Keep one for your records as well. If any issues arise later, these copies can serve as evidence of the agreed terms.
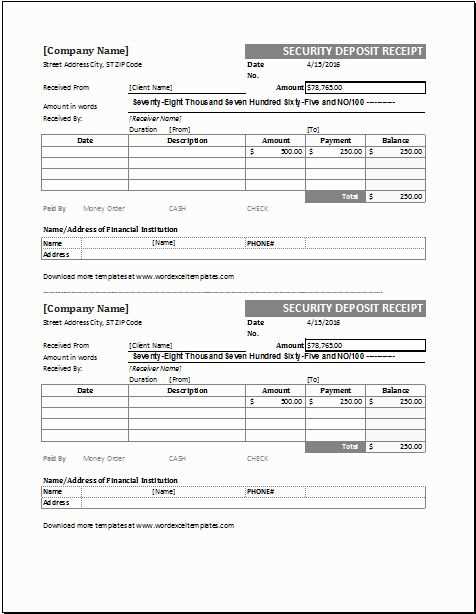
To create a clear and reliable deposit receipt template, include the following elements:
- Date of Deposit: Clearly state the date the transaction was made.
- Deposit Amount: Specify the exact sum deposited, with currency details.
- Account Holder’s Information: Include the depositor’s name and account number.
- Bank Information: Mention the bank’s name and branch where the deposit took place.
- Transaction ID: Provide a unique transaction reference number for tracking.
- Payment Method: Identify the deposit method, such as cash, check, or wire transfer.
- Recipient’s Signature: If applicable, include a space for the recipient’s signature for validation.
- Notes: Add any relevant remarks, like deposit purpose or additional instructions.
Additional Tips
- Clear Formatting: Ensure all elements are organized for easy reading.
- Verification: Consider adding a space for an authorization signature to verify the deposit.
- Privacy: Keep sensitive information secure and consider encryption for digital templates.
Focus on clarity and accuracy. Avoid using excessive jargon or complicated terms that may confuse the recipient. A receipt should provide clear, simple information.
- Incorrect or missing transaction details: Ensure all essential information is included, such as the date, transaction number, amounts, and parties involved. Missing these details can make the receipt invalid.
- Unorganized layout: A cluttered or disorganized design can make it hard to find important information. Keep sections clear and neatly spaced.
- Inconsistent fonts and colors: Use one or two easy-to-read fonts and a consistent color scheme. Mixing too many styles can make the receipt look unprofessional.
- Missing legal disclaimers: Certain transactions require legal notices or terms to be included. Always check whether these are required for your type of receipt.
- Not including company details: Always include your company’s name, address, and contact information to ensure the receipt is identifiable and traceable.
- Unclear payment methods: Specify how the payment was made–whether it was via cash, credit card, check, or another method. Avoid ambiguous terms.
By addressing these points, you’ll ensure your receipt is professional, clear, and legally sound.
Ensure that the bank deposit receipt template clearly lists all relevant details. Include the deposit amount, the date of deposit, and the account information. Verify that the transaction reference number is clearly visible to allow for easy tracking. It’s critical to indicate the method of deposit, whether it’s cash, check, or electronic transfer. Additionally, add space for the bank’s authorization or signature to confirm the deposit’s validity. This will make the receipt an official document for both the depositor and the institution.
Consider structuring the template with separate sections for each piece of information, including headings like “Deposit Amount,” “Account Details,” and “Transaction Reference.” Keep the layout simple and organized for quick reference. Avoid clutter or irrelevant fields that could distract from the core information needed for a successful deposit record.
Finally, use a clean and readable font, and if possible, add the bank’s logo to the receipt for official recognition. By following these guidelines, you can create a functional and clear bank deposit receipt template.