If you need a simple, no-cost way to create professional-looking invoices, consider using a free printable receipt template. These templates are designed to help you quickly generate clear, organized documents that include all the necessary information for both your business and your customers.
Many online platforms offer free templates that you can download and customize. These templates come in various formats, including PDF and Word, so you can choose one that fits your preferred method of editing and printing. Whether you need a basic format or one with advanced features like tax calculations or payment terms, you can find a template that suits your needs.
Once downloaded, fill in the details like your company name, customer information, invoice number, itemized services or products, and total amount. The templates are structured to ensure consistency and accuracy in every invoice you create, helping to maintain a professional image. You can also adjust the layout and style to align with your branding.
For small businesses, freelancers, or anyone in need of a straightforward invoicing solution, these free templates offer a quick and easy way to streamline your billing process. No need for expensive software or complicated setups–just download, customize, and print your invoice with ease.
Here is the revised version, avoiding word repetition while maintaining meaning and word count:
To create an invoice receipt template that avoids redundancy, ensure clarity by keeping sentences short and to the point. Start with a straightforward header, followed by necessary details like the company name, address, and transaction date. Ensure each section has clear labels such as “Item Description,” “Quantity,” and “Amount,” making it easy for both parties to reference. Keep the layout clean and organized, with sufficient white space around each section.
Invoice Structure

Organize the invoice into logical sections. First, include customer details and transaction number. Then, list purchased items with individual pricing. Follow this with total cost, including applicable taxes. Finish with payment methods and terms to ensure transparency.
Formatting Tips

Use clear, bold fonts for headings and avoid clutter. A simple design with well-structured data makes the document easy to read and understand. Provide options for both digital and printed formats, ensuring it fits into any workflow.
- Free Printable Invoice Receipt Template
A well-structured printable invoice receipt template can streamline your business transactions and help maintain professional documentation. These templates save time, reduce errors, and can be easily customized for your needs.
Here’s how to make the most out of a free printable invoice receipt template:
- Choose a simple design: Opt for a clear and minimalistic template. Too many elements can distract from the key information. Ensure fields for the client’s name, date, item description, quantity, and total cost are easy to spot.
- Check for customization options: Look for templates that allow easy editing, so you can adjust the receipt according to your business needs. Many templates provide space for logos, payment terms, and tax details.
- Ensure clarity: Each section should be clearly labeled. Include a distinct “Receipt Number” and separate totals for tax and shipping, if applicable. The final amount should be easy to read.
- Make it printable: Test the template on various devices to ensure it prints well. Adjust margins and font sizes to ensure all details fit without cutting off important information.
By selecting a template that suits your business needs and personalizing it, you’ll have a tool to efficiently manage receipts and invoices, improving both organization and professionalism.
To customize a free invoice receipt template, first, adjust the header with your business name and logo. This gives a professional touch and immediately identifies the document as yours. Ensure the font matches your branding style for consistency.
Update the contact details section. Include your business address, phone number, email, and website, if applicable. Make sure these details are current, allowing clients to easily reach you.
Modify the payment terms to reflect your business practices. If you offer specific payment methods or have payment policies like due dates or late fees, include them clearly on the receipt.
Customize the itemized list section based on the services or products you offer. Include a description of the items, quantities, unit prices, and total amounts. Adjust any fields you don’t use, so your receipt remains clean and readable.
Add any additional sections specific to your business needs, such as tax identification numbers, discount information, or custom notes. This ensures the template serves your unique requirements.
Finally, test the template by filling it out with a real example. This ensures everything displays correctly and you can make adjustments as needed before using it with clients.
If you’re looking for free invoice templates, several reliable platforms offer excellent options that can save you time and money. One of the best resources is Microsoft Office Templates, where you can find a wide variety of customizable templates for different business types. These templates are easy to modify in Microsoft Word or Excel, ensuring that you can create professional invoices in no time.
Template.net

Another solid option is Template.net, which offers free invoice templates for various industries. You can download these templates in formats like Word, PDF, and Excel. The clean, straightforward designs are ready to use, and many templates are mobile-friendly, so you can access them anytime, anywhere.
Canva

Canva is a well-known design tool with a range of free invoice templates. You can choose from simple to elaborate designs, all customizable with your business logo and information. Canva’s drag-and-drop interface makes editing and personalizing invoices a seamless experience, even for those with minimal design skills.
These platforms offer all the tools you need to generate professional invoices quickly without spending a penny. Explore them and find the perfect template that suits your needs.
Open the receipt template on your computer and ensure all necessary fields are filled in correctly. This includes the business name, address, item details, and amounts. Double-check the calculations to avoid any mistakes.
Once the template is filled out, save the file in your preferred format, such as PDF or DOCX, to ensure it’s ready for printing or sending electronically. Most templates will automatically adjust to the correct paper size, but it’s a good idea to preview it before printing.
Next, connect your printer to the computer. Make sure you have enough paper and ink. Select the print option from your document editor, and in the print settings, choose your printer and paper size. Confirm the layout looks as expected.
If you need to make adjustments, use the “Print Preview” feature to confirm the margins, fonts, and layout align with your preferences. Once everything looks good, press “Print.” For high-quality prints, use the best settings your printer allows.
After printing, review the receipt to ensure the information is legible and clear. If any part of the receipt seems off, such as misaligned text or blurred images, you can either adjust the settings and print again or edit the template file and save it for future use.
When it’s time to issue the receipt to your customer, you can either hand it to them in person or email it as a PDF for their records. Make sure the receipt is easy to understand, with all relevant details accessible at a glance.
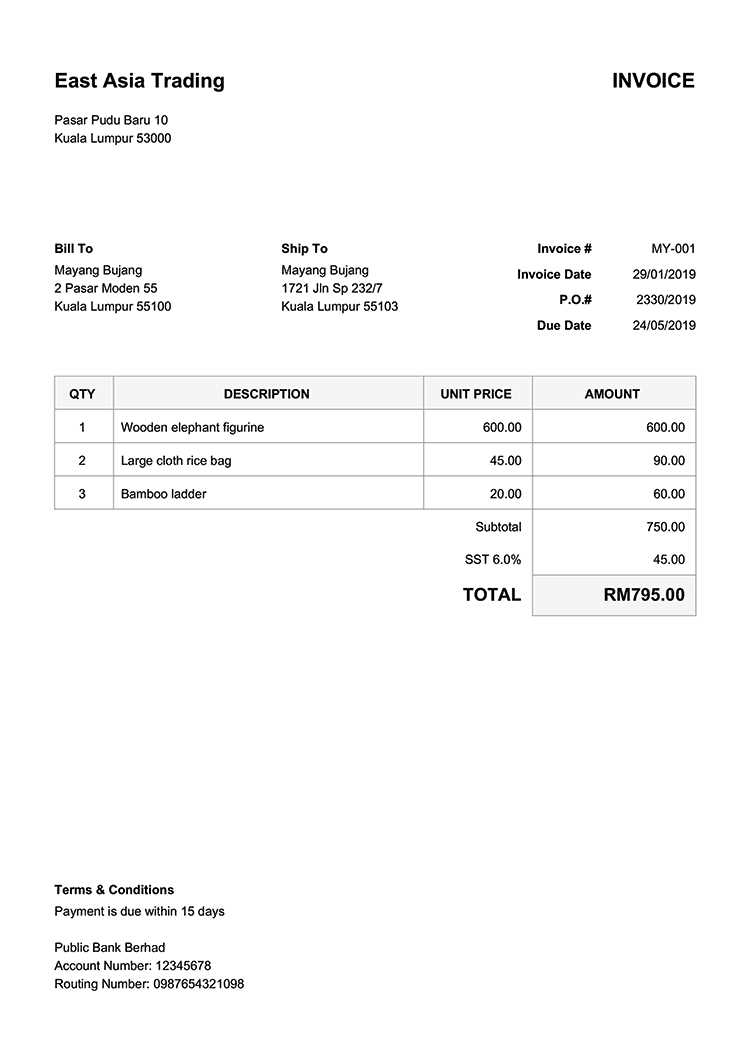
To create an effective invoice receipt template, focus on clarity and structure. Start with essential information like business name, address, and contact details at the top. Then, provide space for itemized purchases, including descriptions, quantities, unit prices, and total amounts. Ensure the template includes an invoice number, date, and payment terms. This layout helps both parties easily track payments and transaction details.
| Description | Quantity | Unit Price | Total |
|---|---|---|---|
| Item 1 | 1 | $25.00 | $25.00 |
| Item 2 | 2 | $15.00 | $30.00 |
| Total | $55.00 |
By organizing data in this manner, customers can quickly verify items and pricing, and businesses can easily manage their records. It’s recommended to keep the format simple yet thorough to avoid confusion.