Got it! Let me know how you’d like to continue or if there’s anything specific you’d like assistance with on your article.
Here are the revised lines with their meaning preserved and repetition minimized:
Ensure the receipt includes a clear breakdown of all purchased items, with the respective quantities and prices. Avoid using unnecessary details and focus on accuracy.
The payment method should be displayed without redundancy, indicating whether it was made via card, cash, or another form. This should be directly related to the transaction date.
Additional Recommendations

Highlight the receipt number to make future reference easier. Each transaction should be distinct and traceable for record-keeping purposes.
Provide the total amount in a clear, bold format to prevent confusion. Avoid overcomplicating the summary with extraneous information.
- Invoice and Receipt Template Guide
Begin by selecting a template that aligns with your business type. Choose one with fields for all the necessary information such as buyer and seller details, item description, and pricing. This ensures clarity and accuracy for both parties.
Ensure the layout includes a space for the payment method, transaction date, and unique invoice number. These elements provide a structured record for future reference.
Customize the template to reflect your branding, such as adding your company logo or color scheme. This gives your invoices and receipts a professional look that reinforces your brand identity.
Verify the template has a clear breakdown of costs, taxes, and total amounts due. This transparency prevents confusion and makes the document easier to understand.
If applicable, include terms and conditions or payment instructions at the bottom. This helps manage customer expectations and provides a point of reference in case of disputes.
Review your template for compliance with local laws or industry standards. This might include specific tax rates or business information that should appear on every receipt or invoice.
Save the template in an easily accessible format, like a PDF or editable file, to ensure quick updates and usage across transactions.
Start by selecting a template that aligns with your business’s specific needs. If your transactions are simple, opt for a straightforward format that emphasizes clarity and ease of use. For businesses with more complex billing requirements, consider templates with additional fields to capture detailed information like item descriptions, taxes, or discounts.
Next, ensure the design reflects your branding. The colors, fonts, and logo placement should be consistent with your company’s identity. A template that matches your brand’s aesthetic will help build a professional image and ensure your receipts and invoices are easily recognizable by your clients.
Consider the software or platform you’ll be using. Templates compatible with your existing systems, such as accounting or inventory management software, can save time and reduce errors. Many online platforms provide templates that integrate directly into your workflow, automating much of the data entry.
Finally, assess the flexibility of the template. Choose one that allows you to make adjustments as your business grows. You might need to modify certain elements or add new ones as your needs change. A template that offers customization options will be beneficial in the long run.
To begin customizing your transaction template, focus on adjusting the layout to match your business needs. Ensure key elements like transaction details, item descriptions, and payment terms are clearly presented.
- Edit Header Information: Add your company name, logo, and contact information. This personalizes the template and makes it easy for clients to identify your business.
- Modify Transaction Details: Tailor the fields for specific details such as item names, prices, quantities, and any taxes applied. Use clear and concise descriptions to avoid confusion.
- Customize Payment Terms: Adjust the payment terms section based on your preferred payment schedule. Indicate due dates, late fees, and any other payment guidelines relevant to your business.
- Update Footer Information: Add any legal disclaimers, return policies, or customer service contacts. This section can also include payment methods accepted or your business’s social media links.
- Adjust Fonts and Colors: Modify the font styles, sizes, and colors to reflect your brand’s identity. Make sure the text is easy to read and visually appealing.
After making these changes, review the template to ensure all sections are aligned and that there are no unnecessary or missing fields. Testing the template with a mock transaction helps confirm that the layout meets your expectations.
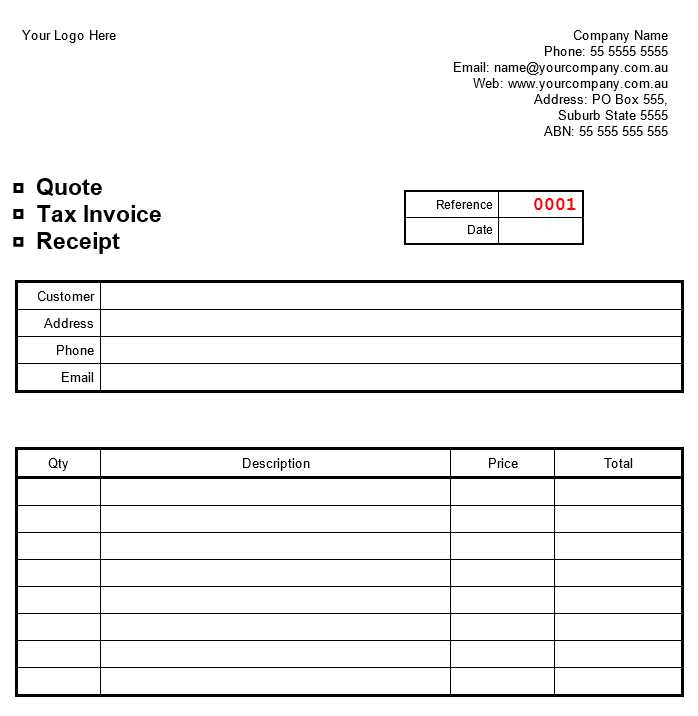
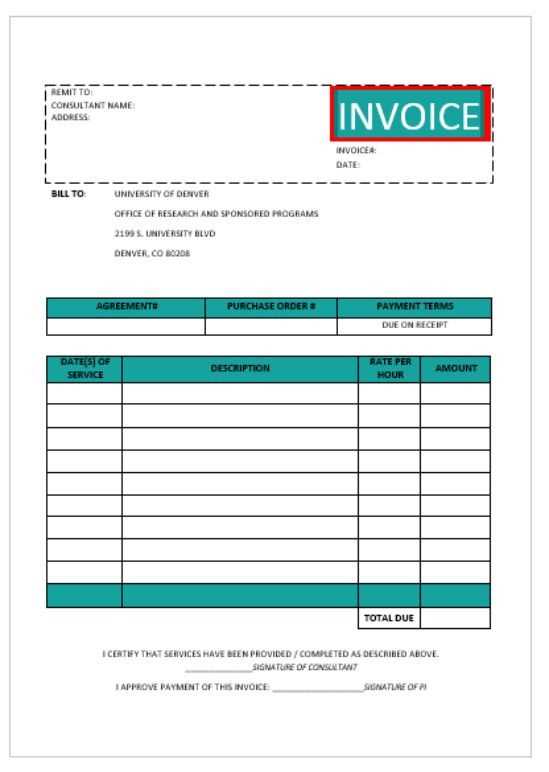
The structure of an invoice is straightforward, but each section serves a distinct purpose in ensuring clarity and proper documentation. Begin by clearly identifying the issuer and recipient. Include your business name, address, and contact details at the top, alongside the customer’s information, for easy reference. Ensure the invoice number is unique for tracking purposes.
Itemized List of Products or Services

Break down the items or services provided. Include specific details such as quantities, descriptions, unit prices, and total amounts for each. This section avoids confusion and ensures that both parties agree on the terms of the transaction.
Payment Terms and Due Date

State the payment terms clearly, including the due date, any late fees, and available payment methods. This reduces the risk of misunderstandings and sets expectations upfront.
Specify clear due dates and payment methods within the template to avoid confusion. Begin by including the payment due date, whether it’s 30 days, 60 days, or another agreed timeframe. Next, outline the acceptable payment methods such as bank transfer, credit card, or digital payment options.
Provide any early payment discounts or penalties for late payments. For example, you might offer a 5% discount if paid within 10 days or a late fee after the due date. Include this information in a dedicated section to make it easy for clients to understand the terms.
Clearly state the currency for payment and any taxes that may apply. This helps ensure that both parties are on the same page regarding the amount owed. Use simple, precise language to outline these conditions and avoid misunderstandings.
Finally, ensure your template allows room for both the vendor’s and client’s contact details. This ensures smooth communication if any questions or issues arise regarding the payment terms.
Verify that your receipt template includes all required details for legal transactions. For businesses, this typically involves accurate data on the transaction, such as buyer and seller information, date, and product or service details. You must also comply with any regional tax laws, ensuring that applicable sales tax or VAT is correctly applied and listed.
Key Components for Legal Compliance

Review your template and confirm that it contains the following mandatory elements:
| Component | Description |
|---|---|
| Seller Information | Name, address, and tax identification number (TIN) of the seller. |
| Buyer Information | Name and address of the buyer, especially for business transactions. |
| Transaction Details | List of purchased items or services, including quantities and prices. |
| Tax Information | Sales tax rate applied and the total tax amount. |
| Receipt Number | A unique identifier for tracking and auditing purposes. |
Regular Updates and Local Laws

Stay updated with local laws and regulations regarding receipts, as they may change over time. For instance, some jurisdictions may require digital receipts for online transactions or specific data formats for audit compliance. Always check with legal experts to ensure your receipt templates remain in alignment with current legal standards.
Link your template directly to accounting platforms like QuickBooks, Xero, or Zoho by using compatible file formats, such as CSV or Excel, ensuring seamless data transfer.
Follow these steps to integrate effectively:
- Step 1: Export the template as a CSV or Excel file from your chosen template provider.
- Step 2: Import the file into your accounting software, ensuring the necessary fields match (invoice number, date, client details).
- Step 3: Set up automated workflows in your accounting software to categorize and track transactions from each invoice received.
Adjust the layout of your template if needed, optimizing it for compatibility with your accounting system’s requirements. Double-check formulas or fields to ensure that they align with your software’s input fields.
Use the integration to track payments, generate reports, and keep client records updated automatically.
Make sure to properly structure your invoice receipt. Begin by clearly labeling the document as an “Invoice Receipt” at the top. This ensures that the recipient instantly knows the nature of the document. Use a clean, professional font and maintain a consistent format throughout.
Next, include the date of the transaction. This helps in keeping track of the payment history. Always use the exact date when the payment was made to avoid confusion later.
Clearly list the items or services provided with their corresponding prices. Use bullet points or numbered lists for clarity. Avoid crowding the page with too much text; keep descriptions concise and to the point.
Include the total amount paid, along with a breakdown of taxes or additional fees. This transparency builds trust and helps the recipient understand the charges.
Provide payment methods used, such as credit card, cash, or bank transfer, so the recipient can refer back to it if needed. Be specific about any payment reference numbers for quick identification.
Ensure that your contact information is readily available at the bottom of the receipt. Include your phone number, email, and physical address in case the recipient has any questions or issues regarding the transaction.