To modify your custom sales receipt template in QuickBooks, first open the program and navigate to the “Sales” tab. From there, select “Create Sales Receipts.” On the sales receipt screen, click the “Customize” button located at the bottom. This action will bring up a list of available templates.
Next, choose the template you want to edit and click on “Edit.” In the editing interface, you can adjust various sections of the receipt, including headers, footers, and line items. You can also add custom fields such as payment terms or product details. Use the drag-and-drop feature to arrange the layout as needed.
Once you’ve made your changes, preview the template to ensure it meets your needs. If everything looks good, save your edits by clicking the “Save” button. You can now apply this updated template to future sales receipts.
For further customization, explore the “Design” tab where you can adjust font styles, colors, and logos to align with your brand. Customizing sales receipts is a great way to create professional, tailored documents that reflect your business’s identity.
Here are the corrected lines with reduced repetition of words, while maintaining clarity and accuracy:
To edit the custom sales receipt template in QuickBooks, go to the “Templates” section under the “Custom Form Styles” menu. Select the template you wish to modify and click “Edit.” This will open the customization options where you can adjust text, colors, and fields.
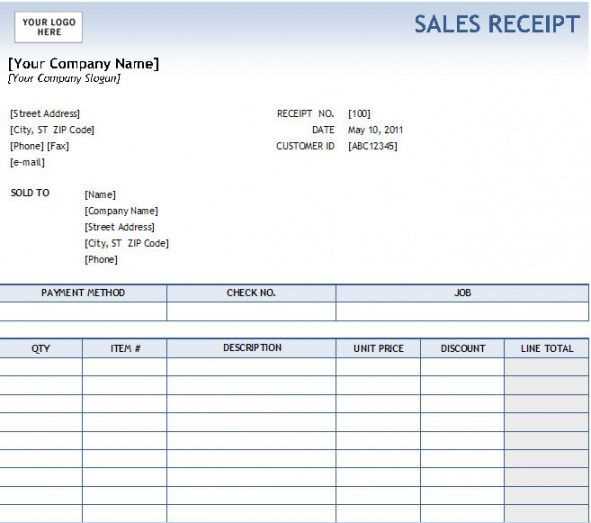
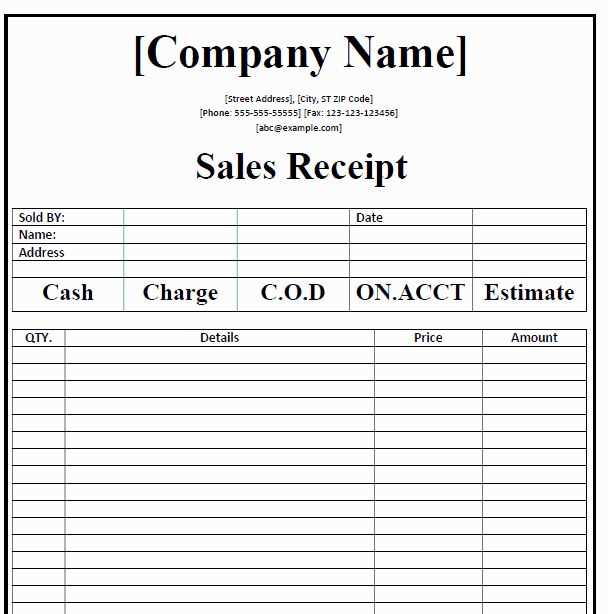
When modifying text, ensure the changes reflect the intended details, such as customer name, item descriptions, and pricing. You can also add or remove sections by selecting the appropriate options from the layout customization tools.
After making the necessary adjustments, click “Preview” to check how your changes appear. If satisfied, save the updated template by selecting “Done” or “Save and Close.” This will apply your changes to future receipts created with this template.
Remember, always double-check that the fields reflect accurate data to avoid errors in your records.
- QuickBooks Custom Sales Receipt Template Editing
To modify your custom sales receipt template in QuickBooks, follow these steps:
- Go to the Gear icon at the top right and select “Custom Form Styles”.
- Choose the sales receipt template you wish to edit or create a new one by clicking “New Style”.
- Click the “Edit” button beside the template you want to adjust.
- From here, you can adjust the layout, colors, and font styles under the “Design” tab.
- If needed, modify the content by clicking on “Content” to edit the header, footer, and other fields.
- For advanced customizations, use the “Emails” tab to personalize email settings for your sales receipts.
- Once you’ve made the desired changes, click “Done” to save your template.
For more complex changes, QuickBooks provides options to adjust custom fields and logos directly within the template design, allowing you to create a receipt that fits your specific needs.
| Option | Description |
|---|---|
| Design | Modify colors, fonts, and layout elements. |
| Content | Edit fields, add custom text, and adjust header/footer. |
| Emails | Personalize the email subject, body, and template. |
To access the Custom Template Section in QuickBooks, follow these steps:
- Log in to your QuickBooks account.
- Click on the gear icon at the top right corner of the screen.
- Select “Custom Form Styles” under the “Your Company” section.
- Click on “New Style” to start creating or editing a template.
Once inside the “Custom Form Styles” section, you will be able to choose from existing templates or create a new one based on your preferences.
Adjust the layout by selecting the areas you wish to modify in the template editor. You can resize, move, or remove sections such as the logo, payment details, or item list. Click on the section you want to adjust, and use the available tools to make changes.
To change fonts and text alignment: Select the text block you want to modify, and use the font size, style, and alignment options in the toolbar. Make sure your font choice fits with the overall style of your document.
For adjusting the color scheme: You can alter colors for various elements like headers, footers, or borders. Choose contrasting colors for readability, and ensure they match your brand identity.
Consider adjusting the padding and margins between elements to enhance the readability and structure of your receipt. Small tweaks can make a big difference in the overall design.
Preview the changes frequently to see how the new design impacts the overall flow and ensure everything looks well-organized before saving your custom template.
To customize your sales receipt template in QuickBooks, start by selecting the “Edit” option in the template settings. From here, you can modify the existing fields or add new ones according to your needs. Adjusting the fields allows you to tailor the template to your specific business requirements.
Adding Fields

Click on the “Add Fields” button to introduce additional information, such as custom notes or special instructions. You can choose from a variety of options like customer name, payment method, and more. Simply drag and drop the selected fields into the desired area of the receipt template.
Removing Fields

If you no longer need a specific field, click the “Remove” icon next to it. This will eliminate the field from the template, ensuring your receipt displays only the relevant information. Make sure to preview the template before saving changes to ensure the layout is correct.
To change the text and formatting in your custom sales receipt template, open QuickBooks and navigate to the “Custom Form Styles” section. Select the template you wish to edit and click on “Edit.” This opens the template editor, where you can adjust various text elements.
For adjusting text, click on the section you want to modify. You can change the text size, font, and color by using the formatting options in the toolbar. Use bold, italics, or underline to highlight important details like item descriptions or totals. You can also align text left, center, or right, depending on your preference.
To adjust the overall layout and formatting of the receipt, use the “Layout Designer.” Here, you can drag and drop text fields, change their sizes, and move them around to suit your needs. This is especially useful for repositioning sections like the company name, address, or item list.
| Action | How to Perform |
|---|---|
| Change Font | Select text > Use the font dropdown in the toolbar |
| Adjust Text Size | Select text > Use the text size dropdown in the toolbar |
| Align Text | Select text > Choose left, center, or right alignment |
| Modify Layout | Go to Layout Designer > Drag and drop sections |
Always preview your template after making changes to ensure the text fits properly and everything is aligned correctly. Adjust margins and padding if needed for better readability.
After making changes to your custom sales receipt template, it’s crucial to preview and test the updated version. This helps ensure that everything looks and functions as expected before using it in real transactions.
- To preview your edits, navigate to the template editing section within QuickBooks. Look for the “Preview” button located at the top of the screen.
- Click “Preview” to see a sample sales receipt. Verify that the design, layout, and content align with your expectations. Check for proper placement of fields such as customer details, item descriptions, and totals.
- Test the functionality by generating a test receipt. Input some dummy data, like a test customer and items, to verify the template’s response during an actual transaction process.
- Pay attention to how each section displays. Ensure that amounts, taxes, and discounts are properly calculated and shown. Verify that your custom fields, logos, and other edits appear correctly.
- If you notice any discrepancies or issues, return to the template editor to make further adjustments. You can edit text sizes, alignments, and other design elements to enhance readability or functionality.
- Once satisfied, save your changes and begin using the template for real transactions.
After customizing your sales receipt template in QuickBooks, it’s crucial to save and apply the changes correctly to ensure they take effect. First, click the Save button at the bottom of the template editor. This will store your adjustments without applying them to any transactions yet.
Applying Your Changes

Once saved, apply the modified template to future sales receipts by selecting it as the default template. Go to the Sales Receipt menu, choose Edit, and then select the updated template from the available options. Any new receipts created will reflect the changes you’ve made.
Test the Template
Before finalizing, generate a sample sales receipt to confirm that your changes appear as expected. If needed, return to the template editor and make further adjustments. This ensures your receipts are formatted exactly as desired for your business needs.
Customizing Your Sales Receipt Template

To edit a custom sales receipt template in QuickBooks, follow these steps:
- Click the gear icon in the top right corner and select “Custom Form Styles” under the “Your Company” section.
- Choose the sales receipt template you want to edit by clicking on “Edit” next to the template name.
- In the “Design” tab, modify the layout by selecting different font styles, colors, and adding or removing fields as needed.
- Go to the “Content” tab to adjust which sections are visible, such as items, totals, and payment details.
Saving Your Changes

- Once you’re satisfied with the design, click “Done” to save the template.
- You can apply this new template to future sales receipts by selecting it from the drop-down menu during the creation of a new receipt.