Using a clear, well-structured bill of sale receipt template helps ensure a smooth transaction between buyer and seller. A receipt should include key details such as the names of both parties, the item or service being sold, and the agreed-upon price. Additionally, you should include information about the payment method and the date of the transaction. This makes it easier for both parties to refer back to the agreement if needed.
Choosing the right template will save time and help you avoid confusion. Make sure the template includes a space for the buyer’s and seller’s contact details, as well as a brief description of the item or service. You may also want to include a clause about warranties or the absence thereof, depending on the nature of the sale.
A good template will also leave room for signatures. This simple step can prevent misunderstandings and provide proof of agreement. Ensure the template is easy to customize to fit various types of sales, whether it’s for a car, a piece of equipment, or personal property.
Here are the corrected lines with minimal repetition:
Ensure clarity in your bill of sale receipt by keeping the language precise. Each transaction detail should be unique and relevant to avoid redundancy. For example, instead of repeating the item description multiple times, list it once with sufficient details.
Item Description

Include the item name, model number, and any distinctive features. Avoid vague terms like “good condition” and replace them with specific descriptions, such as “slightly used, minimal wear on edges.”
Transaction Information
Clearly state the date and total amount paid. Refrain from restating the payment method unless it’s necessary to clarify the transaction process. For example, simply state “Paid in full via cash” or “Paid via bank transfer on [date].”
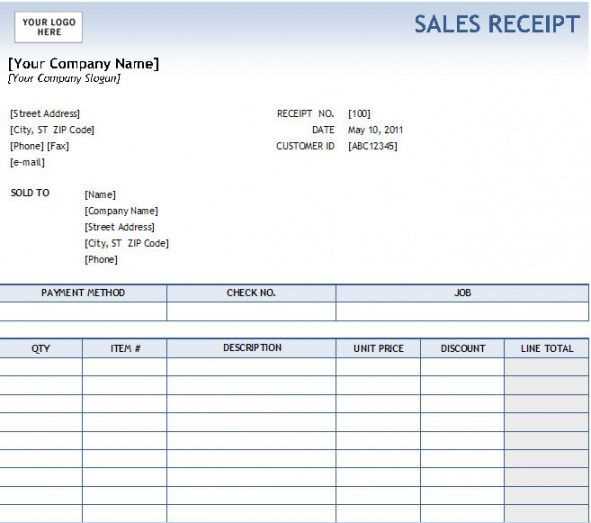
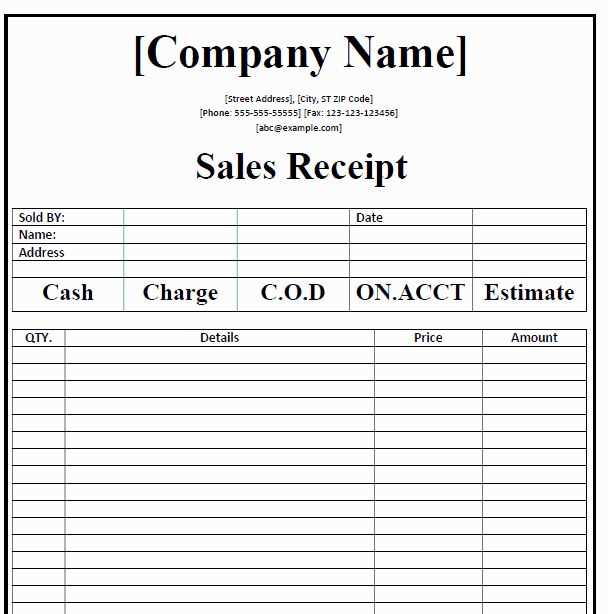
- Templates for Bill of Sale Receipt
To create a clear and professional Bill of Sale Receipt, you can start with a simple template that includes key transaction details. A good template should capture the full names of both the buyer and seller, along with their contact information, the date of sale, and a description of the item being sold.
Basic Template Elements
The following elements should always be included in your Bill of Sale Receipt template:
- Title: Label the document clearly as “Bill of Sale Receipt.”
- Parties Involved: Include the buyer’s and seller’s full names and addresses.
- Item Description: Provide a clear description of the item being sold, including its model, condition, and any identifying features.
- Price and Payment Terms: State the sale price and outline the payment terms (cash, check, or other methods).
- Signatures: Have spaces for both the buyer and seller to sign and date the document.
Customizing Your Template
Customizing the template to suit your needs can be done easily. For example, if you are selling a vehicle, ensure the template includes a section for the Vehicle Identification Number (VIN), odometer reading, and the title transfer details. For real estate transactions, additional fields like the property address and sale conditions may be necessary.
Once the template is ready, both parties should review it carefully before signing to avoid any misunderstandings. Keep a copy for your records and provide one to the buyer for their reference.
Begin by creating a document with clear sections. This will help both the buyer and seller stay organized. A typical bill of sale should include basic information about the transaction and the items being sold. Below are the key components:
1. Buyer and Seller Information

Include the names, addresses, and contact details of both parties. This is important for future reference if any issues arise post-sale.
2. Description of the Item
Clearly describe the item being sold. Include details such as the make, model, year, condition, and serial number if applicable. The more specific, the better.
3. Price and Payment Details
State the agreed-upon price for the item. Also, include any payment terms or methods (cash, check, bank transfer). If there are any deposits or payment installments, note these as well.
4. Date and Location of Sale
Include the exact date of the transaction, as well as the location. This helps both parties confirm when and where the sale occurred.
5. Signatures
Both the buyer and seller should sign the document. Include a space for both signatures and the date of signing.
6. Additional Clauses

If there are any warranties, “as-is” clauses, or other specific conditions, they should be clearly outlined. This protects both parties from future misunderstandings.
| Component | Details |
|---|---|
| Buyer Information | Name, Address, Contact Information |
| Seller Information | Name, Address, Contact Information |
| Item Description | Make, Model, Year, Serial Number, Condition |
| Price and Payment Terms | Agreed Price, Payment Method, Installment Details |
| Date and Location | Transaction Date, Sale Location |
| Signatures | Buyer and Seller Signatures, Date |
| Additional Clauses | Warranties, “As-Is” Clauses, Special Conditions |
Once the template is ready, save it and use it whenever necessary. Keep a copy for both the buyer and seller for records.
Start with clear identification of both parties involved in the transaction. This includes full names, addresses, and contact information for the seller and buyer. Be sure to specify the role of each party–whether the buyer or seller is an individual or a business entity.
Item Details
Describe the item or property being sold with as much detail as possible. For vehicles, include the make, model, year, Vehicle Identification Number (VIN), and odometer reading. For other items, list distinguishing characteristics like serial numbers, condition, and any accessories included in the sale.
Transaction Terms
Include the agreed-upon price and the method of payment, whether it’s cash, check, bank transfer, or another method. If there are any deposits or installment plans, clearly state the amount and due dates. Mention any warranties or guarantees provided by the seller and whether the item is sold as-is.
Finally, ensure that both parties sign and date the document. If applicable, have a witness or notary public sign as well, especially for high-value items like vehicles or real estate.
Adjust your bill of sale to match the specifics of each transaction type. A generic template might not meet all needs, so consider adding details that are relevant to the sale you’re completing.
1. Vehicle Sale
- Include the Vehicle Identification Number (VIN), make, model, and year of the vehicle.
- List any warranties or guarantees provided.
- Note the condition of the vehicle at the time of sale, especially if it’s being sold “as-is.”
2. Personal Property Sale
- Specify the item’s condition, serial number (if applicable), and any accessories included in the sale.
- For high-value items, consider adding photographs as an attachment.
3. Real Estate Transaction
- Provide property details such as address, parcel number, and legal description.
- Include any disclosures required by local laws, such as environmental hazards or defects in the property.
4. Business Sale
- Clearly outline the assets being sold, including equipment, inventory, and intellectual property.
- Detail any non-compete clauses or agreements regarding future business practices.
Each state has different legal requirements for bill of sale receipts, and it is crucial to be aware of these before completing a transaction. In general, a bill of sale must include specific details about the item being sold, such as its make, model, year, and identification number, as well as the names and signatures of both the buyer and seller.
Information to Include in a Bill of Sale
At a minimum, most states require the following information on a bill of sale:
- Full names and addresses of both parties
- Description of the item being sold (e.g., vehicle make, model, VIN, or serial number)
- Sale price and payment terms
- Date of the transaction
- Signatures of both buyer and seller
State-Specific Requirements
Some states also require additional documentation for certain transactions. For example, in California, a bill of sale for a vehicle must be accompanied by a smog certificate, while in Texas, the bill must include the seller’s driver’s license number. Always check your state’s specific regulations before finalizing any sale.
Additionally, some states have specific rules for notarization. While most states do not require notarization, a few, such as Louisiana and Montana, may require a notary public to witness the signing of the bill of sale for certain types of transactions, like vehicles or real estate.
Be sure to review your local laws to avoid issues with the sale and to ensure that your bill of sale is legally binding.
Begin by clearly labeling the document as a “Bill of Sale” at the top. This ensures immediate identification. Include a heading that states the nature of the transaction, such as “Sale of Vehicle” or “Sale of Personal Property,” depending on the item being sold.
Next, clearly identify both the seller and the buyer. Include full names, addresses, and contact information. This eliminates any ambiguity in case the parties need to be contacted later.
Describe the item being sold with enough detail to prevent misunderstandings. For vehicles, this means listing the make, model, year, Vehicle Identification Number (VIN), and any distinguishing features. For other items, include model numbers, serial numbers, and specific descriptions.
State the agreed-upon price in both numbers and words to avoid errors. For example, write “$1,000 (one thousand dollars)” instead of just “$1,000.” This practice removes confusion, especially when there is a discrepancy in digits.
Include the payment method, whether it’s cash, check, or another form of payment. Specify if any deposit was made or if the full amount was paid upfront.
Clarify the terms of the sale, including any warranties or “as-is” clauses. Specify whether any guarantees are made about the condition of the item, and if none, note that the item is being sold as-is with no warranties.
Ensure both the seller and buyer sign the document with their full names and dates. The signatures authenticate the transaction and prevent any future disputes.
Lastly, include a statement that both parties understand the terms of the sale. This reassures both parties that they are in agreement and helps avoid confusion later on.
Always include clear details about the transaction. Specify the full names and addresses of both parties, along with the exact description of the item being sold. This includes serial numbers, model names, and any distinguishing features to avoid future disputes.
Include the purchase price and the date of the transaction. Clearly state if the item is sold “as-is” without warranties, and ensure both parties acknowledge this term. If the item is under any form of guarantee, specify the terms and conditions of that guarantee.
Always sign and date the document, and have the other party do the same. Consider having a witness sign the bill of sale to further strengthen the validity of the agreement. Keep a copy for your records, and provide one to the buyer. This way, both parties can reference the agreement if needed.
Using a template designed for your specific transaction type can help avoid omissions. Customize it to fit your needs and local regulations to ensure all necessary information is captured and legally binding.
Creating a Bill of Sale Receipt Template
Ensure your bill of sale receipt includes the following key details:
- Buyer and Seller Information: Clearly list the full names, addresses, and contact information of both parties.
- Description of the Item: Provide an accurate description of the item or property being sold, including make, model, year, and any identifying numbers (such as VIN for vehicles).
- Transaction Details: Include the date of sale and the total sale price. Specify whether the transaction was in cash or through another payment method.
- Signatures: Both the buyer and the seller must sign the document. This can be done physically or electronically, depending on local regulations.
- Terms and Conditions: If applicable, mention any warranties, guarantees, or “as-is” statements regarding the condition of the item sold.
Keep the template simple and clear. Customize it based on your needs, but make sure all relevant details are included to avoid misunderstandings.