Use this receipt template to document any payment received. Include the amount, the payer’s name, and the date of the transaction for clear and accurate records. This ensures both parties have a solid reference in case of future questions or disputes.
Make sure to add a description of what the money was received for, whether it’s for goods or services. Providing this detail will prevent misunderstandings about the purpose of the payment.
Each receipt should have a unique number for easy tracking. If the payment was made through a specific method, such as a bank transfer, include that information for complete documentation.
For convenience, you can create or use a pre-formatted template that automatically fills in most of these details, ensuring accuracy and saving time in the process.
Here’s the corrected version, where the same word is repeated no more than 2-3 times:
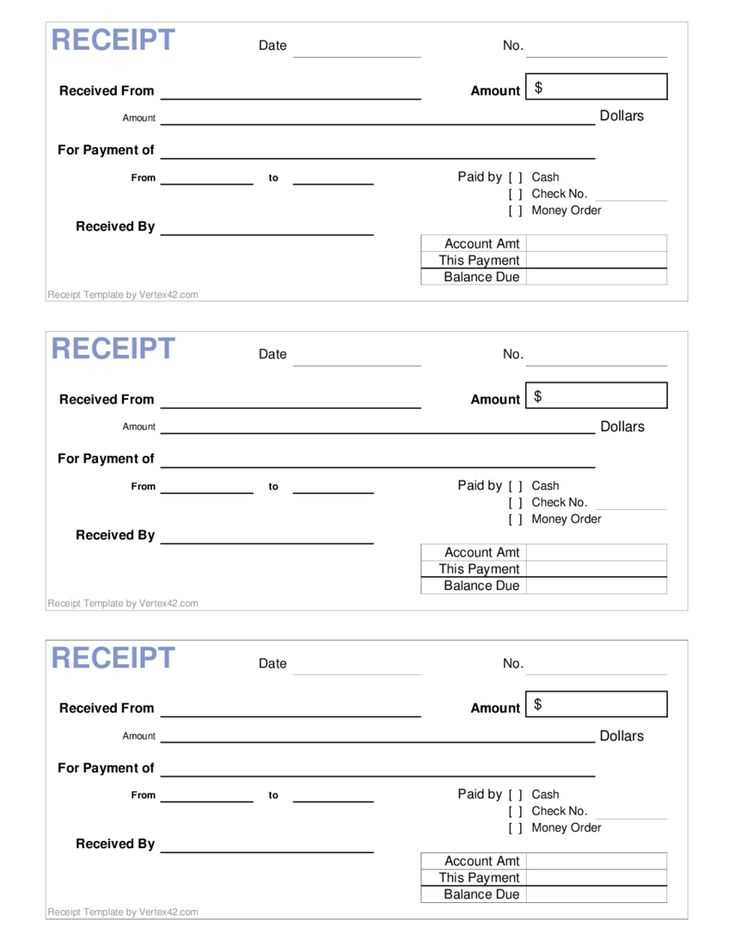
To create a simple and clear receipt template for money received, structure the document with specific fields. Include the payer’s name, the amount received, the date of the transaction, and the purpose of the payment. This ensures clarity and avoids any confusion later.
| Payer’s Name | Amount | Date | Purpose |
|---|---|---|---|
| John Doe | $200 | February 5, 2025 | Loan Repayment |
Use the template consistently. Adjust the fields based on the type of transaction. If necessary, add a receipt number for record-keeping. Keep the wording simple and straightforward to prevent repetition. Once the details are filled, the document should be ready for both parties to sign if needed.
- Receipt Template for Funds Received
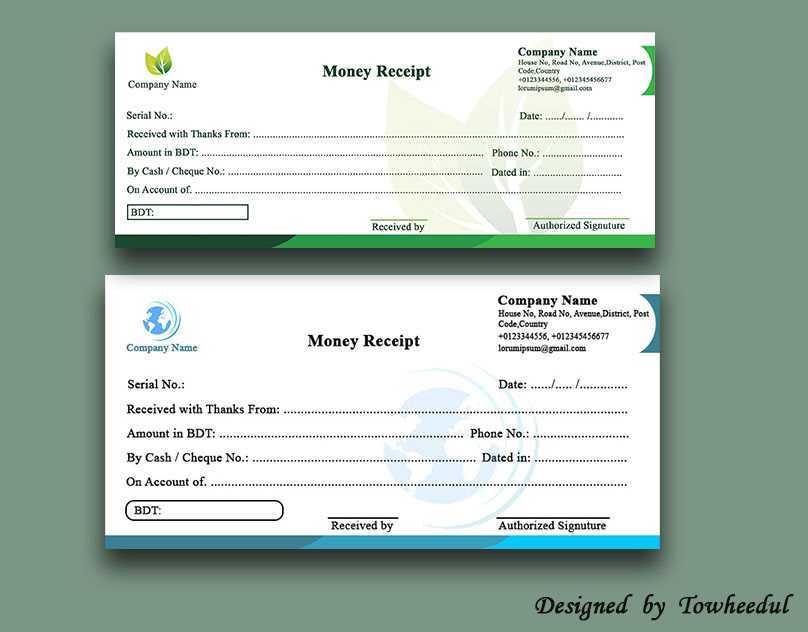
Use the following template to create a clear and precise receipt for money received. This template helps avoid confusion and ensures that all necessary details are included.
| Field | Details |
|---|---|
| Receipt Number | Assign a unique number for tracking purposes. |
| Date | Record the exact date when the payment was made. |
| Received From | Include the name or business of the person who made the payment. |
| Amount | State the total amount received. |
| Payment Method | Specify how the payment was made (e.g., cash, check, bank transfer). |
| Purpose of Payment | Clearly describe the reason for the payment. |
| Receiver’s Name | Include the name of the person or business receiving the funds. |
| Signature | Include the signature of the person receiving the funds for verification. |
Include the following elements in your payment receipt template to ensure clarity and accuracy:
1. Transaction Details
Clearly state the date and amount of the payment. This section should also indicate the method of payment, whether it’s cash, credit card, or bank transfer.
2. Seller and Buyer Information
Provide the full name, address, and contact details for both the seller and the buyer. This information confirms the identity of the parties involved in the transaction.
3. Description of Goods or Services
Detail the products or services provided. Include a brief description, quantity, and unit price. If applicable, include any taxes or discounts applied.
4. Payment Terms

Specify any terms related to the payment, such as due dates or late fees, if applicable. This helps clarify expectations for both parties.
5. Receipt Number

Assign a unique receipt number to each transaction. This number helps with record keeping and tracking payments.
6. Signature
If needed, include space for both parties to sign the receipt. This adds an extra layer of verification and acknowledgment of the transaction.
Clearly record the date and amount on a receipt. Begin with the date at the top or near the header, ensuring it’s easy to spot. Use a format like “MM/DD/YYYY” to avoid confusion. This makes the document useful for reference or accounting purposes.
Record the Amount in Full
Write the full amount in both numerical and word form. For example, “Amount: $250 (Two Hundred Fifty Dollars)”. This helps avoid misunderstandings or disputes about the payment made.
Ensure Clarity in Both Sections
Both the date and amount should be legible and placed in prominent positions. This enhances readability and prevents errors in financial tracking.
Include both payer and payee details clearly to ensure accurate record-keeping. Begin by adding the payer’s full name, address, and contact information. Similarly, list the payee’s details, ensuring all necessary contact information is provided. This creates a clear link between the parties involved in the transaction.
Payer Information
- Name of payer
- Address
- Phone number
- Email address
Payee Information
- Name of payee
- Address
- Phone number
- Email address
Always specify the payment method on the receipt to avoid any confusion about how the transaction was completed. Whether the payment was made by cash, credit card, bank transfer, or any other method, clearly state it to ensure accurate record-keeping and transparency.
List the Payment Method
- Cash: Indicate the exact amount received in cash.
- Credit/Debit Card: Mention the card type (e.g., Visa, MasterCard) if necessary.
- Bank Transfer: Include any reference number or bank details that confirm the transaction.
- Other Methods: Specify if the payment was made through alternative platforms like PayPal, Venmo, or checks.
Why It Matters

Being precise about the payment method helps both parties track their financial transactions and protects against any potential disputes. It also makes it easier to match payments with bank statements or business records.
Adjust your receipt template to match the specifics of each transaction. Different types of transactions require varying levels of detail. Here’s how to tailor the template for different situations:
1. Personal Payments
- Include a clear reference to the transaction type (e.g., loan repayment, gift).
- Specify whether the payment is partial or in full.
- Ensure that the payer’s and payee’s names are correctly listed, along with the amount received.
2. Business Transactions
- Incorporate an invoice number or order reference to link the payment to a specific service or product.
- Note any taxes or additional fees separately to maintain transparency.
- Provide space for both the buyer’s and seller’s contact details, including business information if necessary.
3. Digital Payments
- Include payment platform details (PayPal, bank transfer, etc.) to track the method used.
- Record the transaction ID or confirmation number for verification purposes.
These modifications ensure your template is flexible enough to accommodate various types of financial exchanges, providing clarity and preventing confusion.
Store receipts in an organized and secure manner to prevent loss or damage. Use either digital or physical filing systems, depending on your preferences. For physical copies, employ a filing cabinet or a dedicated storage box with clear labels. For digital receipts, opt for cloud storage or an encrypted system for easy retrieval.
Digital Storage Tips
Use specific folders for different types of receipts, such as categories based on transaction type or date. This makes retrieval simple and efficient. Backup your receipts regularly to prevent data loss. Keep file names descriptive, including the date and amount, for quick identification.
Issuing Receipts Correctly
Ensure that receipts include all relevant details: the amount received, date, payer’s name, and the reason for the payment. Clearly state whether the receipt is partial or full. Double-check for accuracy before issuing. This minimizes errors and ensures clarity for both parties.
Consider using receipt templates to maintain consistency. Many tools are available for generating and printing receipts with all required information, reducing the chance of missing any details.
Receipt Template for Money Received
To create a receipt for money received, start by including the following details:
1. Receipt Number and Date
Assign a unique number to each receipt for tracking purposes. The date should reflect when the payment was received.
2. Payer Information
Include the full name, address, and contact details of the payer. This information ensures clarity on who made the payment.
3. Amount Received
Clearly state the exact amount of money received, specifying the currency. If partial payments are made, break down the amounts and outstanding balance.
4. Payment Method
Specify how the payment was made, whether through cash, check, bank transfer, or another method. This helps clarify the transaction.
5. Purpose of Payment
Indicate the reason for the payment, such as for goods, services, or rent. This helps the recipient track income or expenses.
6. Signatures
Both the payer and the recipient should sign the receipt, confirming the transaction took place.
This format provides clear documentation for both parties, ensuring transparency and accuracy in recording financial transactions.