Creating a deposit receipt template in DOC format is a straightforward way to ensure clear documentation of any financial transactions. This document serves as an official record for deposits made, whether in cash or through other means, providing a structured format for both the depositor and the recipient.
The key components of a deposit receipt template should include the name of the depositor, the amount deposited, the method of deposit, and the date. It’s also useful to include space for any reference numbers or account details, ensuring transparency and accuracy for both parties involved.
Customizing the template allows for additional details such as the purpose of the deposit or specific instructions regarding the transaction. Using a DOC format makes it easy to edit, adjust, and store, offering flexibility for various use cases, from personal transactions to business-related deposits.
By having a reliable deposit receipt template, you reduce the risk of confusion or disputes about the transaction. It also serves as a professional tool for tracking and organizing financial activities over time.
Here is an updated list where words repeat no more than two or three times:
When creating a deposit receipt, consider these essential elements:
- Receipt Number: Each document should have a unique identifier.
- Date: Ensure the correct date of the transaction is listed.
- Depositor’s Name: Include the full name of the person making the deposit.
- Amount: Clearly specify the amount of money being deposited.
- Account Number: Mention the relevant account number if applicable.
- Signature: Provide space for both the depositor’s and the receiving institution’s signatures.
- Notes: Allow space for any additional comments or details regarding the deposit.
Make sure all these components are clear and legible to avoid any confusion in the future. Adjust the layout to suit your needs, but keep the format simple and direct.
- Deposit Receipt Template Doc
To create a Deposit Receipt Template in .doc format, ensure it includes the necessary elements such as the date of deposit, the name of the payer, the amount deposited, and the purpose of the deposit. The template should have a clear, simple layout to avoid confusion and enhance readability.
Key Components
The essential components of a deposit receipt template include:
- Date of Deposit: Specify the date the deposit is made.
- Payer’s Information: Include the full name and contact details of the person making the deposit.
- Amount Deposited: List the exact amount, specifying the currency.
- Deposit Purpose: Provide a brief description of the reason for the deposit.
- Receipt Number: Include a unique number for tracking and referencing the receipt.
Formatting Tips
Keep the template clean and organized. Use bold for headings and clear, readable fonts for easy identification of each section. The amount should be placed prominently for quick verification, and a space for signatures can be added for authenticity.
Open Microsoft Word and choose a blank document. Begin by adding a header that includes your business name, address, and contact information. This helps make your receipt more professional and recognizable.
Step-by-Step Guide
1. Add a Title: Start with a bold title such as “Receipt” or “Payment Receipt” at the top of the page. This makes it clear what the document is.
2. Include Transaction Details: Under the title, list the transaction date, receipt number, and payment method. This information provides context for the receipt.
3. Create a Table for Itemized Details: Use a table to list purchased items or services, including columns for description, quantity, unit price, and total cost. This format ensures clarity and accuracy.
| Description | Quantity | Unit Price | Total |
|---|---|---|---|
| Item 1 | 2 | $15.00 | $30.00 |
| Item 2 | 1 | $20.00 | $20.00 |
Final Steps

4. Add Total Amount: Below the table, calculate and display the total amount. Ensure the total matches the sum of all items and taxes if applicable.
5. Include a Thank You Message: End the receipt with a brief thank you message, showing appreciation for the purchase. This adds a personal touch.
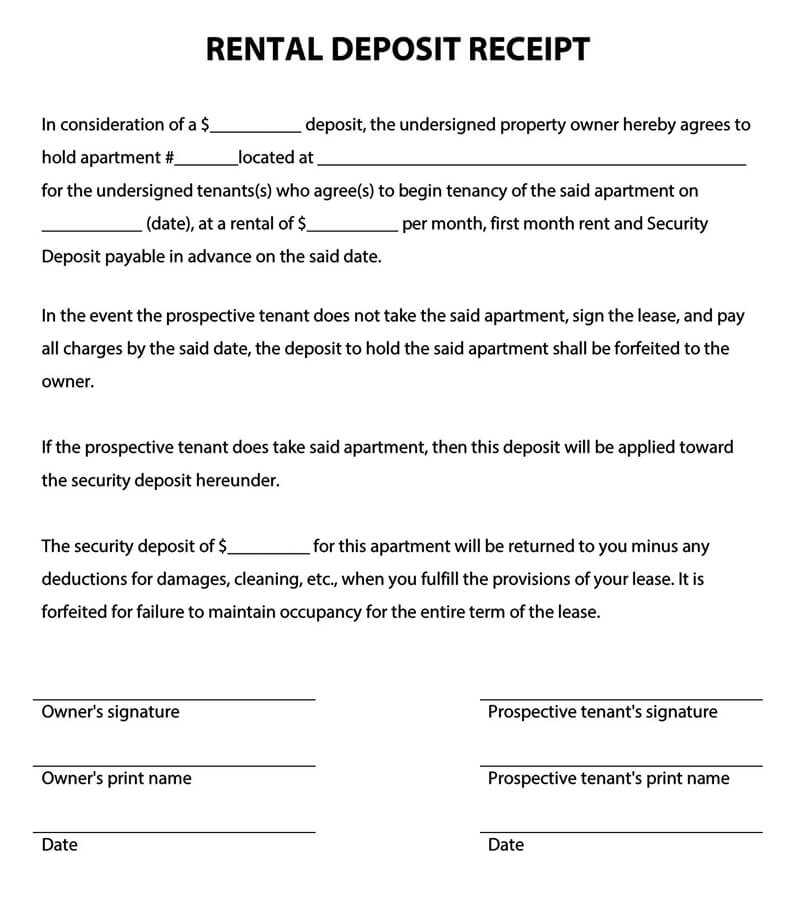
Ensure the following details are included in any deposit acknowledgment to keep records clear and organized:
- Depositor’s Name: Clearly state the name of the person or entity making the deposit.
- Deposit Amount: Specify the exact sum of money deposited, including any currency information if necessary.
- Deposit Date: Indicate the exact date the deposit was made to maintain accurate transaction tracking.
- Account Number or Reference: List the account number or any unique reference ID tied to the deposit for easier identification.
- Payment Method: Mention how the deposit was made, whether by check, cash, wire transfer, or another method.
- Deposit Type: Clarify if the deposit is a cash deposit, credit deposit, or another form to avoid ambiguity.
- Recipient’s Details: Include the name and contact information of the individual or organization receiving the deposit.
These details provide transparency, prevent errors, and make future reference or disputes easier to manage. Always double-check the information before finalizing the acknowledgment.
To customize a receipt for different types of transactions, tailor the information to reflect the specific details of each transaction. For example, when processing a sale, include the product or service name, quantity, price, tax, and total amount. If the transaction involves a donation, adjust the receipt to reflect the donor’s information and the amount donated. For rental agreements, make sure to note the rental period and any deposits or additional fees involved.
Modifying Information Based on Transaction Type
Adjust the layout and sections depending on the type of transaction. A sale receipt may focus on itemized purchases, while a rental receipt should clearly list rental dates, terms, and conditions. For refunds, include a reference to the original transaction, the reason for the refund, and the refunded amount.
Incorporating Relevant Legal and Compliance Details
Ensure your receipt complies with legal requirements by adding necessary information, such as tax identification numbers for business transactions or return policies. Clearly define payment methods, including credit cards, checks, or digital payment methods, to avoid confusion.
Keep the design of your acknowledgment template clean and simple. Use a legible font like Arial or Times New Roman in a size between 10-12 points. Maintain consistent margins of about 1 inch on all sides to avoid overcrowding the content.
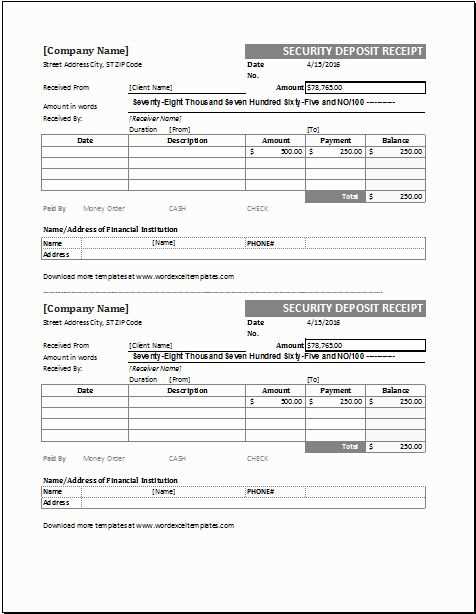
Clear Header
Ensure the title of the acknowledgment is clear and easy to identify. Use bold text for the header, but keep the font size larger than the body text for contrast. For example, “Deposit Acknowledgment” or “Receipt Confirmation” works well as titles.
Structured Layout
Break the content into clearly defined sections. Use bullet points or numbered lists for key details like the amount, date, and receipt number. This makes it easy to scan and reference. Group similar information together under headings such as “Payment Details” or “Transaction Information”.
| Section | Details |
|---|---|
| Title | Clear and bold (e.g., “Deposit Acknowledgment”) |
| Transaction Details | Include payment amount, date, and method of transaction |
| Recipient Information | Full name, contact info, and any relevant identification numbers |
| Signature | Leave space for both parties’ signatures |
Lastly, ensure there is enough white space around sections. Avoid cluttering the page with too much information. This will help in making your acknowledgment more visually appealing and easy to read.
Save your receipt template by selecting the “Save As” option in your document editor. Choose the appropriate file format (such as .doc, .docx, or .pdf) to ensure easy access and compatibility across different devices and programs. Consider organizing your files into specific folders for better management.
To share the template, use email or cloud-based services like Google Drive or Dropbox. Upload the file to your cloud storage and share the link with the recipient. Alternatively, attach the file directly in an email for quick access.
If you plan to use the template frequently, store it in a centralized location on your computer or cloud platform. This ensures that you can access it anytime without needing to search for it. For team collaboration, use cloud storage with shared access permissions to enable easy updates and usage by multiple people.
Accurate data entry is key. Always double-check the spelling of names, addresses, and amounts to avoid errors that could lead to confusion or legal issues.
1. Missing Key Information

Don’t forget to include necessary details like the transaction date, payment method, and item or service description. Without these, a receipt may lack legal value.
2. Inconsistent Formatting

Ensure your receipt has a consistent format. Using different fonts or layouts can make the document appear unprofessional. Keep it clear and readable.
3. Wrong Amounts

- Verify the total amount and any taxes before finalizing the receipt.
- Ensure calculations are correct to avoid disputes.
4. Missing Business Information
Always include your business name, contact details, and tax ID number. These elements confirm the legitimacy of the transaction.
5. Lack of Receipt Number
Issuing unique receipt numbers is a simple yet important practice for record-keeping. This helps track transactions and can assist in resolving disputes.
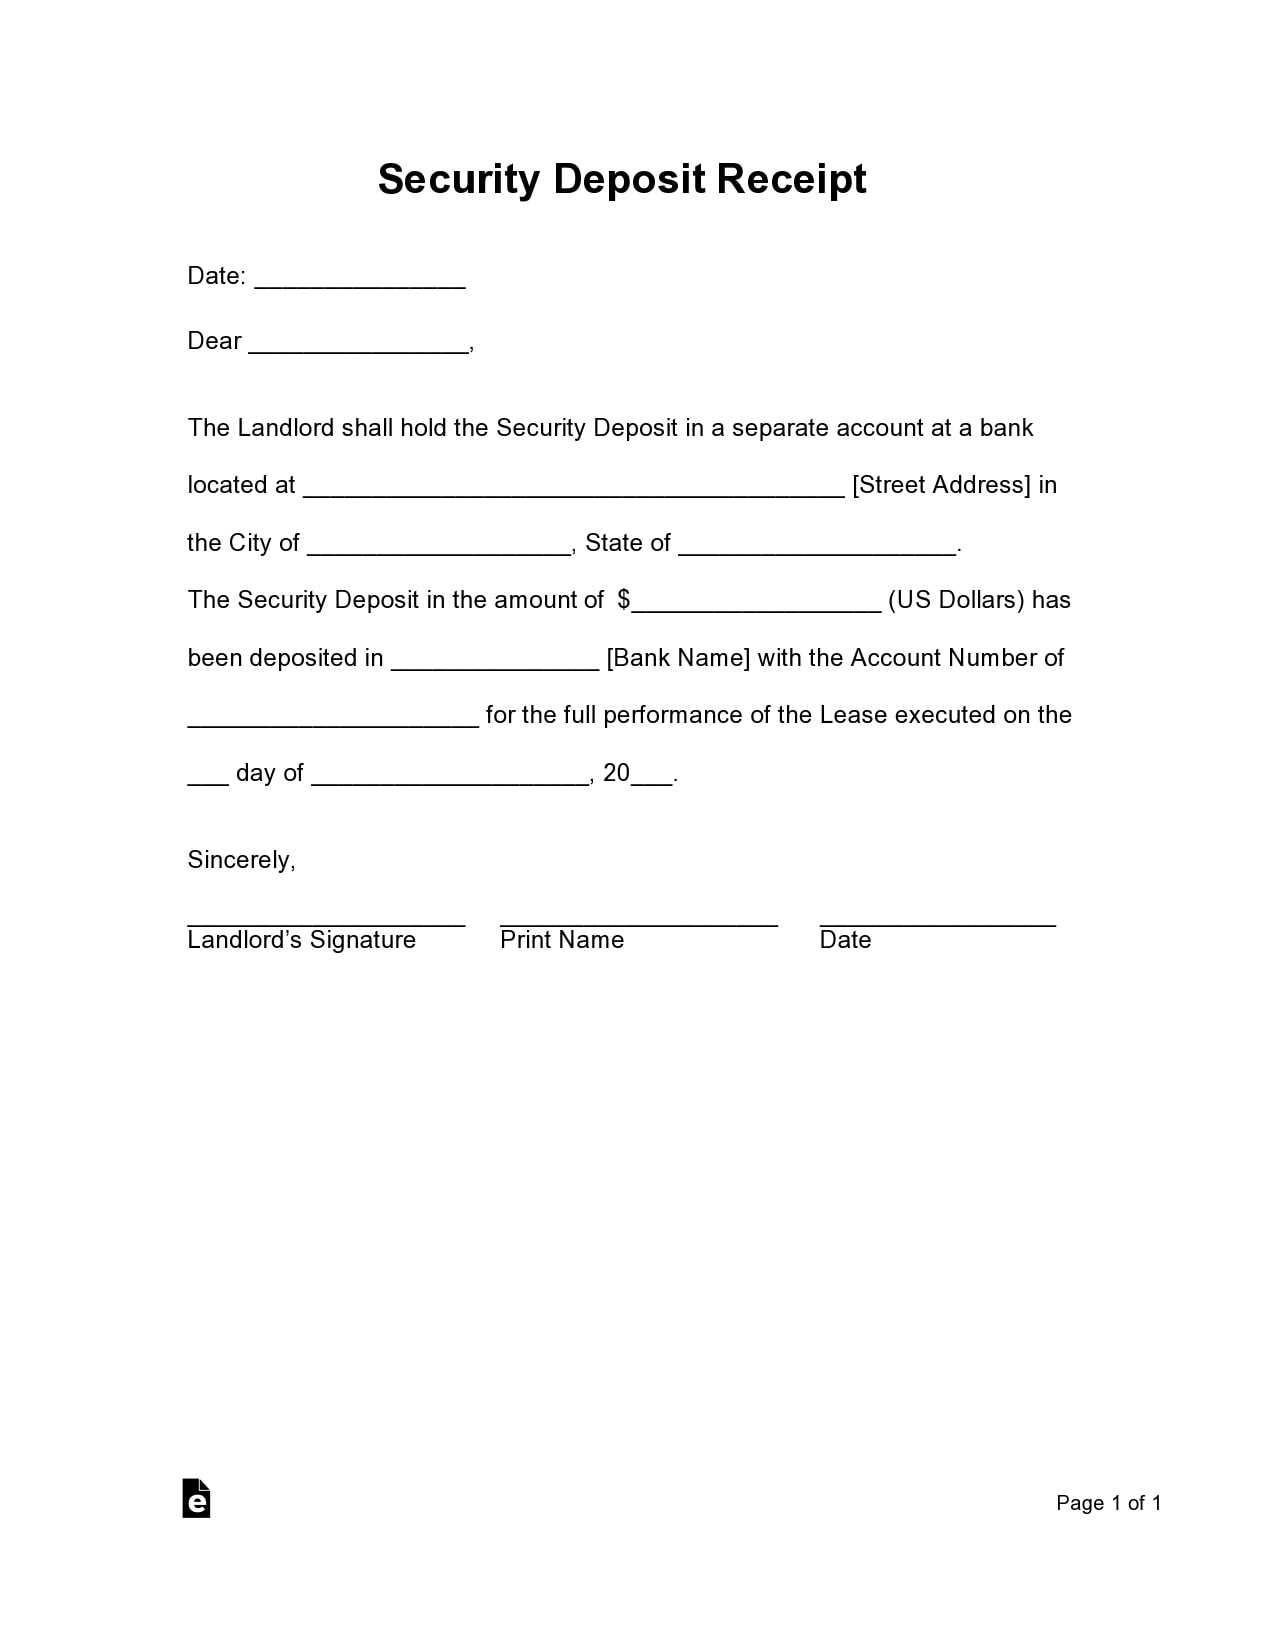
When creating a deposit receipt, include these key details: the deposit amount, the date of the transaction, and the names of the parties involved. Ensure that all figures are clearly stated and easily readable. A receipt should also feature a unique identifier or receipt number for tracking purposes. This helps maintain accuracy and prevents confusion in future references.
Clarity and Structure
Ensure the format is simple and structured. The first line should highlight the purpose of the document – for example, “Deposit Receipt” – followed by the details of the transaction. Then, include space for the signature of the deposit handler and the depositor. These details validate the transaction.