When renting out equipment, furniture, or properties, a clear and accurate receipt helps both the renter and the owner track transactions. A rental receipt template provides a structured format to record the necessary details, ensuring all key information is covered. This simple tool saves time and avoids confusion during the rental process.
A solid template includes sections for the renter’s and owner’s contact details, rental period, item or property description, payment amount, and any additional fees. Make sure to include the rental start and end dates, as well as the payment method used. These basic elements ensure clarity and prevent misunderstandings later on.
Incorporating specific clauses, such as terms for damages or late fees, can further protect both parties. Consider adding a section for the signature of both the renter and the owner, which adds an extra layer of formality and legitimacy to the document.
Here’s the revised version with reduced repetition:
For a cleaner and more streamlined rental receipt, remove unnecessary phrases and focus on the key details. Include the tenant’s name, rental item, dates, and total cost. Avoid redundant statements by consolidating related information.
Start with a clear statement of the rental terms, such as: “This receipt confirms the rental of [Item] by [Tenant Name] from [Start Date] to [End Date].” Keep the payment details concise and only list what’s relevant: “Total Amount Paid: [Amount]”.
Eliminate repeated phrases like “This document serves as” or “For your reference” that don’t contribute additional value. Instead, focus on key facts to maintain readability and clarity. Highlight the most important information with bold text for easy reference.
By minimizing redundancy, you make the receipt more user-friendly and professional, ensuring that it meets the expectations of both parties involved.
- Sample Rental Receipt Template
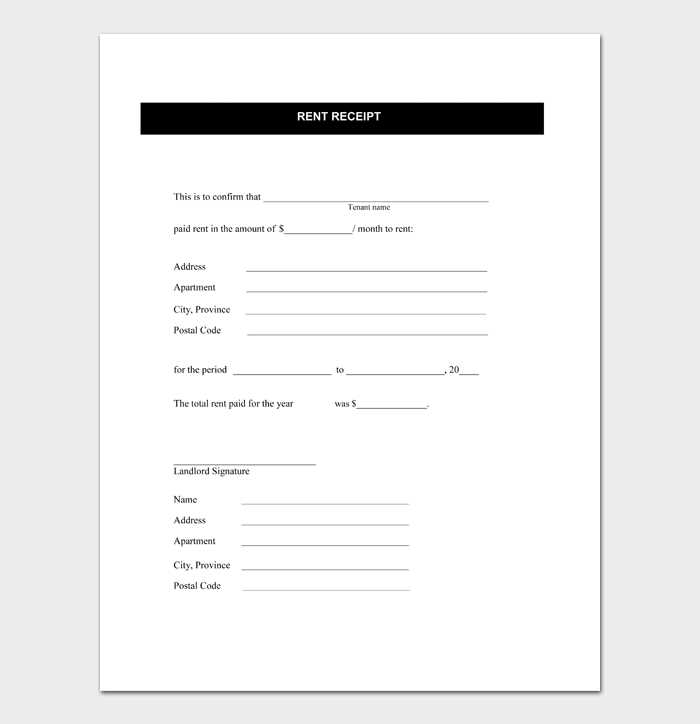
To create a rental receipt, include key details such as the names of the landlord and tenant, rental property address, date of payment, amount paid, and the rental period. This ensures both parties have a clear record of the transaction.
Basic Information
The rental receipt should include the tenant’s full name and the property’s address. Specify the amount paid and the payment method (cash, check, etc.). Always note the date of payment to avoid any confusion later on.
Additional Details

For more accuracy, include the rental period covered by the payment, as well as any extra charges (e.g., late fees or deposits). If applicable, include the landlord’s signature for confirmation of the transaction.
Here’s a simple structure you can follow:
- Landlord’s Name
- Tenant’s Name
- Property Address
- Date of Payment
- Amount Paid
- Payment Method
- Rental Period
- Landlord’s Signature (optional)
Design a rental receipt by organizing the necessary details clearly. Focus on including the following elements: the renter’s information, rental terms, and payment details.
| Field | Description |
|---|---|
| Receipt Number | Unique identifier for the receipt to ensure easy reference. |
| Renter’s Name | The full name of the individual or company renting the item. |
| Rental Item(s) | A list of items being rented, including model numbers or other identifiers. |
| Rental Period | The duration for which the item is being rented, including start and end dates. |
| Total Rental Amount | The total cost, which may include tax, for the rental period. |
| Payment Method | Details of the payment, such as credit card, cash, or bank transfer. |
| Security Deposit | If applicable, the amount held for damages or late returns. |
| Return Instructions | Clear instructions for returning the item, including any conditions. |
Ensure all fields are filled out accurately and consistently. A simple, clean design improves readability and provides clear reference points for both the renter and the landlord.
Include the full names of both the lessor and lessee. This clarifies the identities of all parties involved, ensuring there’s no confusion in the future. Follow with detailed contact information for both parties, such as phone numbers and addresses, to streamline communication if necessary.
Specify the rental property or item being rented. Be as detailed as possible, listing any identifying features or serial numbers. This helps avoid disputes over the rented asset’s condition and location.
Clearly outline the rental period, indicating the start and end dates. This removes ambiguity, especially in the case of long-term rentals. If it’s a recurring rental, define renewal terms, including frequency and conditions.
State the rental rate and payment terms, including the amount due, the due date, and acceptable payment methods. Also, mention any deposits or additional fees, such as maintenance or late payment charges.
Describe any maintenance responsibilities. Specify whether the lessor or lessee is responsible for upkeep, repairs, or replacement of any items during the rental period. This prevents misunderstandings about upkeep duties.
Define the terms for early termination, including any penalties, notice periods, and procedures for ending the agreement before the expiration date. Make sure the parties know how to proceed if they need to cut the rental short.
Lastly, include a section for signatures of both parties. This formalizes the agreement and acts as evidence of consent and understanding. Without signatures, the document lacks legal backing.
Ensure consistent alignment of text across the receipt. Use left alignment for item names and right alignment for prices and totals. This creates a clean, easy-to-read layout that helps avoid confusion.
Choose a Legible Font Size
Use a font size between 10-12 pt for regular text and slightly larger (14-16 pt) for headings or total amounts. This ensures readability without overcrowding the page.
Organize Information with Sections
Group related information, like item details, taxes, and totals, into distinct sections. Use borders or spacing to separate these groups. This makes the receipt more organized and less overwhelming.
Consider using bold or underlined text for key details such as the total amount or payment method, so they stand out. Always leave enough margin space around the text to avoid a cramped look.
Choose a clear, easy-to-read font that complements the overall layout. Stick to standard fonts such as Arial or Times New Roman to ensure the receipt is legible across different devices and print formats.
Incorporate your branding elements like your logo and business colors. This helps make the template uniquely yours and provides a professional touch that clients will recognize.
Make fields adjustable to allow for flexibility. Include placeholders for key details like dates, rental periods, or amounts, but ensure they can be easily modified based on specific transactions.
Ensure clarity and accuracy by structuring the receipt logically. Organize the information so that the most important details, such as rental item description, payment amount, and return date, stand out clearly.
Provide space for additional notes if needed. This allows you to include any special terms or conditions that may apply to the rental, ensuring transparency and avoiding confusion.
Consider mobile-friendly design to make sure the template adapts well to both printed and digital formats. Use a simple layout that displays correctly on smaller screens without losing readability.
Ensure all key details, like rental terms and conditions, are clear and unambiguous. Avoid vague language that can lead to confusion. Always specify the rental period, payment details, and any security deposit requirements in explicit terms.
Incorporate clear headings and subheadings to separate sections of the document. This helps the reader quickly locate relevant information, reducing the chance of overlooking important clauses.
Don’t skip proofreading the document. Spelling and grammatical errors can diminish the document’s professionalism and create potential legal issues. Double-check all figures, dates, and names.
Neglecting to include clauses that cover damage, repairs, or early termination can result in disputes. Address these scenarios specifically so both parties understand their rights and responsibilities.
Avoid using excessive jargon or overly complex language. Simplicity ensures that all parties, regardless of their legal knowledge, can fully understand the terms and conditions. Keep the language concise and straightforward.
Ensure that all signatures, dates, and witness information are included where necessary. Missing signatures or incomplete information can make the document unenforceable in some cases.
Track every receipt related to business expenses. Store them digitally or in physical form, and categorize them accurately. This ensures you can reference them during tax filing or audits.
Keep Receipts Organized

Create folders or digital files for each category of expense. For instance, keep all utility bills in one place and office supplies in another. This system reduces the time spent searching for receipts later.
Label Receipts Clearly

- Label the date and the amount spent on each receipt.
- Note the purpose of the expense, such as office supplies or client entertainment.
- Keep track of the payment method (credit card, cash, etc.).
Labeling helps distinguish between personal and business expenses, making tax deductions easier.
Use Receipts to Claim Deductions
Tax authorities require proof of business-related expenses. Use receipts to substantiate claims for deductions, such as travel costs, meals, and supplies. Keeping accurate records minimizes the risk of errors or disputes during audits.
Store Receipts for Record-Keeping

- Keep receipts for at least three years, or as long as your local tax regulations require.
- For digital receipts, use a secure cloud service for easy access and long-term storage.
Maintain a balance between digitized and physical copies to ensure you have multiple formats if needed for verification or tax preparation.
For a clear and professional rental receipt, focus on these key elements:
- Rental Details: Include the item name, quantity, and rental period (start and end dates).
- Payment Information: State the rental amount, any deposits, and the payment method used.
- Party Information: Add the names and contact information of both the renter and the rental company.
- Terms and Conditions: Briefly outline rental policies such as late fees or item care requirements.
- Signature Section: Provide space for both parties to sign, confirming the rental agreement.
Template Tips
- Ensure clear formatting: Use bullet points or tables for easy reading.
- Be precise with dates and amounts to avoid future disputes.
- Use professional language to reflect the seriousness of the transaction.