If you’re looking to streamline your restaurant’s billing process, adopting a North American restaurant receipt template is an excellent solution. These templates provide a simple structure that meets the expectations of both customers and tax authorities, ensuring your receipts are clear and accurate.
A good receipt template should feature key information such as the restaurant’s name, address, and contact details, as well as the date and time of the transaction. Listing all ordered items with corresponding prices, taxes, and total amounts is also a must. This not only improves transparency but also helps reduce errors during payment processing.
By using a template, you also ensure consistency across receipts, which builds trust with your customers. It eliminates confusion and makes it easier for your team to handle transactions quickly, reducing wait times and increasing customer satisfaction. Customization options allow you to adjust the design to match your restaurant’s branding, offering a professional look while maintaining practicality.
Overall, a well-structured receipt template not only simplifies operations but also enhances the customer experience, making it a small but powerful tool in running a successful restaurant.
Here’s a refined version to avoid redundancy and maintain clarity:
Use concise labels for each section in the receipt template. Instead of overly detailed descriptions, include clear headings such as “Itemized Charges” or “Subtotal” to avoid confusion. Break down all applicable taxes separately for transparency, but ensure that the breakdown is not overly verbose. A simple “Sales Tax” field is sufficient, along with the calculated amount below.
Avoid using terms that repeat throughout the document, such as “total amount due” in different places. Stick to one mention under a clearly marked section titled “Total,” with a single line indicating the full amount to be paid.
Ensure a clean, uncluttered layout with easily readable fonts and sufficient spacing. This helps customers easily identify critical details without feeling overwhelmed by too much text. If there are any additional fees or discounts, list them in a separate section to highlight these charges distinctly.
For customization, consider including a space for the server’s name or a reference number to identify the transaction, but avoid making these elements overly prominent. Simple additions can enhance the receipt’s functionality without overloading it with excessive information.
- Key Information to Include on a North American Restaurant Receipt
Make sure the receipt includes the restaurant’s name, address, and contact details. This is necessary for customers who may need to reach out for any reason. You should also display the date and time of the transaction to clarify when the purchase occurred.
List the items ordered, with clear descriptions and prices for each, to ensure transparency. It’s helpful to break down the taxes applied to each item, and include the applicable sales tax rate to show customers how the final total is calculated.
Include the subtotal of the meal and the total amount paid, indicating any discounts or promotions applied. If a tip was added, list it separately to make sure it is clear that it was voluntarily given or added by the restaurant.
Finally, provide an order or transaction number for reference. This will help both the customer and restaurant staff locate the transaction quickly in case of follow-up.
Choose a clean, easy-to-read font like Arial or Helvetica. Keep the font size large enough to be readable but not too overwhelming–around 10 to 12 points works well. Use a good contrast between text and background, ensuring that the receipt doesn’t become hard to read due to poor contrast. Avoid overly fancy fonts or decorative elements that could reduce legibility.
Organize the information in a logical order. Start with the restaurant name and contact details at the top. Follow this with the date, time, and server’s name or ID number. Clearly separate items on the menu, their quantities, prices, and any discounts or promotions applied. The subtotal, taxes, and total amount should be grouped together in a bold, clear section at the end of the receipt.
Ensure sufficient spacing between the lines to avoid clutter. A well-spaced receipt with distinct sections makes it easier for customers to locate important details like the total amount, payment method, and tipping information. Use lines or boxes to separate different sections for better structure.
Include a clear payment method section to indicate whether the customer paid by credit card, cash, or other methods. If they paid by card, display the last four digits of the card number for reference, along with any tips added at the time of payment.
Finally, test your receipt design for legibility by asking others to read it. Adjust the layout if necessary, ensuring all details are easy to find and understand. A well-designed receipt not only enhances customer experience but also reduces the likelihood of confusion or disputes.
Receipts should be customized based on the payment method used. Each payment type requires specific details to ensure clarity and transparency for both the customer and the business. For card payments, include the last four digits of the card number and the type of card used (Visa, MasterCard, etc.). If the transaction was made via a digital wallet, display the wallet name (Apple Pay, Google Pay) and the method of authentication, such as fingerprint or face recognition.
Cash Payments

For cash transactions, note the total amount tendered and the change provided. This ensures that the customer can verify the amount paid and understand any discrepancies. You can include a simple note such as “Paid with cash” to avoid confusion.
Split Payments
In cases where customers split the bill across different methods, make sure to clearly list the amounts charged to each method. Break down the total into payment categories, whether it’s part cash, card, or digital wallet, making it easy to track the distribution of the payment.
Digital receipts provide a streamlined option for both customers and restaurants. By sending receipts directly to a customer’s email or mobile device, you reduce paper waste and save on printing costs. Digital receipts also allow customers to easily track their purchases, and some systems can integrate with loyalty programs to offer added benefits like rewards or discounts.
Paper receipts, while less environmentally friendly, offer tangible proof of purchase. Some customers prefer paper receipts for personal records or as a backup if they don’t have easy access to email or mobile devices. Additionally, paper receipts can be handed directly to the customer at the point of sale, which eliminates the need for Wi-Fi or email communication, ensuring instant delivery.
Advantages of Digital Receipts

Digital receipts offer long-term storage without taking up physical space. Businesses benefit from reduced overhead costs related to paper, ink, and printer maintenance. These receipts are easily searchable, making it simple for customers to locate past purchases. For restaurants with high foot traffic, digital receipts also minimize wait times, as the transaction process becomes faster without the need for paper processing.
Advantages of Paper Receipts

Some customers feel more secure with paper receipts, especially if they are concerned about data privacy. Paper receipts also don’t rely on internet access, ensuring reliability in any situation. They’re also more commonly accepted for refunds or returns, making them a preferred option in specific scenarios.
Choosing between digital and paper receipts will depend on your restaurant’s operations, customer preferences, and environmental goals. Many establishments opt for a hybrid approach, offering customers the choice of either a digital or paper receipt, to accommodate various needs.
Restaurant receipts in North America must comply with specific legal and tax standards. They should include all necessary details for both consumers and tax authorities. Each receipt should list the total amount paid, applicable taxes, and any tips provided. Here’s a closer look at the core legal and tax elements required in receipts across different regions:
| Element | Requirement |
|---|---|
| Business Information | Must include the name, address, and contact information of the restaurant. |
| Itemized List | Must clearly list each item purchased, including its price before tax. |
| Sales Tax | Sales tax must be displayed separately based on the local tax rate. Some states and provinces may also require a breakdown of the tax by item. |
| Tips/Gratuity | If applicable, tips must be clearly stated. Some areas mandate automatic tips for larger parties. |
| Refund/Return Policy | Restaurants may be required to inform customers about refund or return policies, especially for food-related purchases. |
Failure to meet these requirements can lead to fines or legal complications. It’s crucial for restaurant owners to stay informed about regional tax rules and adjust receipt formats accordingly. Receipts play a significant role in supporting accurate tax reporting, both for the restaurant and its customers. Always keep receipts for at least a few years in case of an audit, as some jurisdictions require retention of financial records for extended periods.
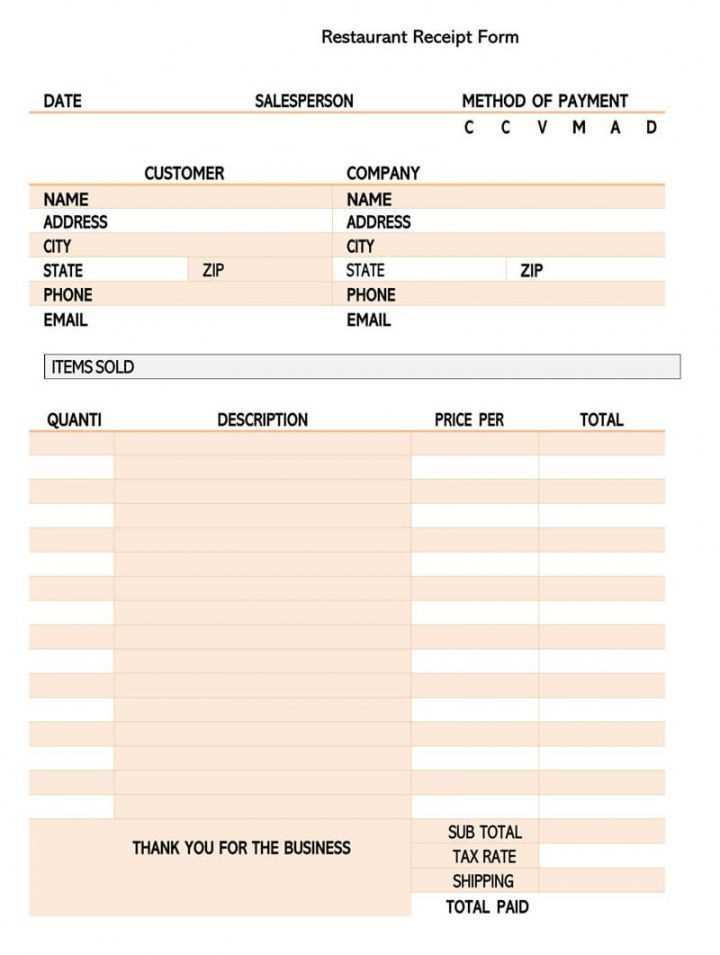
Use a clean, simple design to make the receipt easy to read and understand. A restaurant receipt template should include clear sections for customer details, items ordered, and payment breakdown. Follow these guidelines to ensure your receipt is both functional and user-friendly:
Structure of a Receipt

- Header: Include your restaurant name, logo, address, and contact information at the top. This helps customers easily identify the source of the receipt.
- Order Details: List each item ordered with descriptions, quantity, and price. Separate food and beverage items to avoid confusion.
- Payment Summary: Clearly show subtotal, taxes, any discounts or promotions applied, and the final total. Highlight the payment method (credit card, cash, etc.) for reference.
- Footer: Include a thank-you message, business hours, or a feedback request to encourage customer engagement.
Design Tips
- Font Choices: Use legible fonts like Arial or Helvetica. Avoid using too many different fonts or sizes to keep the design clean.
- Alignment: Align text to the left for a more traditional and easy-to-read format. Keep everything organized and avoid overcrowding sections.
- Spacing: Ensure adequate spacing between sections for clarity. This reduces clutter and makes it easy to find key information at a glance.