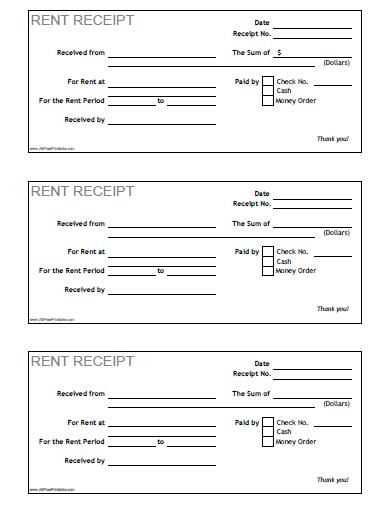
To create a professional online contribution receipt, start by including the contributor’s name, the amount donated, and the date of the transaction. Make sure to add a clear description of the purpose or campaign the contribution is supporting. The receipt should also have a unique reference number for easy tracking.
Structure your receipt with clarity: Include the following fields: contributor’s contact details, the payment method used, the donor’s tax status (if applicable), and any additional notes that help clarify the contribution. Use a straightforward format that minimizes confusion, ensuring all necessary information is easily accessible.
Don’t forget to provide a thank-you note at the bottom of the receipt. A short message expressing appreciation helps strengthen the relationship with your donors and encourages future support. Ensure the tone remains formal yet warm, conveying gratitude without being overly casual.
Online Contribution Receipt Template
For creating a clear and functional online contribution receipt template, ensure it includes the following details:
| Section | Details |
|---|---|
| Donor Information | Full name, contact details (email or phone), and address if required. |
| Contribution Amount | Specific amount donated, including currency. |
| Contribution Date | Exact date of the transaction. |
| Payment Method | Method used for the donation (credit card, PayPal, bank transfer, etc.). |
| Transaction ID | Unique identifier for the payment or receipt number. |
| Organization Details | Full name of the organization, tax ID number (if applicable), and contact information. |
| Thank You Message | A brief note acknowledging the donor’s generosity. |
Ensure the template is easy to read and can be printed or saved as a PDF. Add a clear heading, such as “Contribution Receipt,” to make it easily identifiable. Consider providing a “Receipt Confirmation” link or option in the email or on the website for convenience.
Customizing the Layout for Digital Donations
Choose a clean, intuitive design that highlights key donation details. This ensures users focus on the necessary information without distractions. Place essential sections such as donor name, amount, and transaction date in a prominent position on the receipt.
Organize Information Clearly
- Separate donor details from the donation summary to maintain clarity.
- Include a thank-you message at the top, directly after the donor’s name, reinforcing the importance of their contribution.
- Make the donation amount stand out by using bold text or a larger font size.
- Provide payment method details to give transparency on the transaction process.
Use Visual Hierarchy to Guide the User
- Ensure headings are larger than body text to guide the eye to important sections.
- Use a simple color scheme that aligns with your organization’s branding, but avoid overwhelming the recipient with too many colors.
- Integrate icons or symbols to represent the donation type or payment method for quick recognition.
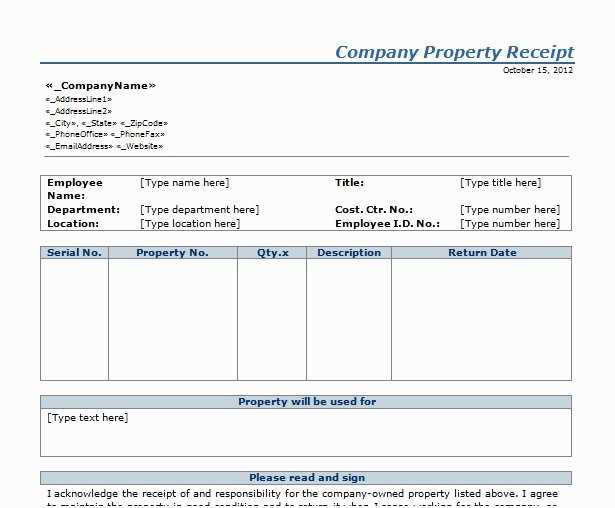
Key Information to Include in Your Template
Include the donor’s full name and contact details at the top of the receipt. This information ensures clear identification in case of any follow-up queries.
Donation Amount and Currency

Specify the exact amount donated along with the currency used. This step prevents confusion, especially when donations may be made in different currencies.
Date and Time of Donation

Document the date and time when the donation was made. This is crucial for record-keeping and tax purposes, as it helps link donations to specific timeframes.
Clearly mention the type of donation, whether it was monetary, material, or other. This distinction is important for accurate reporting and processing.
Ensure your receipt includes a statement about the non-refundable nature of the contribution, if applicable, to set expectations for the donor.
Formatting Tips for Easy Readability
Use clear and legible fonts. Stick to standard, easy-to-read fonts like Arial, Helvetica, or Times New Roman. These are widely available and ensure your receipt looks professional across devices.
Keep your text size consistent. Use a larger font for headings, and a smaller one for the body text. This creates a visual hierarchy and helps users quickly find what they need.
Apply enough spacing between lines and sections. Adequate white space improves the visual flow and makes the document less overwhelming. Use margins and padding effectively to separate key information.
Align text consistently. Left-align most of your text to make reading easier, but right-align amounts or totals for a neat, organized look. Avoid centering blocks of text, as it can disrupt flow.
Break content into digestible chunks. Use bullet points or numbered lists for itemized information, like item descriptions or payment details. This method reduces clutter and enhances clarity.
Include bold or italicized text sparingly to highlight key details such as dates, amounts, or order numbers. Too much emphasis can make the document look chaotic.
Choose a clean layout. Use a grid structure with clearly defined sections, like sender and recipient details, transaction summary, and footer. This helps readers navigate the content with ease.
Double-check for consistency. Ensure your date, time, and number formats are uniform throughout the receipt. This includes currency symbols, decimal points, and separators.
Ensuring Security and Privacy in Receipts
Encrypt all sensitive information within the receipt. Implement SSL encryption for online forms to protect data transmission, ensuring that personal details and payment methods remain confidential. Regularly update encryption protocols to adhere to the latest security standards.
Protect Personal Data
Minimize the collection of unnecessary personal details. Only request essential information, such as email addresses for receipt delivery. Avoid storing payment card details, relying on third-party payment processors to handle financial transactions securely.
Ensure Access Control

Limit access to receipt data through secure authentication methods. Use two-factor authentication (2FA) for both customers and administrators. Audit access logs regularly to monitor unauthorized attempts to retrieve sensitive information.
How to Automate the Receipt Generation Process
Use automated tools to simplify the process of generating receipts. Set up a system that triggers receipt creation once a transaction is completed. This can be done through integrations with payment processors or ecommerce platforms.
- Integrate with Payment Systems: Many payment processors offer APIs that can be linked directly to your website. These APIs can automatically generate receipts upon transaction confirmation, reducing manual effort.
- Use Receipt Template Software: Customize receipt templates in advance. Many tools allow you to create templates with dynamic fields (e.g., name, date, amount). These can be populated automatically with transaction data from your payment system.
- Set Up Automated Email Delivery: Once a receipt is generated, configure your system to send it to the customer immediately. Use email marketing or CRM software to trigger this action after each payment is processed.
- Test for Accuracy: Automate quality checks. Before fully automating, run several test transactions to ensure all information appears correctly, including customer details and payment amounts.
- Implement Cloud Storage: Store receipts in a cloud database. This makes it easy to retrieve and manage receipts at any time, ensuring both you and your customers have access to their records when needed.
Automating receipt generation reduces time and effort, eliminates human error, and improves the overall customer experience. With the right tools and integrations, you can streamline this process significantly.
Common Mistakes to Avoid When Creating Templates
Ensure your template is user-friendly. Avoid cluttering the design with unnecessary elements that distract from the core message. Keep it simple and focused on the key information you need to convey.
1. Overloading with Information

Don’t try to fit everything into one template. Too much information can overwhelm the user. Break it down into sections, and use clear headers for each part to help guide the reader’s eye.
2. Ignoring Mobile Compatibility
Neglecting mobile responsiveness can leave users frustrated. Ensure your template adapts well to different screen sizes, especially for people accessing the template on their smartphones or tablets.
Another common error is not testing the template thoroughly. Always check how it looks in different browsers and on different devices. This way, you catch any potential layout issues before it’s used.