Use a payment rent receipt template to streamline your rent transactions and avoid misunderstandings with tenants. A receipt not only acts as proof of payment but also ensures transparency in rental agreements. Whether you’re a landlord or tenant, this simple document can save you time and effort by keeping your records clear and organized.
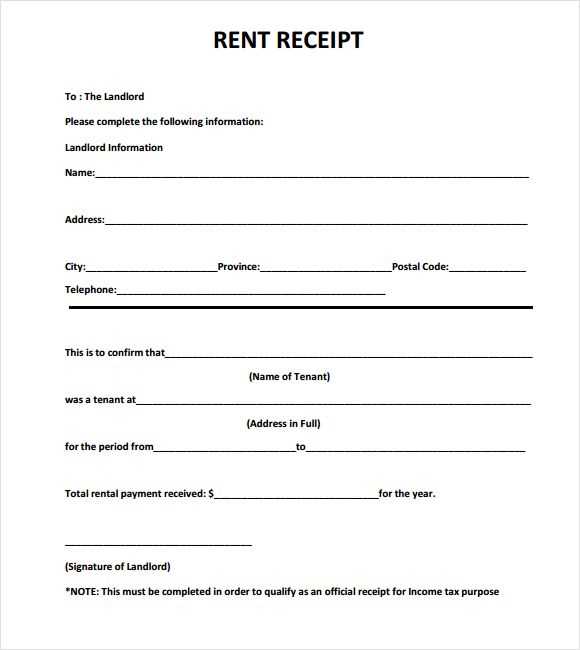
Start with the basic components: tenant and landlord information, rental property details, payment amount, and date of payment. Ensure the receipt includes a unique receipt number for easy reference, especially when handling multiple tenants or properties. This helps both parties track payments efficiently.
For added clarity, include payment methods such as cash, check, or online transfer. This minimizes confusion about how payments were made and ensures proper documentation. Don’t forget to state whether the payment is for rent, late fees, or other charges.
A well-organized payment receipt template will prevent disputes and improve the rental experience. It’s a small step that makes a big difference in maintaining good landlord-tenant relationships.
- Payment Rent Receipt Template
A well-structured rent receipt template includes several key components to ensure clarity and proper documentation. Begin by including the date of payment at the top of the receipt. This helps both parties track the transaction effectively. Add the tenant’s name, address, and contact information. Similarly, include the landlord’s details for reference. It’s important to clearly specify the rental period covered by the payment (e.g., February 2025). This ensures that both the landlord and tenant agree on the timeframe for the transaction.
Include the payment amount in both numerical and written form to avoid any confusion. Break down the rent total if additional charges or fees are involved (e.g., utilities, maintenance fees). This adds transparency to the payment process. Clearly state the payment method, whether cash, check, or electronic transfer, along with any relevant transaction or check number.
Conclude the receipt with a statement confirming that the payment has been received in full. Include a signature section for the landlord or authorized representative. This adds an extra layer of verification for both parties. You may also want to add a space for the tenant’s acknowledgment, though this is not always necessary. A well-designed rent receipt template ensures smooth communication and avoids future misunderstandings between landlords and tenants.
To create a straightforward rent receipt template, follow these steps:
- Include the Date: Start with the date the rent payment is received. This helps both the tenant and landlord track payments.
- Tenant and Landlord Information: Add the tenant’s full name and the landlord’s details, including the contact information of both parties.
- Payment Amount: Clearly state the amount of rent paid. Mention the currency and any additional charges or fees if applicable.
- Payment Method: Indicate the payment method used–whether by cash, check, bank transfer, etc. This ensures transparency about how the transaction was made.
- Rental Property Address: Include the full address of the rental property being paid for to avoid confusion, especially in case of multiple properties.
- Rental Period: Specify the start and end dates of the rental period for which the payment is being made, e.g., February 1 – February 28.
- Receipt Number: Assign a unique receipt number for reference. This is useful for both the landlord and tenant for future inquiries.
- Signature: Provide a section for the landlord or property manager to sign, confirming the receipt of the payment.
By including these elements, the template will serve as a clear, professional record of the payment. Make sure the layout is simple and easy to read for both parties.
Provide the full address of the rental property. This ensures clarity and avoids any confusion, especially if the tenant rents more than one property or has a shared address.
State the tenant’s name. This identifies who made the payment and links the receipt to the individual responsible for the rent.
Include the payment date. This marks the day the transaction was processed, establishing a clear record of the payment timeline.
List the rental period covered by the payment. Indicate the start and end dates of the period for which the rent payment is made. This prevents disputes over the payment period.
Specify the total amount paid. This figure should match the rent due for the period and be easy to reference for both parties.
If applicable, outline any additional charges such as late fees, utilities, or repairs. Itemizing these charges prevents ambiguity regarding the total payment amount.
Example of a Rent Receipt Table
| Details | Information |
|---|---|
| Tenant Name | John Doe |
| Property Address | 123 Main St, Apartment 4B |
| Payment Date | February 4, 2025 |
| Rental Period | January 1, 2025 – January 31, 2025 |
| Total Rent Paid | $1,200 |
| Additional Charges | $50 (Late Fee) |
Include a payment method, whether it’s cash, cheque, or bank transfer. This confirms the transaction method and provides a record of how the payment was made.
Provide the landlord’s or property manager’s signature or printed name. This adds authenticity to the receipt and verifies that the payment was officially acknowledged.
Use a clear and structured layout to make the rent receipt easily understandable. Start by including the name and address of the landlord or property management company at the top, followed by the tenant’s information. This ensures both parties are clearly identified from the outset.
Make sure the receipt is dated with both the date of payment and the date the receipt is issued. This helps track payments accurately and avoid any confusion over missed or late payments.
Include a unique receipt number for each transaction. This helps to keep records organized and makes referencing payments easier in case of any disputes.
Clearly state the amount paid, the payment method (cash, check, bank transfer), and the payment period it covers. This ensures both parties have a record of what has been paid and for what period, reducing potential conflicts later.
Provide a breakdown if necessary. For instance, if the rent includes utilities or other charges, list them separately. This keeps things transparent and avoids ambiguity about the total payment.
Use legible fonts and adequate spacing. Ensure the text is easy to read by choosing a standard font size and maintaining appropriate margins. This small detail helps ensure clarity, especially when receipts are printed or stored digitally.
Finally, add a section for signatures. While not always required, both landlord and tenant signatures can help validate the receipt, providing extra security for both parties in the case of disputes.
To customize a rent receipt based on the payment method, ensure you clearly specify the payment mode used by the tenant. Each method has distinct details that should be reflected in the receipt for accuracy and transparency.
Cash Payments
For cash payments, include the exact amount paid in cash, the date of the payment, and a signature or initials from the landlord as proof of transaction. Add a statement like “Paid in cash” to avoid ambiguity. If possible, provide a unique reference number to track the payment in case of any future inquiries.
Bank Transfer or Check Payments
If the payment was made through a bank transfer or check, include the transaction reference number or check number, as well as the bank details or the issuing bank name for clarity. Mention the date of the transfer and any fees that may have been involved, if applicable.
For credit card or online payments, include the last four digits of the card or transaction ID to provide more specific information. This is helpful for both the landlord and the tenant to verify the payment method without exposing full account numbers.
By adding these specifics to your rent receipt, you ensure that tenants have a clear record of their payments, tailored to the method used, while helping you maintain proper documentation for your records.
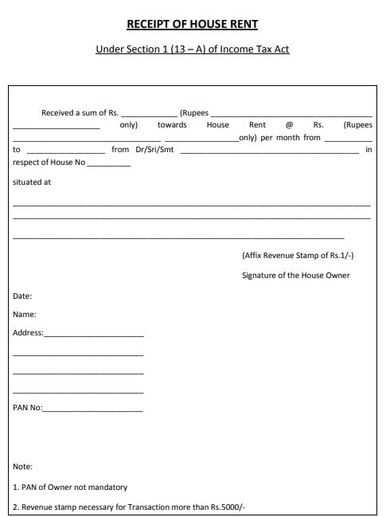
In some jurisdictions, landlords must issue a rent receipt to tenants as part of their legal obligations. This receipt serves as proof of payment and protects both parties in case of disputes. The required details on a rent receipt vary by location, but common elements include the tenant’s name, the landlord’s name, the rental period, the payment amount, and the date the payment was made. Some areas also require a written acknowledgment of the payment method used (e.g., cash, check, or bank transfer).
In the United States, the rules for rent receipts can differ by state. For example, in California, landlords must provide receipts if the tenant pays in cash. In New York, the law mandates rent receipts for cash payments above a certain amount, but it is not a requirement for checks or electronic payments unless the tenant specifically requests one.
In the UK, landlords are encouraged to issue receipts, particularly if rent is paid in cash. While not always legally required, tenants are advised to request a receipt to ensure they have proof of payment. In some areas, a landlord could face legal consequences for failing to provide a receipt when requested.
In Australia, the situation varies depending on the state or territory. For instance, in New South Wales, landlords must provide a receipt for any rent paid, unless the rent is paid electronically and can be verified through bank records. Other states, like Victoria, have similar requirements, emphasizing the importance of clear documentation for any form of rent payment.
It is advisable for landlords to consult local regulations to ensure compliance with specific legal requirements. By providing a rent receipt that contains all necessary information, landlords can prevent misunderstandings and maintain clear financial records. Tenants should also keep their receipts in a safe place, as they may be required for future reference or legal purposes.
For creating rent receipt templates quickly and efficiently, a variety of tools and software are available. These platforms streamline the process, offering customizable options and ease of use.
1. Google Docs and Microsoft Word
- Both platforms offer pre-designed templates that can be customized with tenant details, rental amounts, and payment dates.
- Google Docs provides cloud access, allowing you to create and share receipts on the go, while Word integrates seamlessly with Microsoft 365 for easy editing and sharing.
- Free to use, and they allow full control over the format and layout, making them versatile options for landlords.
2. Rentec Direct
- This property management software includes automated rent receipt generation, eliminating the need for manual input each time.
- It automatically tracks payments, providing a detailed and accurate rent receipt for each transaction.
- Ideal for property managers handling multiple properties, Rentec Direct integrates payment history and other financial data in one easy-to-use interface.
3. QuickBooks
- QuickBooks is a robust accounting tool that not only generates rent receipts but also tracks income, expenses, and tax deductions for landlords.
- It offers customizable templates for receipts and provides detailed financial reports, making it an all-in-one option for landlords who need both invoicing and accounting features.
4. Zoho Invoice
- Zoho Invoice provides a range of templates that can be used for rent receipts, which can be customized to fit specific needs.
- This tool also supports automatic invoicing, making it easier to create and send receipts to tenants without delay.
- It offers multi-currency and multi-language support, making it a great option for international landlords.
5. Rentec Direct
- Specialized for rental property management, Rentec Direct generates automated rent receipts, saving you time while ensuring accuracy.
- It offers customizable templates and tracks payment history, ensuring tenants receive proper documentation for their payments.
Key Components of a Payment Rent Receipt
Ensure that your payment rent receipt template includes the following critical details for clarity and record-keeping:
1. Tenant Information
Include the full name of the tenant, as well as their contact information. This helps confirm who made the payment and avoids any confusion about the parties involved.
2. Property Details
Specify the property address where the payment is being made. This identifies the rented property and links the transaction to the correct lease agreement.
3. Payment Details
List the amount paid, the payment method used (cash, check, bank transfer, etc.), and the date the payment was received. It’s also helpful to provide a reference number for the payment (if applicable) to make tracking easier.
4. Period Covered
Indicate the rental period the payment applies to, such as “January 2025 rent” or “for the period from January 1, 2025, to January 31, 2025.” This ensures both parties are clear on the exact period the payment covers.
5. Landlord’s Details
Include the name and contact information of the landlord or property manager. This helps establish who is accepting the payment and provides a point of contact for any questions or issues.
6. Signature (Optional)
Though not always required, it’s often a good idea for both the landlord and tenant to sign the receipt. This adds an extra layer of confirmation to the transaction.
By following these points, you create a clear, professional, and useful payment rent receipt template that benefits both parties involved in the rental agreement.