Ensure your real estate transactions are well-documented with a clear, professional sales receipt template. This template allows you to accurately record the details of the sale, including buyer and seller information, property description, payment terms, and the final amount paid. With a well-structured receipt, both parties have a transparent record of the transaction.
Include essential details such as the buyer’s name, the seller’s contact information, and a complete property description. Make sure to specify the payment method and whether the amount is paid in full or partially. If there are any additional conditions, include them clearly to avoid misunderstandings.
By using this template, you streamline the process and provide both parties with a document that is easy to refer to if any questions arise later. A clear receipt ensures both buyer and seller have a mutual understanding of the agreed-upon terms.
Real Estate Sales Receipt Template

Use a real estate sales receipt template to record property transactions clearly and accurately. Begin by including the property details: address, type of property, and any other distinguishing features. Ensure the buyer and seller names, along with contact information, are included to prevent misunderstandings.
Key Components
Include the transaction date, total amount paid, and payment method (e.g., check, bank transfer). Be specific with the payment breakdown: deposit amount, closing costs, and any additional fees. If applicable, note the escrow account information.
Legal Considerations
Make sure both parties acknowledge the transaction with signatures. Clearly state any terms, such as contingencies or warranties, to avoid future disputes. It’s helpful to have a section for additional notes, such as pending actions or outstanding conditions that need to be resolved post-sale.
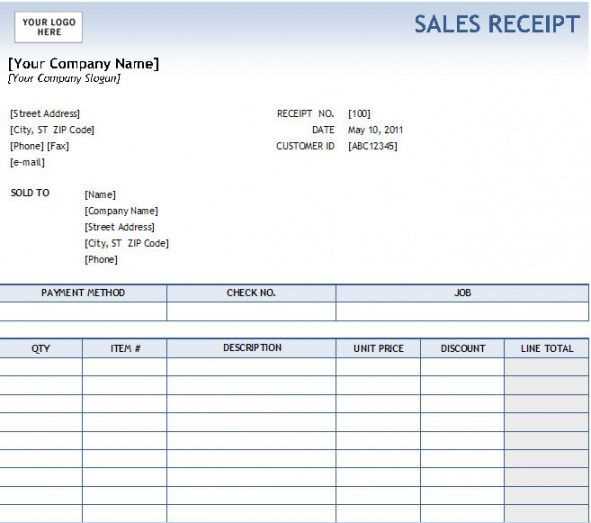
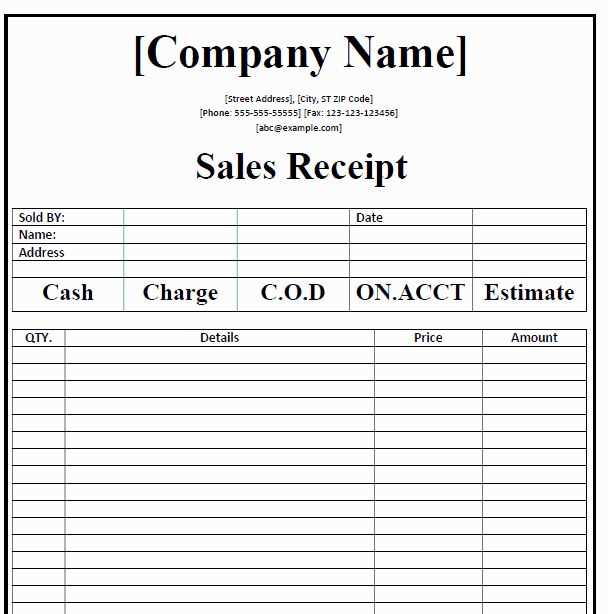
Customizing the Header Section
Begin by incorporating the business name, address, and contact details prominently in the header. This ensures that clients can quickly identify the source of the receipt. Position the business name in a larger font, making it stand out, while placing the contact information beneath it in smaller, easy-to-read text.
Logo Integration

Consider adding the company logo on the left or right side of the header. A simple, clear logo can enhance brand recognition without overpowering the other information. Make sure the logo’s dimensions fit well with the overall layout to maintain balance.
Date and Receipt Number
Place the transaction date and receipt number near the top-right corner for easy access. These two elements are critical for both record-keeping and reference purposes, so ensure they are visible but not distracting from the primary header content.
Incorporating Buyer and Seller Information
Ensure that both parties’ details are clearly stated, including full names, addresses, and contact information. This establishes transparency and makes communication easier. List the buyer’s and seller’s full legal names as they appear on official documents. For addresses, include both mailing and physical addresses if applicable, as well as phone numbers or emails for quick follow-up. If any entity is involved (such as a business), include the legal business name and its representative’s contact details.
Be specific when noting the role each party plays. For example, label the sections as “Buyer Information” and “Seller Information” to avoid confusion. If applicable, include buyer’s financing details or loan information if it pertains to the transaction. For the seller, ensure that property ownership information is accurate and fully detailed to confirm their authority to sell.
Detailing Property Description
Clearly describe the property to avoid confusion. List the number of rooms, including bedrooms and bathrooms, and specify their dimensions. Mention the property’s total square footage and include any additional features like a garden, balcony, or garage. Be specific about the materials used in construction or finishes such as hardwood flooring or marble countertops.
Property Features

| Feature | Description |
|---|---|
| Bedrooms | 3, spacious with built-in wardrobes |
| Bathrooms | 2, modern with walk-in showers |
| Living Area | Open plan, 500 sq ft with large windows |
| Kitchen | Fully equipped, stainless steel appliances, granite countertops |
| Parking | Private garage for 2 cars |
Additional Considerations
Highlight any unique selling points, such as recent renovations or energy-efficient features. If the property is in a desirable neighborhood or close to important amenities, mention that as well. Always include any ongoing maintenance or improvements that could increase value in the future.
Calculating the Payment Amount
To determine the correct payment amount, first, identify the total sale price of the property. Then, subtract any applicable down payments, discounts, or credits. If the buyer is financing, calculate the loan amount by deducting the down payment from the total price.
For transactions with interest, include the total interest on the loan over the payment term. This can be calculated using the interest rate and the duration of the loan. Add the interest amount to the loan principal to get the final amount owed by the buyer.
If taxes or fees apply, calculate these based on the local tax rates and any specific fees related to the sale. Ensure that these amounts are added to the payment total to reflect the true cost to the buyer.
For clarity, list the breakdown of all components–sale price, down payment, taxes, fees, loan amounts, and interest–in the receipt. This helps avoid confusion and ensures transparency in the transaction.
Listing Terms and Conditions
Clarify the property details, including the address, square footage, and specific features. List the sale price and any other associated costs like closing fees, taxes, or HOA dues. Specify whether the listing is contingent on financing, inspections, or any other requirements. Clearly define the buyer’s and seller’s responsibilities regarding inspections, repairs, and any other post-sale activities.
Outline the offer and acceptance process. Detail how offers will be submitted and the timeline for responses. Set forth the conditions under which the listing can be withdrawn or modified, and describe how any changes to the listing will be communicated.
Include the terms for earnest money deposits, including the amount, due date, and conditions for refund or forfeiture. Provide a clear explanation of the inspection period, including any deadlines for scheduling or completing inspections and the procedures for handling discovered issues.
Including Legal Clauses and Signatures
Ensure all legal clauses are clearly outlined and mutually agreed upon in the document. This provides both parties with legal clarity and protection in the transaction. Include details such as the agreed-upon price, payment method, and the transfer of ownership terms.
Key Legal Clauses to Include

- Condition of the property at the time of sale.
- Disclosure of any property defects or encumbrances.
- Contingencies, such as financing or inspections.
- Any warranties or guarantees offered by the seller.
- Responsibilities for taxes and closing costs.
Signature Section

Ensure both buyer and seller sign the document. These signatures confirm their understanding and agreement to the terms. Include spaces for full names, dates, and witness signatures, if applicable. It is also advisable to have the document notarized for additional legal validity.