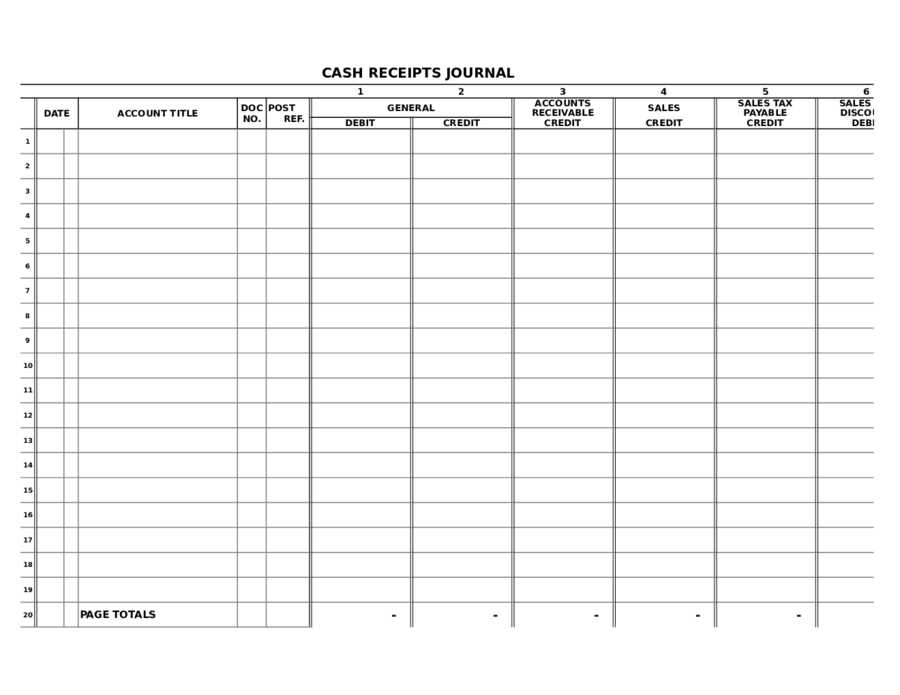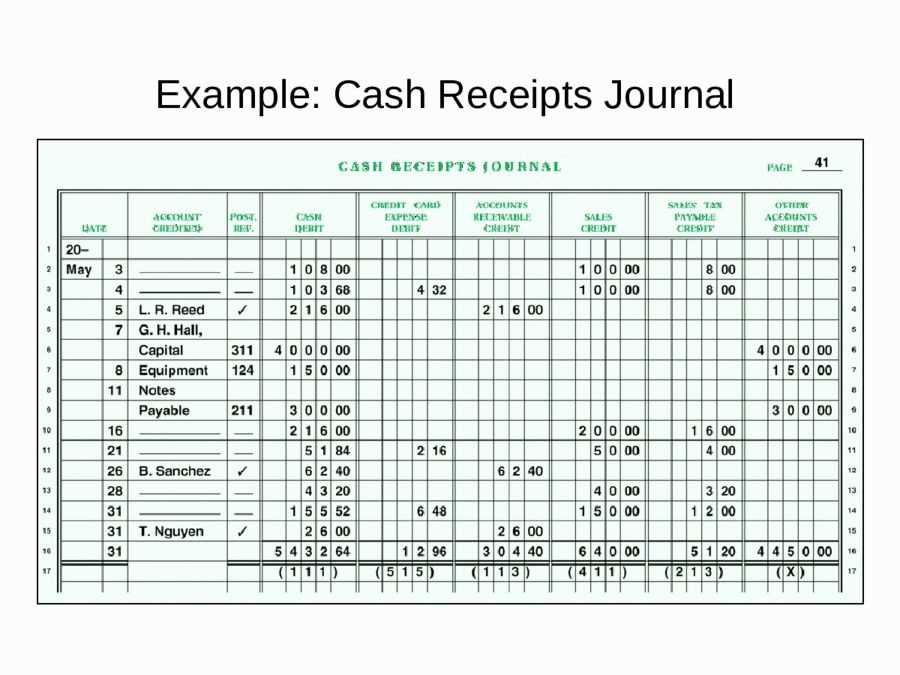
Track your cash transactions with ease using a simple and organized cash receipts journal template. This tool will help you keep a record of each payment received, providing clarity and accuracy in your financial management.
In your template, include columns for the date, description of the transaction, amount received, and the method of payment. A well-structured template simplifies the process of maintaining accurate records and helps avoid errors that can occur in handwritten journals.
Using a printable version allows for easy customization. Adjust the columns or add specific sections relevant to your needs, such as client names or payment references. The flexibility of a printable template ensures it fits various business requirements.
Free Printable Cash Receipts Journal Template
Using a printable cash receipts journal template helps streamline financial record-keeping. These templates provide a clear and structured way to track incoming cash transactions, offering a straightforward approach to managing finances.
Benefits of a Printable Cash Receipts Journal
- Easy organization: Organize receipts by date, amount, and purpose for quick reference.
- Time-saving: With a ready-made template, you avoid the hassle of creating a format from scratch.
- Customizable: Templates can be adjusted to fit specific needs, whether you’re tracking business income or personal transactions.
- Portable: Print and use the template whenever necessary without requiring electronic devices.
How to Use the Cash Receipts Journal Template
- Fill in the date of the transaction.
- Record the name of the payer and the reason for the payment.
- Write the total amount received, and if applicable, include payment method details.
- Keep the template updated regularly to maintain accurate financial records.
With this method, managing cash receipts becomes much more straightforward and less prone to errors, especially when you maintain consistency in entries.
How to Create a Cash Receipts Journal Template
Design a cash receipts journal template by focusing on simplicity and organization. Begin by creating columns for key details: date, description, receipt number, payment method, amount received, and account credited. This structure ensures all necessary information is captured in one place.
Step 1: Choose Your Format

Select a format that suits your needs. You can use a spreadsheet for flexibility, or opt for a table in a word processor for easy printing. Both methods allow quick adjustments for different scenarios, ensuring the template works across multiple situations.
Step 2: Define Key Fields
Each column should serve a distinct purpose. For example, the “date” column captures the transaction date, the “description” gives context for the payment, and the “amount” column lists the cash received. Be consistent in how these fields are used to ensure clarity in record-keeping.
Customizing the Template for Specific Needs
Adjust the categories in the template to match your business or personal requirements. If you need to track more detailed transaction types, add extra columns or rows for categories such as “Discounts” or “Sales Tax.” These additions help provide a clearer view of your finances.
Consider color-coding entries to distinguish between different types of payments or clients. This makes reviewing records faster, especially during audits or when cross-referencing with other documents.
For businesses dealing with multiple currencies, add a column for currency type or exchange rates. This can be essential for accurate bookkeeping if transactions are made internationally.
If your receipts involve various methods of payment, such as credit cards or checks, include separate columns to specify these details. This separation helps when reconciling with bank statements or handling refunds.
Adjust the date format to align with your regional standards or personal preference. You can use MM/DD/YYYY or DD/MM/YYYY to ensure consistency with other financial records.
Modify the template’s layout if needed. If you prefer a more compact version, reduce the number of rows for daily entries. Alternatively, expand the layout to accommodate more extensive records if your transactions are frequent or involve large sums.
Formatting Tips for Easy Use and Clarity

Use clear, distinct headings for each section of your cash receipts journal. Separate columns with enough space, ensuring each entry is easily distinguishable. Keep the font consistent and legible; avoid overly small text or unusual fonts that can make reading difficult.
Organize Your Columns
Label each column clearly: date, description, amount, and payment method. Ensure there is sufficient space for detailed entries, especially in the description section. Using bold text for headings will make them stand out and help users locate specific information quickly.
Color Coding and Shading
Apply subtle shading or color coding to alternating rows for easier tracking. Light colors or soft grays work best without overpowering the content. This technique helps users to scan rows effortlessly and spot entries without straining their eyes.
Best Practices for Recording Cash Transactions
Record each cash transaction immediately after it occurs. This prevents errors and ensures that no transactions are forgotten. Use a structured format to log the transaction, including date, amount, and the involved parties. Always categorize the transaction properly to maintain a clear record of cash flow.
Maintain Accurate Documentation
Keep all receipts and invoices related to cash transactions. These documents serve as proof and can be useful in case of audits or discrepancies. Store them securely, either physically or digitally, ensuring easy access when needed. Cross-check the information in your journal with your receipts regularly to ensure consistency.
Reconcile Regularly
Reconcile your cash receipts journal at least weekly. This helps to detect discrepancies early and correct them before they accumulate. Compare the recorded entries with actual cash on hand and adjust any discrepancies. Regular reconciliation helps maintain an accurate and reliable financial record.
How to Incorporate Date and Amount Columns
To ensure proper tracking and organization, include two key columns in your cash receipts journal: the “Date” column and the “Amount” column. Both are critical for accurate record-keeping and financial reporting.
The “Date” column should clearly reflect when each transaction occurs. Make sure to use a consistent date format throughout the journal, such as MM/DD/YYYY or YYYY-MM-DD, to avoid confusion. This column allows you to sort and filter receipts by date, making it easy to trace any specific transaction.
Next, the “Amount” column captures the monetary value of each transaction. Use a standard currency format, aligning all amounts to the right for easy readability. Separate positive and negative amounts if necessary, using parentheses for withdrawals or expenses. This organization will help prevent errors during reconciliations.
| Date | Amount |
|---|---|
| 01/15/2025 | $200.00 |
| 01/16/2025 | $150.00 |
| 01/17/2025 | ($50.00) |
Align both columns properly for clear visibility. The date column should be placed first, followed by the amount column. This setup ensures your records are straightforward to navigate, whether you’re entering data manually or reviewing the journal later.
Tips for Keeping Your Journal Organized
Use clear headings for each entry to make it easy to locate information. Group similar transactions together to maintain clarity. For example, separate payments from refunds or categorize by client or project.
Regularly update the journal to prevent backlog. Add entries at the end of each day or week to keep the journal current and manageable.
Use a consistent format for all entries, including date, amount, and description. This will help ensure uniformity and prevent confusion.
Consider using color coding or symbols for quick visual references. Assign different colors for various transaction types, such as income, expenses, or refunds.
Review the journal weekly to identify any discrepancies or missing entries. This will help spot errors early on and make corrections before they accumulate.
Limit the amount of space between entries to maintain a clean, organized look. This prevents clutter and makes it easier to track changes over time.


