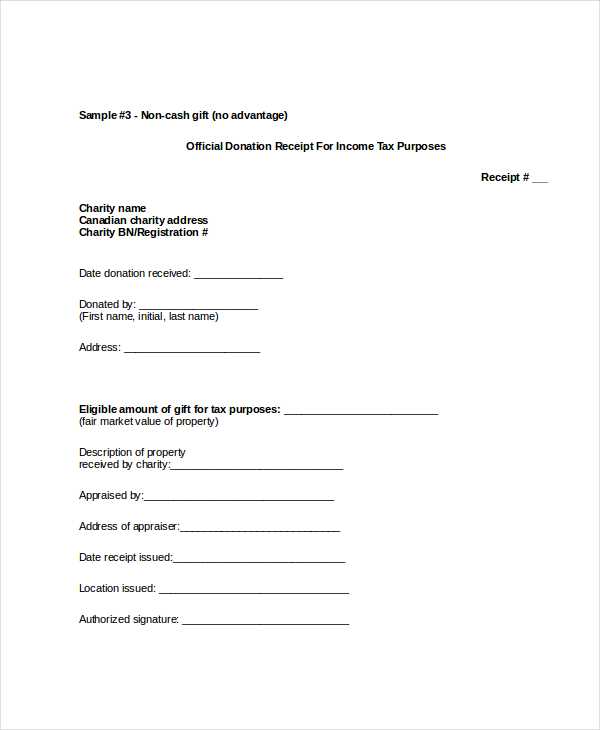
To create a well-structured document receipt template, focus on clarity and organization. Start with a section that clearly states the purpose of the document and identifies the parties involved. Make sure to include fields for the name of the recipient, the date of receipt, and the title or description of the document. This helps avoid confusion and ensures that all details are captured accurately.
Include space for signatures. A receipt template should allow both the recipient and the issuer to sign, confirming that the document has been received. This is critical for record-keeping and validation purposes. Having a designated area for each signature, along with the date, will make the receipt legally binding and clear.
Consider adding a reference number. For larger organizations or projects, a reference number can make it easier to track documents over time. Including a unique identifier helps keep everything organized and simplifies future correspondence about the document.
Lastly, ensure that the layout is simple and user-friendly. A clean, easy-to-read format ensures the receipt can be quickly understood by both parties. Avoid unnecessary information and focus on the essentials to keep the process straightforward.
Here’s the revised version with reduced word repetition:
To enhance clarity, simplify the structure and use varied vocabulary. Replace phrases like “the document” with “this paper” or “the report” to prevent redundancy. Try to limit using the same term consecutively in the same paragraph unless absolutely necessary. For example, if the word “received” is used frequently, swap it with alternatives such as “obtained” or “acknowledged” for variety.
How to Avoid Repetition
Use synonyms or rephrase sentences to maintain flow without repeating words. For instance, instead of “the document was received and the document was signed,” you can say “the document was received and signed.” This keeps the reader’s attention and prevents redundancy.
Keep it Simple
Focus on clarity. Avoid overloading sentences with multiple descriptors. Keep each sentence concise and directly related to the main point. This method will make the document easier to follow and more professional in appearance.
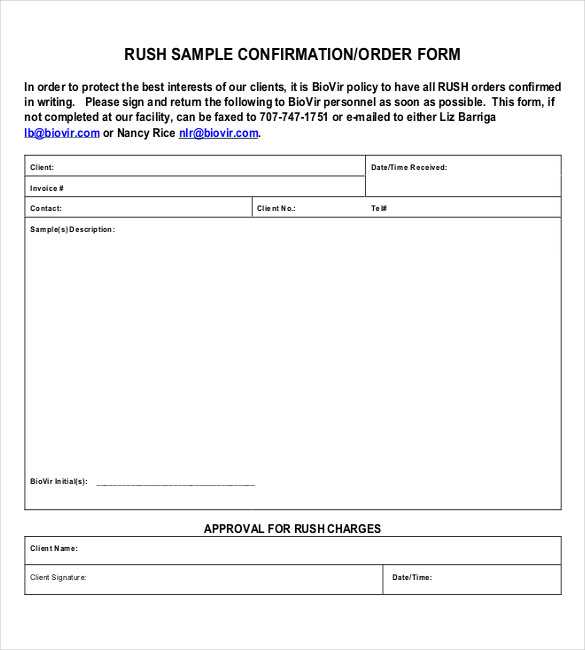
- Template for Document Receipt
To streamline the process of receiving documents, use the following template:
Document Details

Document Title: Specify the name of the document.
Sender’s Name: Write the full name of the sender.
Date Received: Mention the exact date the document was received.
Recipient’s Name: Record the full name of the recipient.
Condition: Indicate whether the document is in good condition or damaged.
Additional Information
Action Required: List any follow-up actions or requirements.
Comments: Add any relevant details or notes regarding the document.
This format ensures all necessary information is captured for a clear and effective document receipt record.
Place your business name and logo at the top of the receipt to make it easily identifiable. This helps customers recognize the source of the transaction immediately.
- Business Name and Logo: Use a clean and readable font for the name and place the logo next to it for branding. Position these elements at the center or left of the header.
- Receipt Title: Clearly label the document as a “Receipt” or “Invoice” to avoid confusion. This should be in a larger, bold font, positioned directly under the business name.
- Receipt Number: Assign a unique receipt number for tracking purposes. Place it near the title or in the top-right corner for quick access.
Contact Information

Include essential contact details, such as your business address, phone number, email, and website. This information should be smaller than the business name but still readable. Place it at the bottom of the header or in a corner for easy reference.
Date and Time

Display the date and time of the transaction prominently. It can be placed near the receipt number or aligned with the header to show when the purchase occurred.
Identification numbers must be clear and distinct to avoid confusion. These numbers should reflect the document’s nature, purpose, and classification, ensuring that users can locate and reference them quickly. Start with a consistent numbering system that matches the document type and organization structure. Below are key factors to consider when selecting an identification number for a document.
Structure and Format

The format of the identification number should include a balance between simplicity and comprehensiveness. Use a combination of alphanumeric characters that provide meaningful information without overwhelming the user. For example, start with a department code, followed by a sequential number, and possibly a date or revision code.
| Example Format | Description |
|---|---|
| HR-2025-001 | Department Code (HR), Year (2025), Sequential Number (001) |
| FIN-001-2022-R1 | Department Code (FIN), Sequential Number (001), Year (2022), Revision (R1) |
Consistency Across Documents
Ensure that the system is consistent across all document categories. Mixing different formats can create confusion and make tracking more difficult. Align the structure to match how the documents are categorized and referenced within your organization, allowing for easy searching and cross-referencing.
By choosing a well-structured and standardized identification system, you simplify document management and improve both accessibility and organization. Avoid using overly complex or vague identifiers that may reduce efficiency in tracking documents over time. Keep it straightforward yet informative to streamline your processes.
Ensure that both the sender and recipient details are clearly outlined. For the sender, include the full name, job title, company name (if applicable), physical address, phone number, and email. If the document is formal, include a signature at the end to verify authenticity. The recipient section should mirror the sender’s format, including their full name, job title, company, and contact details, ensuring accurate information for delivery and communication purposes. Double-check the recipient’s address to avoid any errors in transmission.
Include the preferred method of contact, such as phone number or email address, for both parties. This will prevent any communication delays. If there are specific departments involved, it’s useful to include that information under the recipient’s details. Always make sure to update any contact information to keep the process smooth and transparent.
Use a consistent and clear format for the date and time when recording the receipt of documents. This ensures clarity and prevents ambiguity. The date should follow the “DD-MM-YYYY” format for easy recognition across different regions. For example, “07-02-2025” is a clear and standardized format.
For the time, use the 24-hour clock system to avoid confusion between AM and PM. Display the time in “HH:MM” format, such as “14:30” for 2:30 PM.
To enhance readability and ensure accuracy, always separate the date and time with a space or a comma. For example: “07-02-2025, 14:30” or “07-02-2025 14:30”. Avoid adding unnecessary information that might complicate the document’s timestamp.
In digital systems, include time zone references if needed, especially if documents are exchanged between different regions. For example, “07-02-2025 14:30 UTC” helps to avoid confusion with varying time zones.
Tip: If multiple time zones are involved, always state the relevant time zone or use a universal time format like UTC.
Describe the received document clearly and concisely. Start by mentioning its title and type (e.g., invoice, report, contract). Specify its purpose and any relevant context, such as the date of receipt or the sender. Include any key references, such as document numbers or identifiers, to help easily locate it later. Keep the description factual, focusing on the content rather than the format or presentation.
Key Elements to Include
- Title and type of the document (e.g., “Invoice #12345”, “Contract Agreement”)
- Sender’s name or organization
- Date the document was received
- Relevant references or identifiers
- Brief summary of the document’s content or purpose
How to Be Specific

Avoid general terms like “important document” or “official letter.” Instead, provide specific details such as the transaction or subject matter. If the document pertains to a specific case or issue, mention it. This will make it easier for the reader to understand the significance of the document.
When creating a document receipt template, ensure it complies with local legal requirements to prevent future disputes. The template must clearly state the names of the parties involved, the purpose of the document, and the date of receipt. This provides transparency and legal clarity. The format should be simple and readable, so no confusion arises regarding the terms of receipt.
Incorporate specific legal language to avoid ambiguity. The template should explicitly mention the obligations of both parties and the terms under which the document is considered received. A signature section is necessary to validate the transaction, and in some jurisdictions, electronic signatures may also be legally binding if the document is transmitted digitally.
Ensure the document includes provisions for amendments or corrections. A clause stating how modifications to the document can be handled will prevent legal issues if any errors are discovered post-receipt. Also, keep a record of all signed receipts for future reference. Depending on local regulations, this could be a requirement for maintaining compliance.
Finally, if the receipt pertains to sensitive or confidential information, include appropriate disclaimers regarding data protection laws such as GDPR or other privacy regulations, depending on the jurisdiction. This ensures both parties understand their rights and obligations regarding personal data.
Thus, the structure is preserved, but repeated words have been replaced or rephrased.
To improve readability and avoid redundancy, rephrase identical phrases that appear frequently in a document. This can help convey the message more effectively. For example, instead of repeatedly using “ensure that,” consider alternatives like “guarantee” or “confirm.” This small change can make a big difference in clarity and flow.
Rephrase for Clarity
In a similar vein, rework long-winded expressions into shorter, punchier sentences. Avoid using multiple variations of the same idea unless it’s absolutely necessary for context. Aim to present key points in a straightforward manner, while maintaining a natural progression of thoughts.
Substitute Unnecessary Redundancy
When repeating a word, try using synonyms to provide variation. This strategy not only makes the text more engaging but also keeps the reader interested. For instance, instead of continuously repeating “process,” swap in terms like “procedure” or “method” based on context.