Creating a clear and accurate receipt for a deposit can simplify transactions and help both parties stay organized. A well-structured receipt provides transparency and minimizes misunderstandings. Whether you’re handling personal or business-related deposits, using a standardized template saves time and ensures important details aren’t overlooked.
A good deposit receipt should include key information: the date of the deposit, the amount, the purpose, and the details of the depositor. Clearly state the method of payment, such as cash, check, or electronic transfer. Include space for both the recipient’s and the depositor’s information, as well as any relevant transaction reference numbers.
To make the process even more seamless, opt for a template that can be easily customized. This ensures you can quickly adjust it to fit various scenarios without starting from scratch every time. Save yourself time and stress with a template that ensures all necessary details are captured accurately.
Here are the corrected lines:
Update the deposit amount field to reflect the exact sum in both numbers and words. Ensure consistency between the written amount and numerical figure. Correct any discrepancies to prevent confusion.
Make sure the date format aligns with the regional standards, using a consistent style throughout the document. Double-check for any typos in the date fields to maintain accuracy.
Verify the names of all parties involved, ensuring that there are no spelling errors. It’s crucial to match the names exactly as they appear on the official records or identification documents.
Clarify the purpose of the deposit in the appropriate section, avoiding vague terms. Use clear and direct language to outline the reason for the transaction.
Check the signature lines and ensure that all necessary signatures are included. If applicable, leave enough space for all required parties to sign.
Confirm the account information is accurate, with no missing or incorrect account numbers. Double-check all routing and account details to avoid processing errors.
Recheck the total amount of the deposit, ensuring the sum is correct after any adjustments. Clear up any mistakes in the figures listed to prevent errors in processing.
- Receipt for Deposit Template
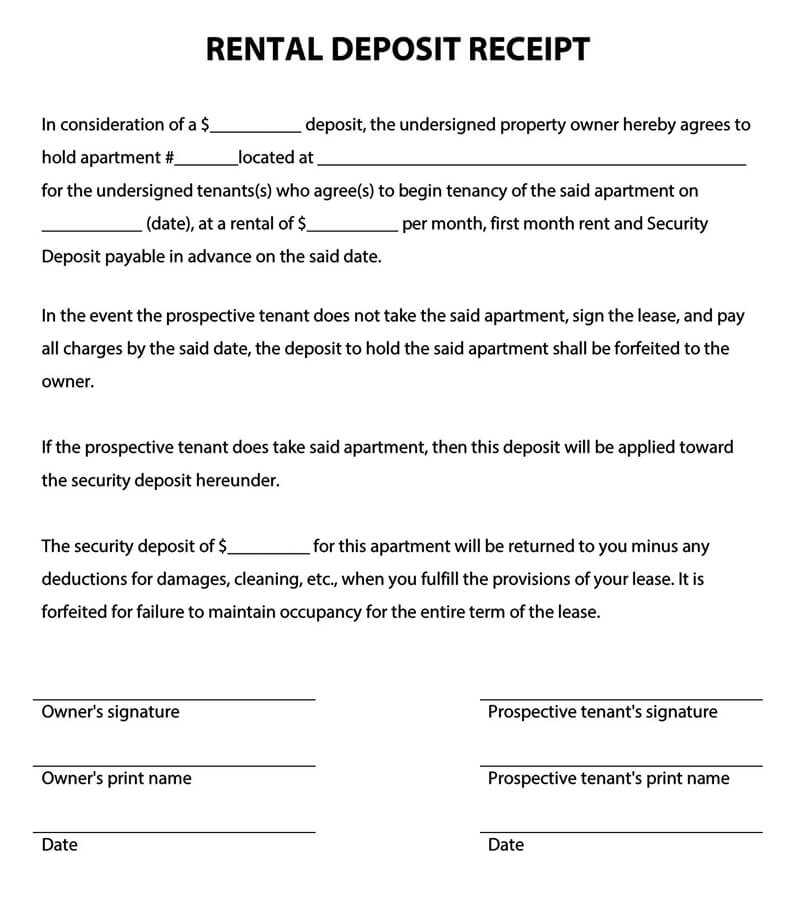
A deposit receipt template should clearly outline the transaction details for both the payer and the recipient. Begin with the name of the entity receiving the deposit, followed by the transaction date and amount. Include the purpose of the deposit, whether it’s for rent, services, or other agreements.
Key Elements of a Deposit Receipt

The receipt should feature the following sections:
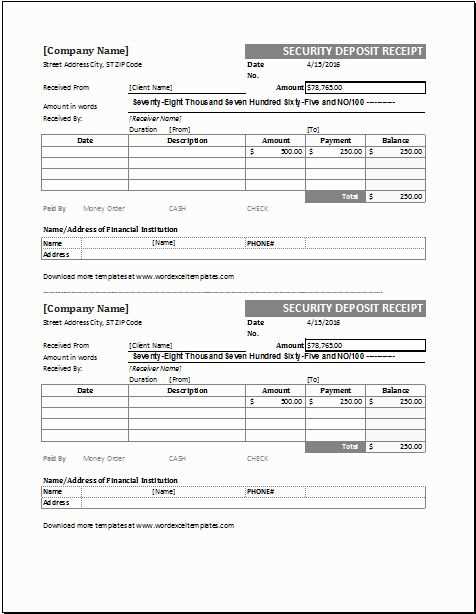
- Payee Information: Name, address, and contact details of the recipient.
- Payer Information: Name and contact details of the person making the deposit.
- Deposit Amount: The exact amount of money received, written in both numbers and words.
- Payment Method: Indicate how the deposit was made (cash, check, credit, etc.).
- Purpose of Deposit: A short description of what the deposit is for (e.g., rental deposit, service retainer).
- Transaction Date: The exact date the deposit was made.
- Receipt Number: A unique identifier for tracking purposes.
Customizing the Template

When creating a deposit receipt template, adjust the structure to suit your needs. Add sections for any additional details that may be relevant, such as tax information, late fees, or payment terms. Keep the format clean and organized to ensure clarity.
Ensure both parties receive a copy of the receipt. This protects both the payer and the payee and provides proof of the transaction if any issues arise later.
Creating a deposit receipt requires clear and concise information. Start by gathering the necessary details for the deposit transaction. This includes the date, amount, depositor’s name, and any reference or account numbers that identify the transaction.
Key Elements to Include:
- Date of Deposit: Record the exact date of the transaction for reference.
- Depositor’s Name: Include the full name of the person or entity making the deposit.
- Deposit Amount: Clearly list the total amount deposited, including any applicable currency or denomination.
- Reference or Account Number: This helps track the deposit and link it to the correct account or transaction.
- Deposit Method: Specify whether the deposit was made via cash, check, or electronic transfer.
- Deposit Purpose (Optional): Include any additional details about the deposit’s purpose if relevant.
- Signature (Optional): If required, the signature of the depositor or a representative from the receiving party can be included for verification.
Formatting Tips:
- Ensure the receipt is easy to read with a clean layout.
- Use bullet points or numbered lists for clarity.
- Keep the font professional and legible, avoiding decorative styles.
Once all relevant details are filled in, provide a copy to the depositor and retain one for your records. This simple but thorough approach ensures both parties have accurate documentation for the deposit.
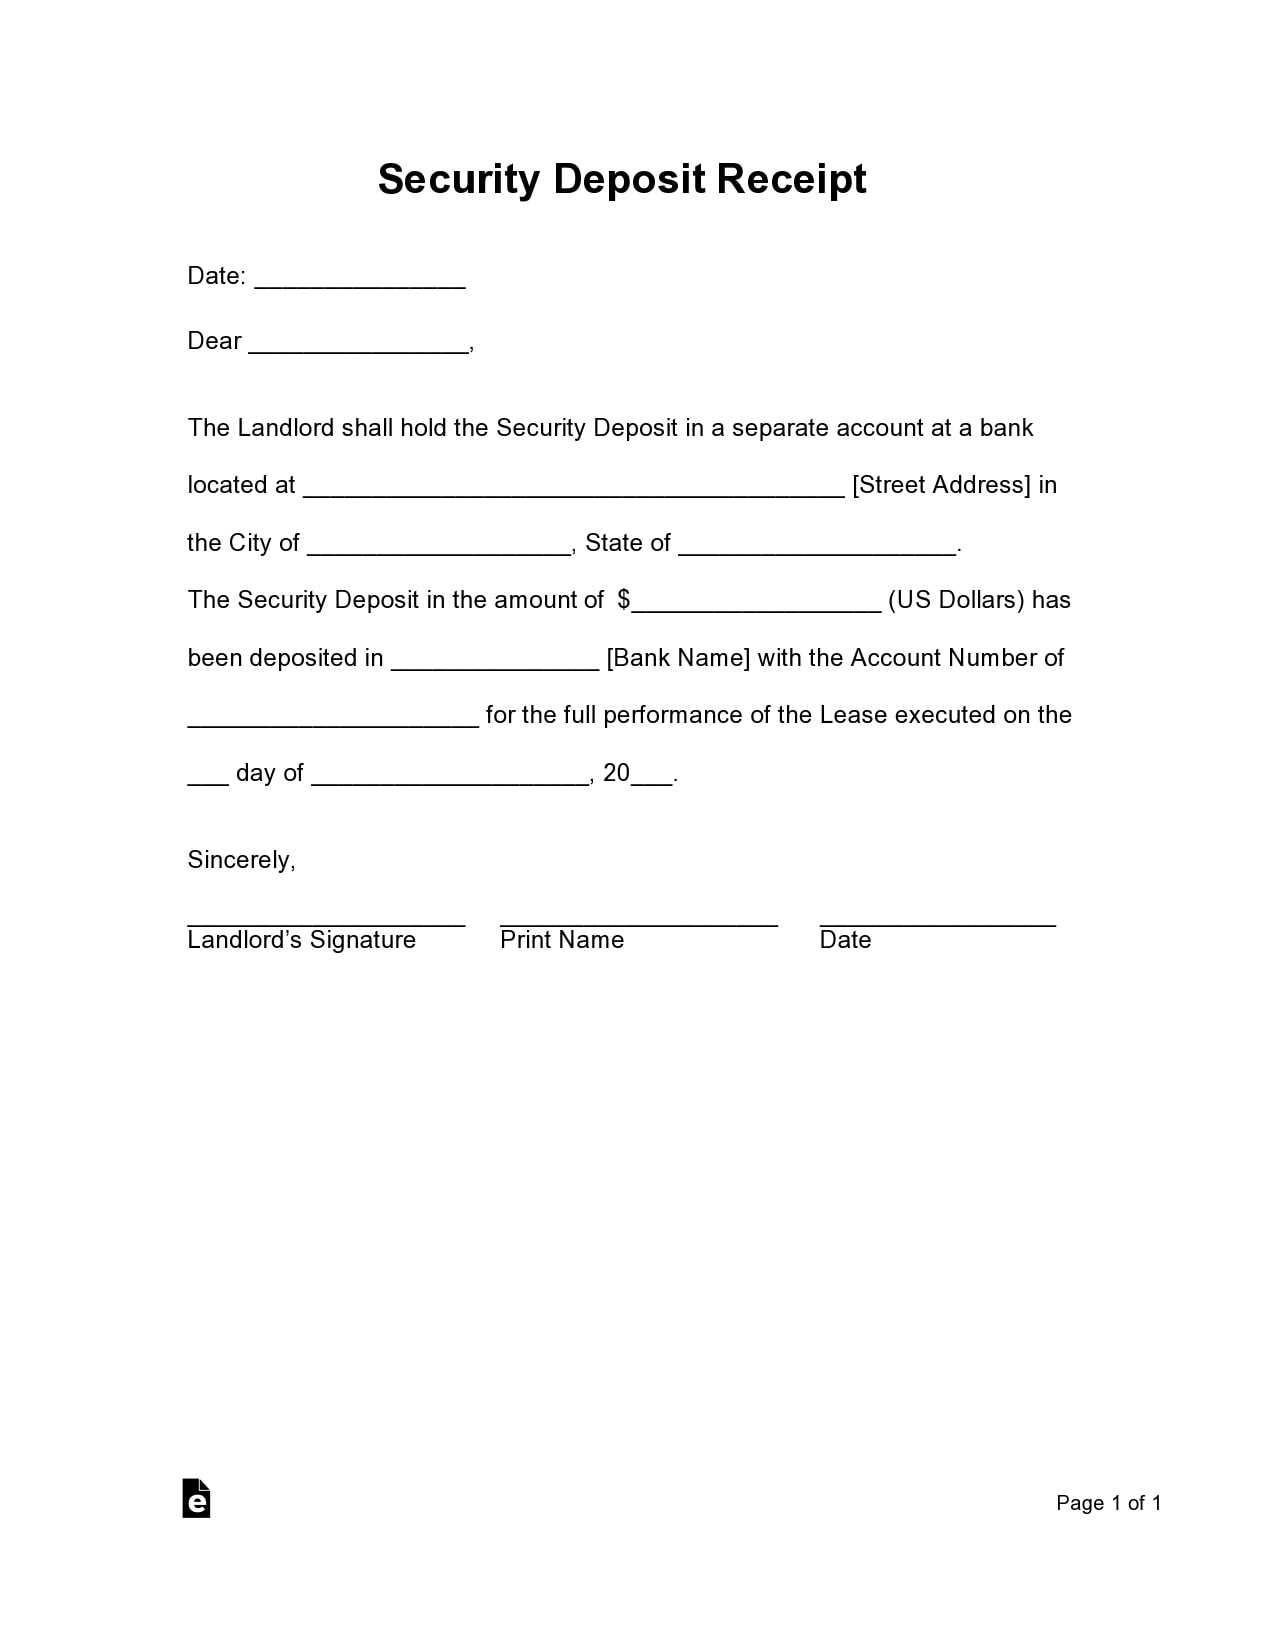
To ensure clarity and transparency, a deposit confirmation should contain specific details. Here are the key elements to include:
- Deposit Amount: Clearly state the amount of money deposited, ensuring the number is accurate and easy to read.
- Deposit Date: Include the exact date when the deposit was made. This helps in tracking and validating the transaction.
- Account Information: Mention the account number or identifier where the deposit was made. This allows both parties to cross-reference the transaction quickly.
- Depositor’s Name: Include the full name of the person or entity making the deposit to avoid confusion with other deposits.
- Confirmation Number: Assign a unique confirmation number for easy tracking of the deposit in future communications.
- Deposit Method: Specify the method used for the deposit, such as cash, check, or electronic transfer. This provides a record of how the funds were sent.
- Bank or Payment Processor Details: If applicable, include the name of the bank or payment service handling the deposit for transparency.
Including these elements will help both the depositor and recipient keep accurate records and avoid confusion in future transactions.
Adjust your deposit receipt template based on the specifics of each transaction type to ensure accuracy and clarity. For a cash deposit, include details such as the total amount in words, the denomination breakdown, and any cash handling fees, if applicable. For check deposits, list the check number, issuing bank, and date of issue. Similarly, for wire transfers or electronic payments, note the transaction reference number, sender’s bank details, and any associated fees.
Consider adding a section for transaction notes, especially for deposits involving special conditions like partial payments, refunds, or deposits with deductions. This makes it clear to both parties what is being deposited and under what terms.
| Transaction Type | Details to Include |
|---|---|
| Cash Deposit | Total amount in words, denomination breakdown, cash handling fees |
| Check Deposit | Check number, issuing bank, date of issue |
| Wire Transfer | Transaction reference number, sender’s bank details, transaction fees |
| Refunds or Partial Payments | Reason for deposit, amount refunded or partially paid |
When customizing your template, always prioritize clarity. The more precise the information, the smoother the transaction process will be for both you and the recipient. This will reduce the likelihood of errors or disputes down the line.
Digital receipts provide convenience with easy access and storage. With just a click, you can access your receipts on your phone or computer, saving both space and time. For businesses, they streamline processes by cutting down on paper waste and reduce the risk of lost receipts. The ability to search through receipts quickly also eliminates the hassle of searching through physical piles of paper. They are ideal for those who prefer a more organized, eco-friendly solution.
On the other hand, paper receipts offer simplicity and tangibility. Some people prefer them for their physical nature, as they can be easily stored in files or wallets. This option can be especially beneficial for customers who are not as comfortable with digital tools or for transactions in environments with limited digital access. Paper receipts can also be useful in cases where proof of purchase is required in a specific format, such as during warranty claims.
Choosing the right format depends on the nature of your business and your customers. If you have tech-savvy clients and want to cut down on physical storage, digital receipts are a great choice. For businesses that operate in more traditional settings, offering both options can cater to a wider audience.
Make sure your receipt template includes all required legal information specific to your location. For example, include the full name and address of your business, as well as any relevant tax identification numbers. Verify that the receipt displays the date of the transaction and an accurate breakdown of products or services sold, including prices and applicable taxes.
If your business operates in a jurisdiction with specific consumer protection laws, ensure your receipt template complies with regulations regarding refund policies or consumer rights. For example, some countries require clear statements on warranties or return policies on receipts.
Keep in mind any industry-specific rules that might apply, such as the need to display certain disclosures or notices for financial services. Additionally, some businesses may need to include specific accounting codes or itemized lists depending on the nature of the transaction.
To avoid penalties, stay updated with changes in tax laws and regulations affecting receipts. Regularly review your receipt template to ensure it reflects current legal standards and practices.
Keep your receipt template aligned with your needs by regularly reviewing and modifying key sections. Begin by focusing on the sections that change most often, like customer details, amounts, and transaction descriptions. This helps you maintain consistency with the latest information and requirements.
Track Changes in Legal or Business Requirements

Regulations may change, so stay updated on tax laws, business licenses, or other legal criteria. Update your template’s fields or add new sections to accommodate any changes, such as new tax rates or financial regulations. Make sure to include all necessary details to avoid mistakes or compliance issues.
Adjust for Branding and Aesthetic Preferences

As your branding evolves, update the template to match your current visual style. This includes updating colors, fonts, and logos. It’s crucial that the document reflects your company’s identity while maintaining a professional appearance.
Consider testing your updated templates to ensure they display correctly across different devices and printers. This ensures the formatting stays intact regardless of how or where the receipt is printed.
Set a reminder to review the template periodically. Regular checks can help catch any outdated information before it becomes an issue. Don’t hesitate to adjust or streamline sections if you notice inefficiencies or areas for improvement.
To create a deposit receipt template, ensure it includes the following elements: the name of the recipient, the amount deposited, the method of payment, and the date of the transaction. This will confirm the transaction and prevent confusion in the future.
Receipt Content

Start with clear headings such as “Deposit Receipt” to make the purpose of the document immediately apparent. Below, include specific fields such as “Depositor Name,” “Amount,” and “Payment Method.” For clarity, the “Amount” section should show the currency and provide a space for the exact amount in words.
Design Tips
Avoid clutter by keeping the layout simple. Use lines or borders to separate sections, and ensure the font is legible. The receipt should be easy to read and structured logically to facilitate quick reference when needed.