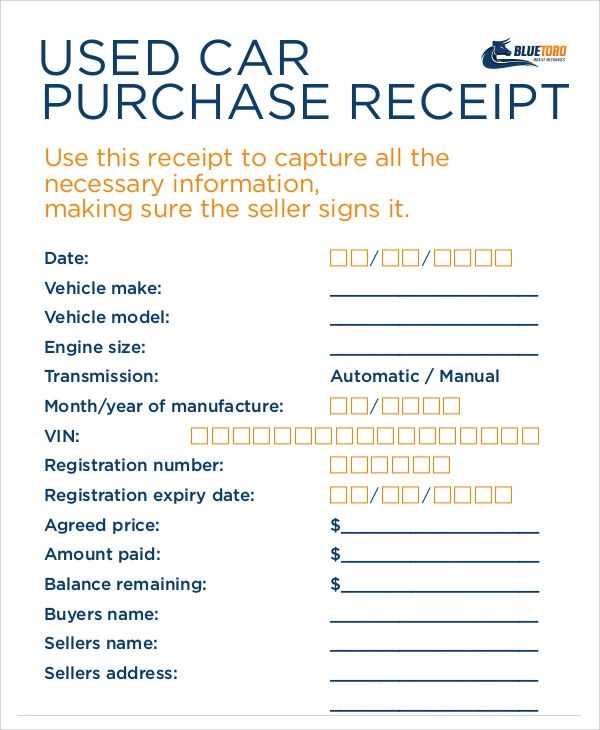
Creating a detailed after purchase receipt template helps businesses maintain clear and professional communication with customers. Include key information like the item name, quantity, price, and total cost to ensure the receipt is complete. A simple format will prevent confusion and improve customer satisfaction.
Start with basic details: Begin the receipt with the business name, address, and contact information. This helps customers identify where the purchase was made. Following this, list the purchased items, including the quantity, description, and individual price. A subtotal section allows for quick calculation of the total cost before taxes and discounts are applied.
Include taxes and payment methods: Clearly specify the tax rate applied and the total tax amount. This ensures transparency and allows customers to verify the breakdown of costs. Finally, include payment information such as the method of payment and the transaction number. It’s helpful to also provide the date and time of the purchase for easy reference.
Using a template like this creates an organized and trustworthy impression, building confidence and encouraging repeat business.
Here is the revised version with reduced word repetition while keeping the meaning intact:
Revising the document is an important task to ensure clarity and flow. Begin by reviewing the text for repetitive terms, replacing them with synonyms or restructuring sentences. Focus on making each idea concise while maintaining the core message. Cut unnecessary adjectives or adverbs that don’t add new meaning. Replace long phrases with shorter alternatives to keep the writing clean and straightforward.
Adjust sentence structure to enhance readability. Break up long sentences into simpler ones, and ensure transitions between paragraphs are smooth. This keeps the content engaging without overwhelming the reader. Keep the target audience in mind and eliminate jargon unless it’s required for understanding. After refining, review the document again to confirm it flows well and communicates effectively.
By following these steps, the revised version will have fewer repetitive words, making the content easier to follow and more professional.
- After Purchase Receipt Template: A Practical Guide
A clear and well-organized receipt template helps both customers and businesses keep accurate records. To start, your receipt should include basic details like the business name, address, and contact info. This ensures the recipient knows who issued the receipt and how to get in touch if needed.
Next, always list the purchase items clearly. Include item names, quantities, prices, and any applicable taxes. If the purchase involves discounts, show the original price and the final price after the discount. This transparency helps customers feel confident about the transaction.
Include the date of the purchase and the transaction number for future reference. This is especially important for returns, exchanges, or warranty claims. A unique transaction ID also helps in case you need to track the purchase in your records or databases.
Don’t forget to indicate the payment method, whether it was credit card, cash, or another method. This helps track the payment history accurately and provides transparency in case of any payment disputes.
If the purchase is part of a subscription or a recurring service, add information on the next billing cycle or renewal date. This sets clear expectations for future payments and reduces confusion.
Lastly, always ensure the receipt is easy to read. Use a clean layout with clear headings and sufficient spacing. The simpler the format, the easier it will be for the customer to understand and store for future reference.
Deciding on the receipt format is crucial to ensure clarity and accuracy. A well-designed receipt will help your customers easily understand the details of their purchase. Start by considering the format that aligns best with your business type and customer preferences.
Paper vs. Digital
For traditional brick-and-mortar businesses, paper receipts are often preferred, but digital receipts offer convenience and environmental benefits. Digital formats, like PDFs or emails, allow for easier storage and sharing, while paper receipts may be more suitable for customers who need immediate proof of purchase. Consider offering both options to cater to different preferences.
Structure and Details

The format should be simple but informative. Key elements to include are the transaction date, itemized list of purchased goods, prices, taxes, total amount, and business contact information. Using a clear layout with distinct sections makes it easy for customers to review their purchase at a glance.
In addition, think about adding branding elements, such as your logo or business name, to reinforce recognition and professionalism. If your receipt serves as a warranty or return proof, ensure the format is sturdy enough for handling over time, particularly for paper receipts.
Ensure your purchase receipt template includes these key elements for clarity and efficiency:
- Business Name and Contact Information: Clearly display your business name, address, phone number, and email. This helps customers reach out easily if needed.
- Receipt Number: Include a unique number for each transaction. This helps both you and the customer track purchases for future reference.
- Date and Time of Purchase: Provide the exact date and time of the transaction to avoid confusion and support future returns or exchanges.
- Itemized List of Purchased Products or Services: Break down the items purchased, including the quantity, description, and individual price for transparency.
- Total Amount Paid: Clearly state the total amount paid, including applicable taxes, discounts, and any additional fees. This ensures your customer understands the final charge.
- Payment Method: Indicate how the payment was made–whether by cash, credit card, or another method–to verify the transaction.
- Tax Information: If applicable, show the breakdown of taxes applied to the purchase. This is important for both customers and for record-keeping.
- Return or Exchange Policy: Include your return or exchange policy if it’s not already clearly stated elsewhere, so customers know their options after purchase.
- Thank You Message or Additional Notes: Add a personal touch by thanking the customer for their purchase or offering any necessary instructions related to the product or service.
Customizing receipts for specific industries ensures that your template meets the unique needs of your business while maintaining a professional appearance. Here’s how you can adapt receipts based on industry requirements:
Retail
- Include detailed itemized lists, including product names, quantities, and individual prices.
- Make sure to add discounts, taxes, and total amounts clearly, as customers often compare receipts for price verification.
- Provide information for easy returns or exchanges, such as store policies or contact numbers.
Services

- List services rendered with clear descriptions of each task performed.
- Highlight hourly rates, if applicable, and time spent on each service.
- Add a section for tips, if this is a common practice in your industry.
Hospitality

- Incorporate sections for room charges, food, and beverage, with the option to detail each item purchased.
- Ensure the receipt includes a breakdown of taxes and gratuities, which are often added automatically.
- Add options for guest reviews or feedback, improving customer engagement and loyalty.
Each industry has its own set of expectations for receipts. Tailoring your template for these expectations helps you build trust and improve customer satisfaction.
Integrate payment methods directly into your receipt system by using reliable payment gateways like PayPal, Stripe, or Square. Set up APIs or plug-ins provided by these services to ensure that payments are processed securely and reflected on your receipts. Ensure that each transaction includes payment method details such as credit card or digital wallet information for clarity.
For tax information, configure your system to automatically calculate applicable sales tax based on the buyer’s location. Many payment platforms offer tax calculation tools or integrations with tax software like Avalara or TaxJar. You can set tax rates based on regions, or use predefined rates for countries with consistent tax structures.
Always ensure your receipts show the precise tax amount charged for transparency. Include the tax rate applied, and if relevant, any exemptions or discounts the customer may have received. Accurate tax reporting helps maintain compliance and builds trust with customers.
To stay compliant, your receipts must contain specific details that vary depending on the jurisdiction. Always include the transaction date, total amount, and a breakdown of the items purchased, including their prices. For businesses operating in certain regions, you may need to show the applicable sales tax or VAT separately.
Additionally, ensure that your receipt includes clear contact information, such as your business name, address, and phone number. If required, a unique transaction ID or receipt number helps track the purchase in case of disputes or returns.
If you sell goods internationally, be aware of the different legal requirements for each country. Some jurisdictions mandate the inclusion of specific terms or product categories, so familiarize yourself with the local regulations before generating receipts.
| Legal Requirement | Details |
|---|---|
| Business Name and Address | Ensure it is clearly visible on the receipt. |
| Transaction Date | Include the exact date of the purchase. |
| Sales Tax/VAT | Break down taxes or include a total amount if required by law. |
| Item Description | List each item with its price and quantity. |
| Transaction ID or Receipt Number | Provide a unique identifier for reference. |
Ensure that your receipts are clearly legible, especially when dealing with electronic versions. Transparency in your receipt details can help avoid legal issues and protect your business from potential claims.
Use a clear folder system for storing physical receipts. Organize them by category, such as electronics, clothing, or groceries, to make it easier to locate specific ones later. Label each section accordingly and place receipts inside clear plastic sleeves to keep them intact and easy to view. For added organization, keep an index sheet in the front with a quick reference guide.
For digital receipts, use a dedicated folder on your computer or cloud storage service. Name each file with the date and a brief description, such as “2025-02-04 – Laptop Purchase”. This allows for quick searching and sorting. You can also scan or take pictures of paper receipts, storing them in the same digital folder for consistency.
If you often need to refer to receipts for returns or warranties, keep a separate folder or folder subcategory specifically for those documents. Make sure to note any important dates like return deadlines next to the receipt to prevent missing the window for returns or exchanges.
Regularly review your receipts and purge outdated ones that no longer serve a purpose. Digital receipts can be archived after a certain period, while physical ones should be discarded once they are no longer needed.
To structure your purchase receipt, begin by listing all purchased items in a clean and clear format. Use a numbered list to make each product or service easy to reference. After itemizing, include the date of purchase and the total amount at the bottom, ensuring clarity for both the customer and the business. Adding payment method details and transaction ID will help further verify the purchase. Keep everything organized by maintaining consistent alignment and spacing, especially when dealing with multiple items. This simple format allows for easy understanding and quick validation of the transaction.