How’s the content creation for your ACLS practice tests going? Need any help with them?
Here are the corrected lines:
Ensure you clearly specify the receipt’s purpose, whether it’s for services or goods. This helps both parties understand the context of the transaction.
Update the date format to avoid confusion. A standardized format such as “DD/MM/YYYY” prevents any misunderstandings in future reference.
Item Details
List the purchased items or services with a clear description, quantity, and price. This makes the receipt more transparent and easier to cross-reference with invoices.
Transaction Total
Make sure the total amount is calculated correctly, including applicable taxes or discounts. This ensures that the receipt is accurate and reflects the true value of the transaction.
- General Money Receipt Template Guide
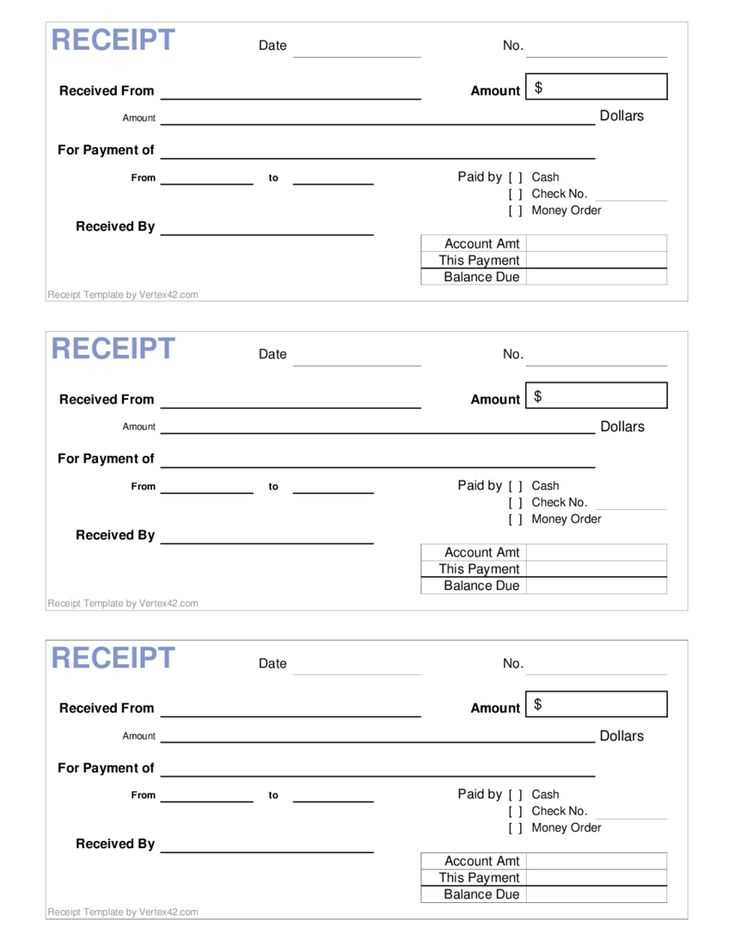
To create a clear and straightforward money receipt, start with the basic details. Begin with the name of the payer, which ensures there’s no confusion about who made the payment. Then, list the amount received along with the date to confirm the transaction took place at a specific time. It’s important to specify the purpose of the payment, such as a service fee or product purchase, to avoid ambiguity. Always include the name and contact details of the recipient for easy follow-up if needed.
Here’s an example template layout that can serve as a reliable reference:
| Item | Details |
|---|---|
| Payer Name | [Payer’s Full Name] |
| Amount Received | [Amount in Numbers and Words] |
| Date of Payment | [MM/DD/YYYY] |
| Purpose of Payment | [Payment Description] |
| Recipient’s Name | [Recipient’s Full Name] |
| Recipient’s Contact | [Phone/Email] |
| Signature | [Recipient’s Signature] |
Make sure to double-check all entries for accuracy. If possible, keep a copy for both the payer and the recipient. This simple approach ensures clarity and helps to resolve any future questions related to the payment.
To create a receipt template in Word or Excel, begin by opening a new document or spreadsheet. In Word, use a table to organize sections such as date, amount, item description, and payment method. Adjust the table’s columns and rows to ensure each section is clear and easily readable. In Excel, use cells for similar sections, with formulas for calculating totals or taxes, depending on the complexity of the receipt. Choose a clean, simple font like Arial or Calibri for better legibility.
Ensure that the header includes your business name and contact details. This will help establish the template’s purpose and provide essential information at a glance. Add a section for the recipient’s details, ensuring enough space to fill in names, addresses, and other relevant contact information. Make sure the template has space for a unique receipt number for tracking purposes.
For a polished look, incorporate borders or shading to separate different sections, such as the item list and payment details. This makes the receipt more professional and organized. When finished, save the template for future use. In Word, save it as a .docx file, while in Excel, save as a .xlsx file, so you can reuse the format for various transactions.
Begin with a clear identification of the parties involved. Specify the names of both the payer and recipient, ensuring accuracy. Include addresses or contact details if necessary for clarity.
Indicate the precise date of the transaction to establish a clear timeline. This ensures there is no ambiguity about when the payment was made.
Record the amount received, broken down if multiple payments or items are involved. Specify the currency to avoid any confusion regarding the payment type.
Describe the purpose of the payment. Whether it’s for goods, services, or a loan repayment, a brief description helps clarify the reason behind the transaction.
Clearly state the method of payment used. This could be cash, bank transfer, check, or other methods, depending on the agreement.
End with a signature from the recipient or an authorized representative. This serves as confirmation that the payment was received in full.
To make your receipt template more versatile, adapt it to suit various transaction types. Tailoring your template ensures clarity and provides all necessary details for each transaction scenario.
1. Modifying for Service Payments
When customizing for service-based transactions, focus on including service descriptions and time details. For example, list the hours worked or the specific services provided along with their corresponding rates. This adds transparency and helps avoid confusion.
- Include service dates and durations.
- Detail any applicable discounts or promotions.
- Clearly break down individual service costs.
2. Adjusting for Product Sales
For product transactions, incorporate information on the items sold, their quantities, and unit prices. If applicable, list any warranties or return policies to ensure that buyers understand the terms of the sale.
- List products or items with descriptions and quantities.
- Include taxes, shipping fees, and total amounts.
- Provide clear payment methods used for the transaction.
By customizing the layout and content for different transaction types, your receipts will become more accurate, professional, and user-friendly, helping both customers and businesses manage records effortlessly.
To stay compliant, ensure your receipt includes all necessary legal details. These requirements vary by jurisdiction, but here are the most common components:
- Date of the transaction: Include the exact date to clearly record when the transaction occurred.
- Item description: A brief, accurate description of the purchased items or services.
- Amount charged: Clearly display the total amount, including taxes and any additional fees.
- Seller’s information: Include the name, address, and contact details of the business issuing the receipt.
- Payment method: Specify whether the transaction was made via cash, card, or other methods.
- Tax identification number: Some jurisdictions require businesses to include their tax ID or VAT number for verification.
- Terms and conditions: Mention any return, refund, or warranty policies if applicable.
Check Local Regulations
Regulations differ depending on your location. Verify your obligations by consulting with a local accountant or legal expert familiar with receipt laws. This helps ensure compliance with both tax reporting and consumer protection laws.
Regular Updates
Stay informed about any updates to tax laws or consumer rights that could affect receipt requirements. This ensures you maintain legal compliance even as regulations evolve.
Group receipts by category such as “office supplies,” “travel expenses,” or “utilities.” This simple step helps locate specific receipts quickly. Store physical receipts in labeled folders, using clear, durable folders to keep them intact. For digital receipts, use apps or cloud services that allow easy sorting and tagging. Organizing by date or transaction type further streamlines retrieval. Make it a habit to sort and store receipts regularly to avoid a pile-up at the end of the month.
Use folders with dividers to separate different categories. Consider a multi-pocket folder for quick access or a ring binder for long-term organization. Label each section clearly with a permanent marker to avoid confusion later.
Digitize receipts as soon as possible. For added security, scan or photograph receipts right after transactions. This reduces the risk of losing physical copies and makes them accessible anywhere. Use high-quality scanning apps that create legible, searchable files for easy reference.
Maintain a backup system. Store digital receipts in multiple locations, such as on your computer and in the cloud. This ensures that even if one storage solution fails, the data remains secure. Keep your files organized with consistent naming conventions like “2025_01_Receipt_CategoryName” for clarity and quick searching.
Distribute receipts efficiently by choosing the method that aligns with the recipient’s preferences. If they are open to digital formats, email is a straightforward choice. Attach the receipt in PDF or another commonly accepted format to avoid compatibility issues.
Email Distribution

Emailing a receipt ensures quick delivery and easy tracking. Ensure the email subject line clearly mentions the receipt to help recipients locate it. Attach the file or provide a secure link for access. Include a brief message in the body to explain the attached document.
Physical Distribution

If digital methods aren’t suitable, print the receipt and mail it. Use clear and legible fonts to ensure the details are easily readable. Include a return address and a contact number in case the recipient needs further clarification.
For creating a clear and practical money receipt, ensure the document includes the following details. This format helps both the recipient and the sender easily understand the transaction.
Transaction Information
Start by specifying the amount paid, the date of the transaction, and the purpose of the payment. Clearly mention whether it’s for goods, services, or another reason. Include the method of payment–cash, check, or electronic transfer–for accuracy.
Sender and Recipient Details

List the names of both the sender and the recipient, along with their contact information. This step confirms who was involved in the transaction and can be useful for future reference or verification.
By structuring the receipt in this way, you maintain clarity and transparency, which are key for record-keeping and avoiding potential misunderstandings.