If you’re looking for a straightforward way to keep track of purchases, using a personal purchase receipt template can save you time and help organize your expenses. This template ensures that all the necessary information is captured efficiently, making it easy to manage your financial records.
Start by including basic details such as the date of purchase, item description, and total amount spent. These fields will provide a clear overview of your transaction. It’s also helpful to add space for payment method, whether it’s cash, credit card, or another option, to keep your records complete.
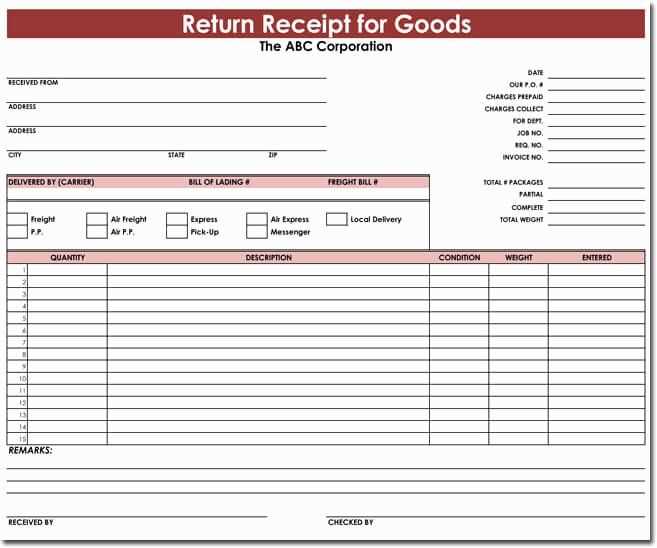
Next, consider adding a section for store details–the business name, address, and contact information. This can be particularly useful for returns or warranty claims. Additionally, include a transaction ID or receipt number for easy reference if needed in the future.
With a personal purchase receipt template, you can quickly document and retrieve your purchase details, giving you control over your finances. It’s a simple yet effective tool to maintain order and stay on top of your expenses.
Here’s the corrected version:
Ensure the receipt includes clear details: buyer’s name, item description, price, date of purchase, and transaction number. It’s helpful to include your store’s contact details and return policy. Keep the format simple–this makes it easier to read and prevents any confusion later. Use a readable font size, and if possible, ensure the text contrast is high enough for visibility. Lastly, always double-check for any errors before issuing the receipt to the customer to avoid future discrepancies.
- Personal Purchase Receipt Template
Creating a personal purchase receipt template is straightforward and can be customized to suit your needs. Focus on including the key elements that ensure clarity for both the buyer and the seller. Keep the format clean and simple for easy readability.
Basic Structure
The template should start with the date of purchase followed by a clear title such as “Purchase Receipt”. Include the name of the seller, their contact information, and business details if applicable. Then, list the items purchased with individual prices, quantities, and totals. For accuracy, also include taxes or discounts applied. Finish with the total amount, payment method, and any return policy if needed.
Additional Elements

If required, add a unique receipt number for tracking purposes. You may also want to leave space for any special notes or terms agreed upon during the transaction. Ensure that the format is adaptable for both printed and digital use, so it remains professional in both formats.
Create a clear and easy-to-read purchase receipt template by following a few simple steps. Include essential details such as the buyer’s information, seller’s contact details, itemized list of products, prices, taxes, and total cost. This ensures both parties have a record of the transaction.
Include Basic Information
The template should start with the basic information of both parties. Include the seller’s name, address, phone number, and email address. For the buyer, add the name and contact details, if applicable. This section should be at the top for easy access and reference.
List Purchased Items

Next, provide a section that lists the purchased items or services. For each item, include a description, quantity, unit price, and total price. This helps the buyer quickly see what they paid for and serves as a record of their purchase.
Calculate the Total
At the bottom of the receipt, clearly show the subtotal for all items, followed by taxes and any discounts. Then, include the total amount due. The calculation should be easy to follow, ensuring transparency and accuracy.
Make sure to include a payment method section to indicate how the transaction was completed, such as cash, credit card, or online payment. This helps both parties confirm how the payment was made.
Finally, add a thank you note or a return policy, if applicable. This creates a more personalized touch and informs the buyer about any future actions they may need to take.
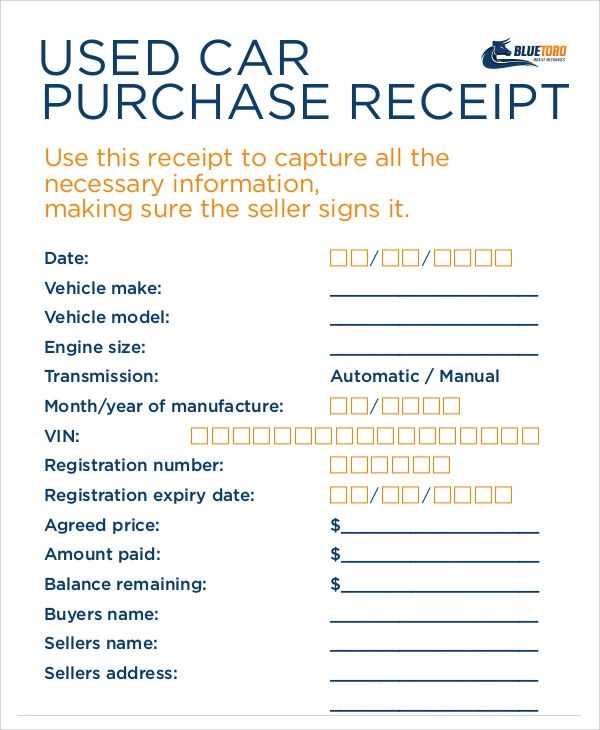
Clearly display the date of the transaction. This helps both parties track the timing of the purchase, especially for returns or warranty claims. Include the exact time, if possible, for added clarity.
List the full name and address of the seller. This helps establish legitimacy and gives the buyer a reference in case they need to contact the seller later.
Include a description of the purchased items or services. Be specific with item names, quantities, and any model or serial numbers. This makes it easy to verify the items if there is a need for future action.
State the unit price and the total cost. If there are multiple items, list each one with its price and the total for all items at the bottom. Make sure taxes are separately mentioned if applicable.
Provide payment details, including the method (cash, credit, debit, etc.). This helps clarify how the transaction was completed and provides a record for financial purposes.
Incorporate a unique receipt or transaction number. This makes it easier for both parties to reference the receipt in case of disputes or future inquiries.
Include the contact details of the business or seller. This should include a phone number or email address so that the buyer can reach out if necessary.
Adjust the details on your receipt based on the type of transaction. For retail purchases, include itemized listings with product names, quantities, prices, and applicable taxes. For services, add a description of the service provided, the date, and the duration, along with the hourly rate if applicable. If it’s a subscription, show the start and end dates of the service, along with payment intervals.
Consider adding unique elements based on the nature of the transaction. For example, include warranty details for electronic purchases, or return policy information for clothing and accessories. This helps clarify terms for the customer and reduces potential disputes.
Include your business’s contact information and a customer support section for inquiries, especially for services or longer-term transactions. This not only provides transparency but also builds trust and accessibility. Adjusting your receipts to meet the expectations of different purchase types shows professionalism and attention to detail.
To create a clear and professional personal purchase receipt, follow these key steps:
- Include the seller’s details: Name, business name (if applicable), and contact information are fundamental. Ensure this section is prominently placed at the top of the receipt.
- List the purchased items: Clearly state each item with a brief description. Include quantities, prices, and any applicable taxes. This helps avoid confusion and clarifies the transaction.
- Specify the date of purchase: A timestamp is vital to document when the transaction occurred. It also serves as a reference for future follow-ups or returns.
- Include payment details: Indicate the payment method (e.g., cash, credit card) and amount paid. If a partial payment is made, outline the balance due.
- Provide a unique receipt number: This aids in record-keeping and simplifies future inquiries regarding the transaction.
- Outline return/refund policies: If applicable, briefly mention any terms related to refunds or exchanges. Make sure this information is clear and easy to find.
Sample Template

- Seller’s Information: ABC Electronics, Phone: (123) 456-7890
- Purchased Items: 1x Smartphone – $499.99, 1x Charger – $29.99
- Date of Purchase: February 10, 2025
- Payment Method: Credit Card
- Receipt Number: #125478
- Refund Policy: Returns accepted within 30 days with receipt.
By following this structure, you ensure that your receipt is both informative and easy to understand for both the buyer and the seller.