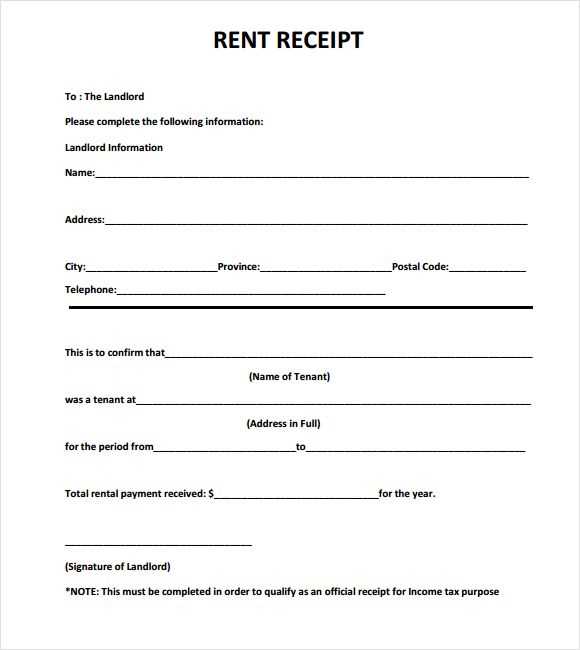
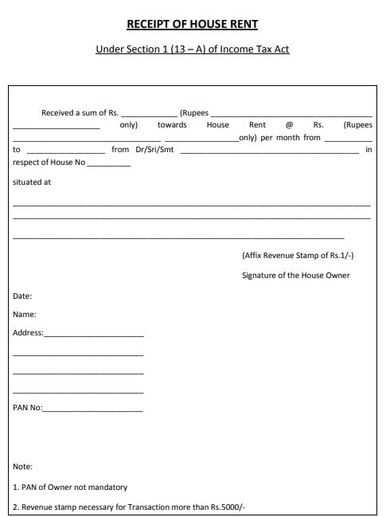
To create a rent receipt, use a simple, clear format that includes all necessary information. The document should list the tenant’s name, the landlord’s name, and the rental property address. Make sure to note the payment amount, date received, and the payment method used. This ensures transparency and avoids any future disputes.
In addition to the basic details, specify the rental period the payment covers. This helps both parties keep track of payments and prevents any confusion about the time frame. Include a brief description of the service or rent payment received, such as “monthly rent” or “security deposit.”
Including a signature or a digital confirmation from the landlord is a smart step for added assurance. It provides legal weight to the document, making it easier to resolve any potential issues. Ensure the receipt is delivered promptly and stored in a secure manner for future reference.
Here’s the revised version where words are repeated no more than 2-3 times:
When creating a generic rent receipt, ensure that all necessary details are included. Start with the tenant’s name, rental property address, and the rental period. Specify the amount paid, including any extra charges or discounts. Clarify the payment method, whether it’s cash, check, or bank transfer. Lastly, both the landlord’s and tenant’s signatures provide acknowledgment of the transaction.
Key Elements to Include
Tenant Information: Full name and contact details.
Property Address: The location of the rental.
Payment Details: Include the amount paid, due date, and payment method.
Final Touches

Signatures: Ensure both parties sign to confirm the transaction.
Date: Make sure the date is accurately stated.
- Generic Rental Receipt Template
A generic rental receipt template should include key details that confirm the transaction and ensure both parties have proper documentation. Below is a basic structure you can follow to create a clear and complete receipt:
Basic Information
Start with the landlord’s name, address, and contact details, followed by the tenant’s name and address. Ensure the rental property address is clearly stated.
Payment Details

Clearly specify the payment amount, the period it covers (e.g., monthly rent), and the date of payment. Mention the payment method used (e.g., cash, check, or bank transfer).
| Item | Details |
|---|---|
| Landlord’s Name | [Full Name] |
| Tenant’s Name | [Full Name] |
| Rental Property Address | [Address] |
| Amount Paid | [Amount] |
| Payment Period | [Start Date – End Date] |
| Payment Method | [Method] |
| Payment Date | [Date] |
This format allows both landlord and tenant to reference the transaction easily. Always include a note that the payment is being acknowledged as received. If any other terms apply (such as late fees), include that information as well to avoid future disputes.
To ensure clarity and proper record-keeping, include key details about the tenant when creating a rent receipt. Begin with the tenant’s full name. This ensures the receipt is linked to the correct individual. You should also include their current address, especially if they rent multiple properties or have moved recently.
Next, add the rental unit information, such as the apartment number or the unit’s address. This can help avoid any confusion, especially if the landlord manages several properties. The lease agreement date is another important detail to include, as it ties the receipt to a specific rental period.
Always record the payment date and the amount paid. This verifies that the tenant has made the correct payment for that period. If the payment was partial, make sure to specify the balance remaining. If the tenant paid through a method like check or bank transfer, it’s helpful to include that payment reference, such as the check number or transaction ID, for accurate tracking.
Conclude by noting any other pertinent details, such as late fees, discounts, or adjustments. These notes help provide a clear, accurate history of the rental payment and any changes in the amount due.
Ensure the rent receipt includes the following details for clarity and accuracy:
1. Tenant Information: Include the tenant’s full name and address to specify who is making the payment. This helps avoid any confusion with other renters.
2. Landlord Information: Clearly mention the landlord’s name, address, and contact details. This establishes accountability and allows the tenant to reach out if needed.
3. Payment Date: The receipt should specify the exact date the payment was made. This is key for both parties to keep accurate financial records.
4. Payment Amount: State the exact amount paid by the tenant, along with any relevant breakdown if there are additional fees like utilities or late charges.
5. Rent Period: Indicate the rental period the payment covers, e.g., “March 1, 2025 – March 31, 2025.” This confirms the time frame for which the payment was made.
6. Payment Method: Document the method used for payment, whether by check, cash, bank transfer, or another method. This provides a transparent record of the transaction.
7. Signature or Confirmation: Include a space for both the landlord’s signature or a confirmation statement from the tenant. This serves as an acknowledgment that the transaction has occurred.
8. Receipt Number: Numbering receipts helps keep organized records, making it easy to track payments, especially for future reference.
Clearly state the tenant’s full name, address, and the landlord’s details. This helps with identification and ensures there is no confusion about the parties involved.
Include the exact rental amount and the payment period. This makes it easy to confirm how much was paid and for what timeframe, avoiding misunderstandings.
Record the payment date. This is crucial for establishing a timeline and confirming when the transaction occurred.
Specify the payment method used (cash, check, transfer, etc.). This provides transparency and may be needed in case of disputes over how the payment was made.
If any deposits or advance payments were made, clearly list these details. This helps track refundable amounts and clarifies any conditions for returning deposits.
Check local laws to ensure compliance with any specific requirements for rent receipts in your area. Some jurisdictions may have mandatory clauses or formats that must be followed.
If applicable, include receipt numbers for easier tracking. This also provides a reference for both the landlord and tenant to use in case they need to refer to the payment at a later time.
Ensure your rent receipt includes all relevant details to avoid confusion. Here’s a breakdown of what should be included:
- Tenant’s Full Name: Clearly list the tenant’s legal name.
- Landlord’s Details: Include the name or business name and contact information.
- Rental Property Address: Specify the address of the rental unit.
- Payment Date: Mention the exact date the rent payment was made.
- Amount Paid: Specify the total payment made, including any extra charges if applicable.
- Payment Method: Note whether the payment was made by cash, check, bank transfer, etc.
- Period Covered: State the rental period the payment covers (e.g., monthly, weekly).
- Receipt Number: Assign a unique reference number for tracking purposes.
Including these elements helps maintain transparency and ensures both parties have clear records of the transaction.