A clear, organized template is key to keeping track of business expenses. A reliable receipt template simplifies the process of documenting and categorizing your purchases. It can save time, prevent errors, and ensure your records are in line with accounting standards. With the right structure, you can easily track deductions for taxes and maintain transparency in financial reporting.
Your template should include key details such as the date, vendor name, expense category, and total amount. Be sure to include a section for taxes or VAT if applicable, as these often need separate reporting. It’s also helpful to leave room for a brief description of the expense to clarify its purpose.
By creating or using a standardized template, you’ll have an easier time preparing for audits, reimbursements, and budgeting. Many businesses use digital templates that can be quickly updated and stored in the cloud, making access to records faster and more secure. With a functional receipt template, you streamline both your daily processes and long-term financial planning.
Here’s the revised version without unnecessary repetition:
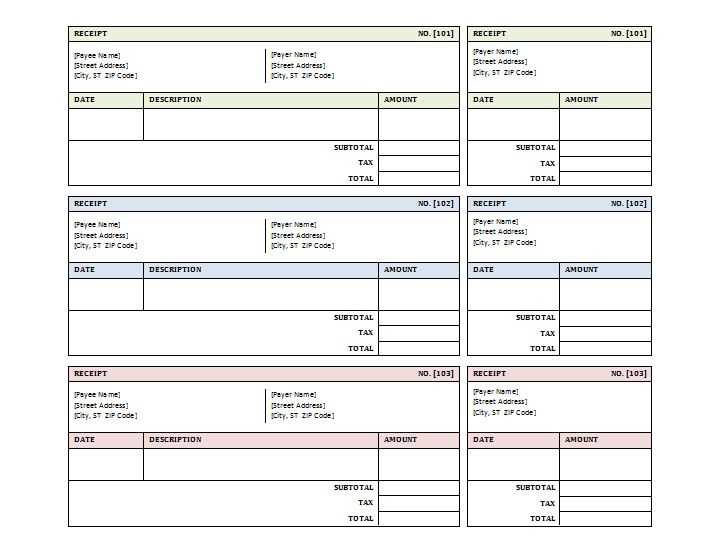
To create a business expense receipt template, start by clearly defining the information that must be included. Ensure the receipt captures details such as the vendor’s name, address, and contact information, as well as the purchase date, itemized list of goods or services, and the total cost.
Key Components

The template should also contain space for tax information, payment method, and any discounts or promotions applied. Make sure the format is consistent, so users can quickly fill in the necessary fields. Avoid including redundant sections that do not directly relate to the transaction, such as excessive instructions or irrelevant notes.
Template Layout

Arrange the sections logically, with the most important details at the top. A clear, simple layout ensures the receipt is both easy to read and understand. Keep the font consistent and the text size legible. To enhance user experience, leave enough space between fields for easy writing or digital entry.
Using this approach will provide a streamlined and practical receipt template, minimizing confusion and ensuring that all necessary information is captured effectively.

Receipt for Business Expense Template: A Practical Guide
How to Create a Business Expense Receipt Template in Excel
Key Information to Include in Your Expense Receipt
Customizing Your Template for Different Types of Expenses
How to Add Tax Calculations and VAT to Your Template
Ensuring Compliance: Legal Requirements for Expense Receipts
Tips for Organizing and Storing Receipts Digitally
To create an efficient business expense receipt template in Excel, start with a clean, easy-to-read layout. Include the following fields: company name, address, contact details, receipt number, date, and a description of the goods or services purchased. Add columns for the quantity, unit price, total amount, and payment method. These details ensure your records are clear and accessible for future reference.
Key Information to Include in Your Expense Receipt:
Each receipt must detail the business purpose, the vendor’s information, and the total amount paid. Make sure to list any applicable taxes or VAT, with separate line items for the amount before tax and after tax. Including a unique receipt number and a clear breakdown of the items or services helps with auditing and tracking expenses.
Customizing Your Template for Different Types of Expenses:
Adjust your template for various types of expenses by adding specific categories. For example, if the expense is travel-related, include fields for transportation costs, accommodation, and meals. If it’s a software subscription, you can add sections for license type and subscription dates. Customization makes it easy to track different expense types and ensures accuracy.
How to Add Tax Calculations and VAT to Your Template:
Incorporate tax and VAT by adding simple Excel formulas. Use a tax rate multiplier to calculate tax on each item or service. For instance, if the tax rate is 20%, multiply the amount before tax by 0.20 to find the VAT. Excel’s SUM function helps you automatically calculate the total amount including taxes. Keep a separate column for tax amounts to maintain clarity.
Ensuring Compliance: Legal Requirements for Expense Receipts:
Ensure your receipt template meets legal standards by including required details such as the business name, tax identification number (TIN), and the VAT registration number (if applicable). In many jurisdictions, receipts must clearly display the tax rate applied and the total amount of VAT paid. Check your local tax laws for any specific requirements related to the format or content of receipts.
Tips for Organizing and Storing Receipts Digitally:
For easier access and organization, store your receipts digitally. Scan or take photos of paper receipts and save them in a cloud-based folder with a clear naming convention (e.g., [Date]_[Vendor]_[Amount]). Use software tools or Excel to categorize and tag receipts based on date, vendor, or expense type. This method simplifies the process of generating expense reports and ensures receipts are protected from loss or damage.
Hey! What’s on your mind today?