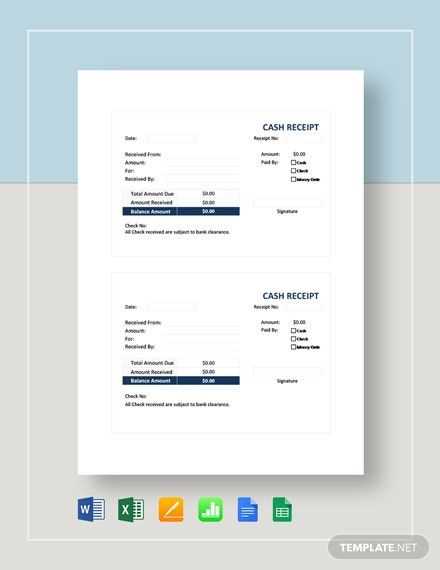
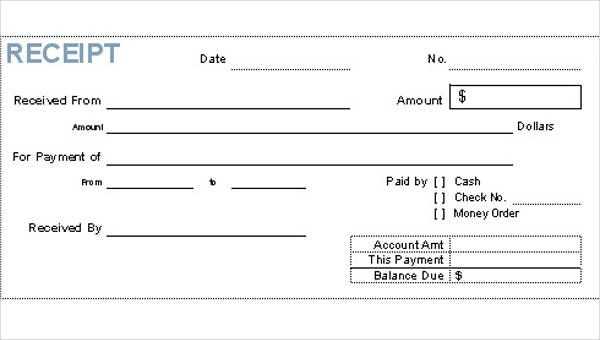
For accurate record-keeping, use a clear and simple cash paid receipt template that captures all necessary transaction details. This template should include the payer’s name, the amount paid, the date of the payment, and the purpose of the transaction. Make sure to include a unique receipt number to keep your records organized and easily searchable.
Design your template with space for both the payer’s and receiver’s signatures. This adds a layer of authenticity and helps avoid disputes. Keep it straightforward–too much clutter can make it harder to verify information at a later date. Always ensure that all amounts are clearly written, and double-check for accuracy before finalizing the receipt.
When creating a cash paid receipt template, consistency is key. Use the same format across all transactions to make tracking payments more efficient. This approach reduces errors and makes audits or reviews easier. Additionally, consider using software to automate and store receipts for faster processing in the future.
Here’s the corrected text with reduced word repetition:
To create a more readable and streamlined receipt template, focus on varying your vocabulary. Replace words that appear too often, like “payment,” with synonyms or alternative phrasing. This ensures clarity and avoids redundancy. For instance, use “transaction” or “amount” when referencing a financial sum, and consider “receipt” or “voucher” when referring to the document itself.
By structuring the receipt in a clear, concise format, you improve its functionality. Use bullet points or numbered sections to break down the information and provide a smoother reading experience. Additionally, ensure that key details such as the date, items, and amounts are easy to locate without excess wording or repetition.
Incorporate only relevant information that supports the transaction. Remove extraneous content that does not add value, keeping the receipt direct and useful for both parties. Keep the text simple but precise, ensuring every word serves a clear purpose.
Lastly, always double-check for redundancies or phrases that could be simplified further. The goal is to make the receipt straightforward while maintaining professionalism.
- Cash Paid Receipt Template Guide
Ensure the receipt includes the transaction date, amount paid, and the name of the recipient for clarity. These details confirm the exchange and help maintain proper records. Include a unique receipt number to keep track of payments. Mention the purpose of the payment–whether it’s for goods, services, or other reasons. This makes the receipt more specific and easier to reference later.
In the “Paid By” section, indicate who made the payment–this could be an individual or a business entity. Make the amount clear by both writing it out in words and numerically. This reduces any confusion about the payment details.
It’s helpful to add a line or two about the method of payment, whether it was in cash, via bank transfer, or another method. This shows transparency and helps if a dispute arises. Keep the receipt concise and to the point; avoid any unnecessary information that doesn’t pertain directly to the transaction.
Finally, make sure the receipt is signed by both parties or include a statement confirming the transaction is complete. This adds an additional layer of accountability and serves as a proof of payment.
Start by selecting a clear and straightforward format for your receipt that aligns with your business needs. A simple layout that includes key details like transaction date, amount, payment method, and a brief description of the items or services purchased is effective for most scenarios. Ensure that the font is legible and the spacing is adequate to prevent clutter.
If your business involves frequent or complex transactions, consider incorporating itemized breakdowns for easier reference. This is particularly useful for customers who need more details, such as taxes, discounts, or shipping fees. A clean, organized table or list format works well for displaying this information clearly.
For smaller transactions, a minimalist design with just the essentials–total cost and payment confirmation–might be more appropriate. This keeps the process swift and uncomplicated, which is important in fast-paced environments like retail or food services.
Lastly, consider whether you need to integrate your receipt format with any accounting or invoicing systems. If so, make sure the receipt is compatible with the software or template you use for easy data entry and tracking.
Include the date of payment at the top. This helps both parties keep accurate records of the transaction timeline.
Payment Amount

Clearly state the exact cash amount received. Break it down if necessary, especially if change was given or additional fees applied.
Sender and Receiver Information

List the full names or business names of the payer and the recipient. This ensures clarity on both sides of the transaction.
Describe the reason for the payment briefly, such as for goods, services, or any other purpose. It gives context and helps in verifying the transaction later.
Signatures can be helpful for both parties to acknowledge the receipt. A signature from the payer is often included for confirmation of the transaction.
Finally, a unique receipt number or code is useful for tracking and reference in case of future questions or disputes.
Adjust the template layout to match your brand identity. Modify the colors, fonts, and logo to reflect your business’s style. For consistency, choose colors that align with your company’s logo and website design. Pick fonts that are easy to read and match the tone of your business. Customizing these elements ensures your receipt looks professional and tailored to your brand.
Update the content sections to include business-specific details. Replace placeholder text with your business name, address, contact information, and any other relevant data. Include your tax identification number or business registration number if required. Ensure that all contact details are accurate and up-to-date to avoid confusion.
Adjust the payment section to suit your payment methods. If you accept multiple types of payments (credit card, cash, bank transfer), ensure the receipt template reflects this. Add checkboxes or fields for different payment methods, making it easy to track each transaction type.
Customize the layout for readability and functionality. Keep the most important information, like payment amount and receipt number, in clear, visible sections. Use tables or lines to separate different details, making the receipt organized and easy to understand. Avoid clutter to ensure the receipt is user-friendly and professional.
If your business requires a specific format or additional fields, like discounts, taxes, or items purchased, make sure to add these sections to the template. Tailor the receipt to the needs of your business while keeping it simple and straightforward for your customers to understand.
Each region has specific legal guidelines for issuing receipts that businesses must follow to ensure compliance. These requirements often vary based on local tax regulations, consumer protection laws, and business practices. Below are the key requirements in different regions:
United States
- Receipts are generally required for transactions over a specific amount, often $75 or more, depending on state laws.
- The receipt should include the business name, address, transaction date, description of goods or services, and the total amount paid.
- Sales tax must be clearly listed if applicable, including the rate applied and the total tax charged.
- Electronic receipts are widely accepted and are legally equivalent to paper receipts in most states.
European Union
- In the EU, businesses must provide receipts for all transactions, with a few exceptions for very small purchases.
- Receipts must list the business’s VAT number and the VAT rate applied to the transaction.
- In some countries, such as France, electronic receipts are mandatory for transactions with businesses that exceed certain thresholds in annual turnover.
Australia

- Receipts must include the seller’s ABN (Australian Business Number) for tax purposes.
- Businesses must issue receipts for all sales over $75 unless the buyer requests one for a smaller amount.
- Sales tax (GST) must be clearly shown on receipts for taxable items and services.
Canada
- Receipts must include the business’s GST/HST registration number for tax purposes.
- Businesses are required to issue a receipt for every transaction where sales tax is applied.
- Receipts can be issued in both paper and electronic formats, but the necessary information must be legible and accurate.
It’s crucial to research and adhere to the specific regulations in your region to avoid legal penalties and ensure smooth transactions with customers. Always consult local authorities for the most accurate and updated information.
To handle multiple transactions on a single receipt, break down each transaction separately. Label them with clear headings like “Transaction 1,” “Transaction 2,” etc., to prevent confusion. Each transaction should include an itemized list of purchased goods or services, along with their individual prices and any taxes applicable.
List Each Transaction Clearly
Under each transaction heading, list the products or services purchased, the quantity, price per item, and total for that transaction. Ensure that tax is calculated and displayed separately for each item to avoid any ambiguity.
| Transaction # | Description | Quantity | Price | Amount |
|---|---|---|---|---|
| 1 | Item A | 2 | $5.00 | $10.00 |
| 1 | Item B | 1 | $7.00 | $7.00 |
| 2 | Item C | 1 | $12.00 | $12.00 |
Sum the Total for All Transactions
At the bottom of the receipt, sum the totals from each transaction. Include the grand total and indicate any discounts or special offers applied to the entire receipt.
| Transaction # | Total |
|---|---|
| 1 | $17.00 |
| 2 | $12.00 |
| Grand Total | $29.00 |
This layout ensures the customer can clearly see the breakdown of multiple transactions on a single receipt. It also provides transparency and a clear overview of the total amount paid.
One common mistake is failing to include all necessary details. A cash receipt should contain the date, the amount paid, the purpose of the payment, and the payer’s name. Missing any of these can create confusion later.
- Double-check that the amount is accurate and clearly written, especially when writing it in both numbers and words.
- Use a readable format for the date and ensure it matches the actual transaction date.
- Include both the payer’s and the receiver’s information for accountability.
Another issue is improper record-keeping. Always store cash receipts in an organized manner, whether digitally or physically, to avoid losing track of transactions. It is also wise to back up digital receipts regularly.
- File receipts in folders categorized by date or type of transaction.
- If using digital receipts, ensure the storage system is secure and backed up.
Additionally, avoid vague descriptions. Be specific about what the cash payment is for. “Miscellaneous” or “Payment” do not provide enough clarity.
- Write a short, clear description of the service or product paid for.
- Avoid generic terms and specify the reason for the payment, such as “consulting fees” or “rent payment.”
Don’t forget to provide a unique receipt number to help with tracking and prevent confusion between multiple receipts issued on the same day.
- Use sequential numbers to ensure each receipt is easily identifiable.
- Keep a log or record of issued receipt numbers for reference.
Lastly, leaving out signatures from both the payer and the receiver can lead to disputes. Always make sure that both parties sign the receipt as confirmation of the transaction.
- Have a designated area for signatures at the bottom of the receipt.
- Ensure both parties sign and date the receipt at the time of the transaction.
Ensure your receipt template is clear and straightforward by following a consistent structure. Start with the payment details: include the total amount paid in large, bold text to make it easy to spot. Specify the payment method–whether it’s cash, card, or check–right after the amount. If relevant, include any reference number for tracking purposes. Then, provide the date and time of the transaction, as well as the name of the business or individual receiving the payment. This ensures accountability and clarity.
Next, include a space for the payer’s name. This helps both parties keep track of who made the payment. In case of refunds or disputes, this information becomes crucial. If applicable, add a line for the payer’s contact information for follow-up purposes. Always have a place for both signatures–of the payer and the payee. This confirms mutual agreement on the transaction details.
Consider adding a brief description of what the payment is for. It’s useful for both parties, especially in cases where the payment covers multiple items or services. To enhance usability, incorporate a simple, user-friendly format, avoiding any unnecessary clutter. The simpler the template, the quicker the transaction process.