To create a flat deposit receipt template, focus on clarity and precision. Make sure the template includes fields like the payer’s name, date of transaction, deposit amount, and a unique receipt number. This ensures both the depositor and recipient have a clear record of the transaction.
Use a simple layout that prioritizes readability. Include a section for both parties to sign, confirming the accuracy of the transaction details. This will help prevent disputes and offer legal protection if needed. The date of the deposit should be prominently displayed, so there’s no confusion about when the transaction took place.
For further customization, consider adding company branding or other identifying information in the header. This can make the receipt look more professional while still remaining straightforward. The key is to maintain a balance between functionality and presentation, without overcrowding the document.
Here is the corrected version:
The deposit receipt template should clearly outline the transaction details to avoid confusion. Ensure that the deposit amount, date, and name of the depositor are displayed prominently. Double-check the accuracy of all figures and details before finalizing the document.
Key Elements to Include

Include a reference number for the transaction. This will help track deposits and easily cross-reference records. Always specify the method of payment, whether it’s cash, check, or electronic transfer.
Formatting Tips

Ensure that the font is clear and readable. Use standard font sizes for headings and transaction details to maintain consistency. Avoid cluttering the document with unnecessary information that could detract from the key points.
- Flat Deposit Receipt Template
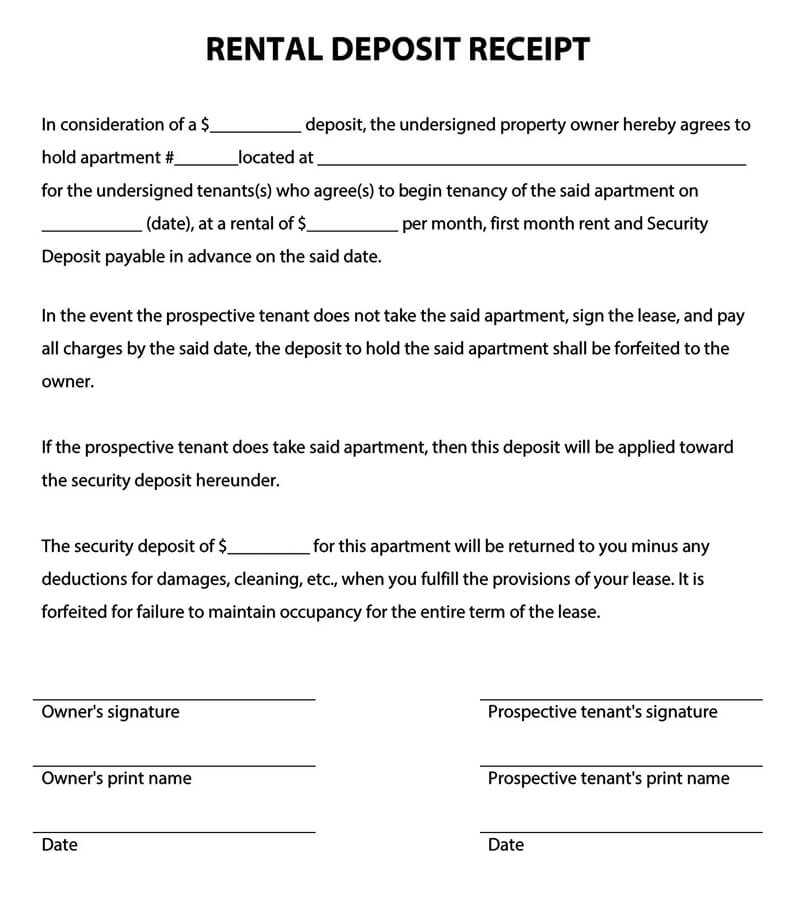
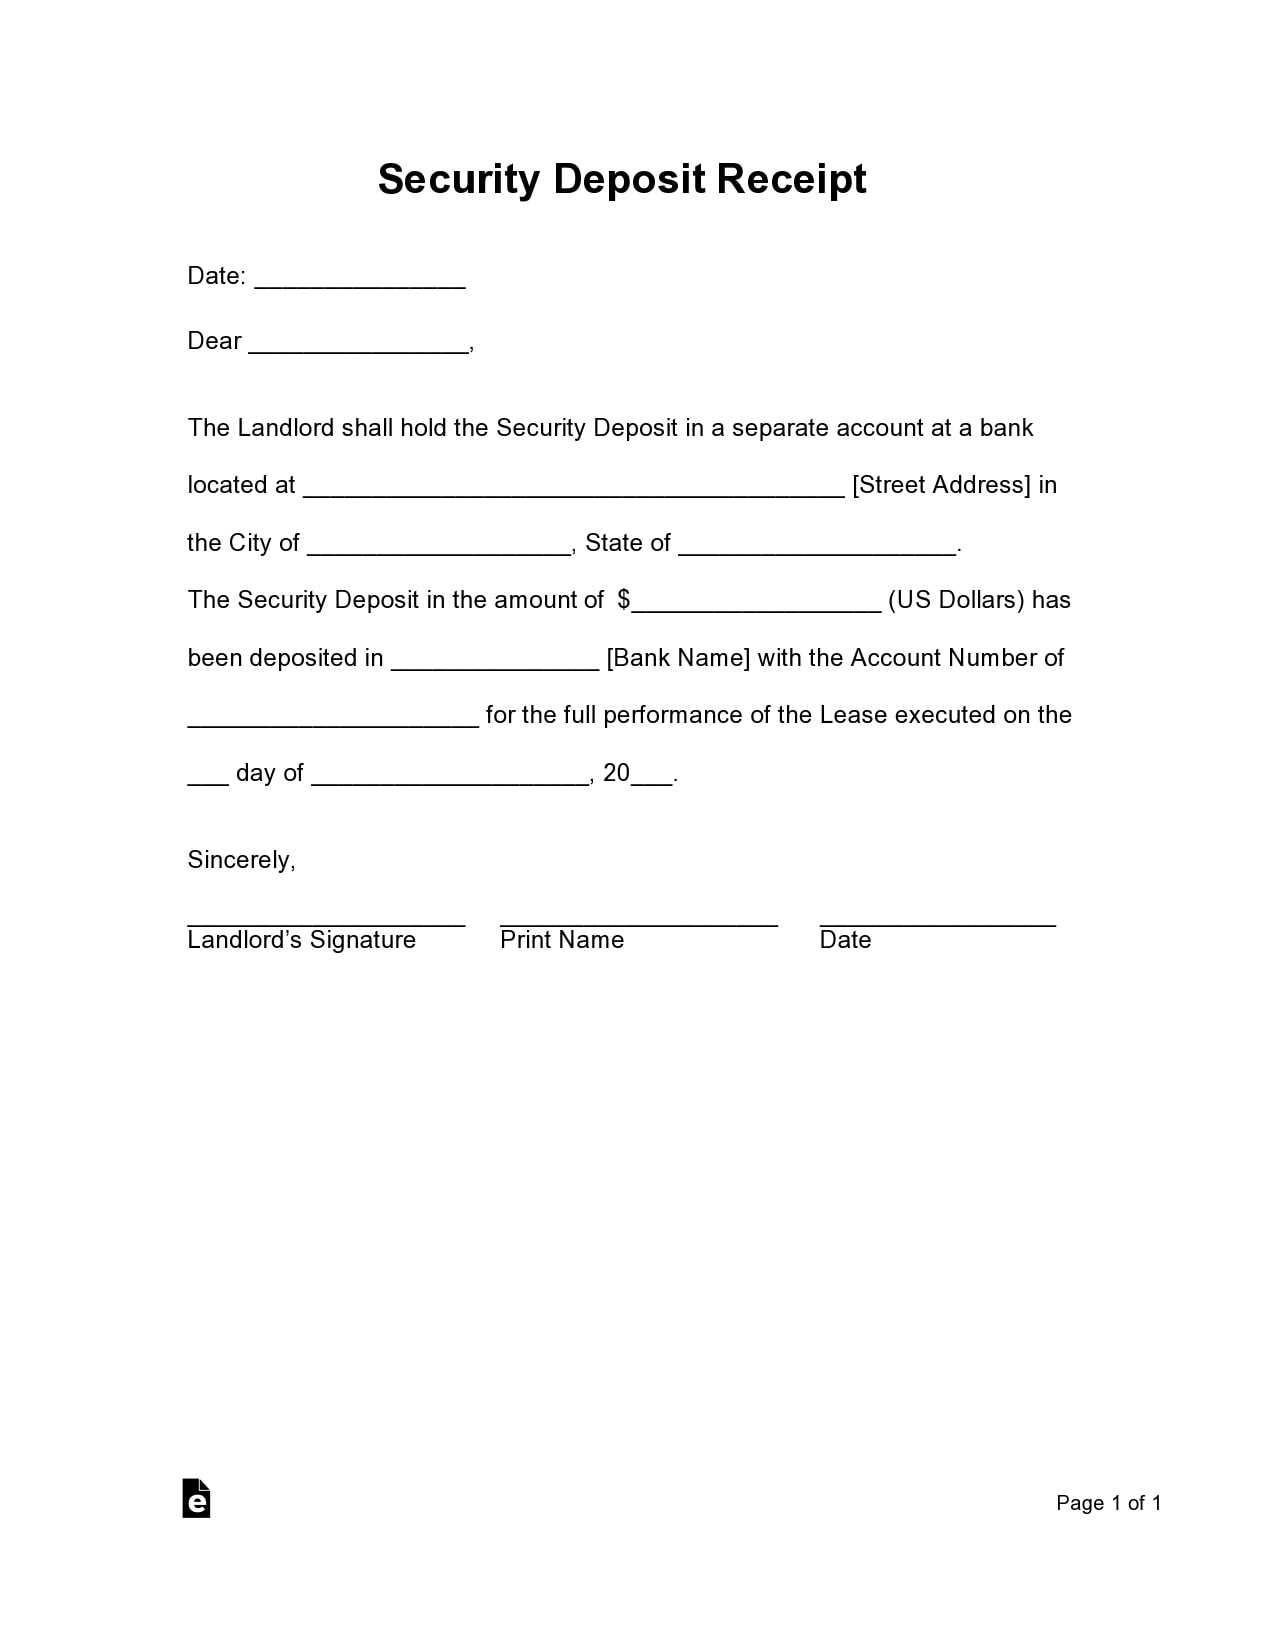
A Flat Deposit Receipt is a straightforward document used to confirm that a deposit has been received. It serves as proof for both parties in a transaction, typically used for rent or other fixed payments. To create an effective Flat Deposit Receipt, include the following key details:
Key Components

- Date of Receipt: Include the exact date the deposit was received to establish a clear record.
- Amount Deposited: Clearly state the amount paid, ensuring it matches the amount agreed upon.
- Payment Method: Specify the method of payment, such as cash, check, bank transfer, or another mode.
- Recipient Details: Include the name, address, and contact information of the party receiving the deposit.
- Depositor Details: Provide the name and contact details of the person making the deposit.
- Purpose of Deposit: Briefly describe the reason for the deposit, such as security deposit or advance payment for rent.
- Signature: Both parties should sign the receipt for confirmation and agreement on the details.
Template Structure

- Header: Title the document clearly as “Deposit Receipt” or “Flat Deposit Receipt” at the top.
- Body: Organize the body of the receipt with the components listed above, providing a space for each item. It’s helpful to use bullet points or numbered lists for easy reading.
- Footer: End the receipt with a space for signatures and the date of issue.
Ensure that the receipt is simple and straightforward. Avoid unnecessary information that may clutter the document. Use a clear, readable font to make the document easy to understand and retain the details for future reference.
Design a flat deposit receipt template with clear fields for essential details like the payer’s name, amount, payment method, and date. Set the layout to be simple and user-friendly, focusing on the key information. Start with a title that says “Deposit Receipt” at the top, followed by spaces for the transaction date and reference number. Below, list the payer’s name and address. Then, provide sections for payment amount, the method used (cash, check, or transfer), and any relevant notes. Include a signature line at the bottom for both the payer and receiver, ensuring all required information is covered without cluttering the template. A clean, minimalist design ensures quick filling and easy readability, which is ideal for personal use.
Customize deposit receipts to reflect your business needs and enhance client communication. Start by incorporating your company’s logo, contact information, and a unique receipt number to ensure easy tracking and identification. This creates a professional and personalized touch that clients appreciate.
Adjust the receipt layout by adding specific fields such as the transaction type, payment method, and reference number. This allows for quick reference and categorization of deposits, reducing confusion and improving internal record-keeping.
Incorporate customizable text fields for specific instructions or notes. For example, you can include payment terms, conditions, or reminders related to the transaction. This provides clarity and can help manage expectations on both sides.
Another valuable option is enabling itemized lists for businesses dealing with multiple products or services. This can break down the deposit amount per item, making the receipt not only more informative but also useful for accounting purposes.
Consider adding a section for digital signatures. This feature boosts authenticity and streamlines approval processes, especially in online or hybrid transactions. It also allows both parties to confirm the deposit’s details electronically, ensuring a faster, more secure transaction process.
Lastly, adapt the format to different mediums. Offering printable, PDF, or email-friendly formats makes it easier for clients to store or forward receipts, enhancing their experience with your business.
Make sure the deposit receipt clearly displays all essential details. Avoid omitting key information such as the deposit amount, date, and payment method. These details must be easily readable and accurate to prevent confusion.
Do not overload the receipt with unnecessary design elements. Stick to a simple and clean layout that focuses on functionality. Too many graphics or excessive text can make it hard to find critical details at a glance.
Using inconsistent fonts and font sizes can cause readability issues. Keep the typography uniform across the document. This helps users quickly scan and understand the information without distractions.
Neglecting to include contact details for customer service or support is a common mistake. Always provide a way for recipients to reach out if there are issues with their deposit.
Don’t forget to include a unique reference number or code for each deposit. This can help in tracking the transaction and resolving any disputes later on.
Failing to properly format dates or amounts can lead to confusion. Ensure the date is displayed in a standard format (e.g., YYYY-MM-DD) and amounts are presented clearly, using proper currency symbols and decimal points.
| Error | Impact | Correction |
|---|---|---|
| Missing deposit amount | Confusion or disputes over the amount | Ensure the amount is clearly shown and highlighted |
| Inconsistent formatting | Hard to read or process information | Use consistent fonts and formatting throughout |
| Omitting contact info | Customer unable to resolve issues | Always include customer support details |
| Incorrect date or amount formatting | Errors in processing or understanding the receipt | Use standard date and currency formats |
Ensure that the format of your flat deposit receipt clearly outlines the transaction details. Include the deposit amount, date of deposit, and the account to which the funds were credited. Double-check the recipient’s name and address for accuracy. The inclusion of any reference numbers or transaction IDs helps trace the deposit back to the source.

Always provide both parties with a copy of the receipt. Make sure to have a professional layout that organizes information neatly. Keep the receipt concise, listing only the necessary data–too much detail can confuse the purpose of the document.
Make sure the receipt is easily readable by using standard fonts and clear text size. If you are including signatures, ensure both parties sign in appropriate places to validate the document. Add a simple confirmation section, such as “Amount received” or “Deposit confirmed,” to prevent ambiguity.