To create a pet deposit receipt, make sure to include key details such as the date of payment, tenant information, and the specific amount of the deposit. Clearly specify that the deposit is for any potential damage caused by pets during the tenancy. Also, include the landlord’s name or company details and a section explaining the terms under which the deposit might be returned or withheld.
Format Your Receipt Clearly by organizing the information in a logical way. Start with basic contact details and move on to payment specifics. Include a unique receipt number for tracking, and make sure both the tenant and landlord sign the document to confirm the agreement.
Be Transparent about how the pet deposit will be managed. Clearly state the amount, any non-refundable portion, and conditions for return. Ensure the template has space for notes, in case there are special agreements or exceptions made for specific tenants or pets.
Use simple, understandable language to avoid confusion and ensure both parties are on the same page regarding the pet deposit’s purpose and conditions for refund.
Got it! I’ll make sure to keep things more natural and direct. Let me know if there’s anything else you’d like me to adjust.
- Pet Deposit Receipt Template
To create a clear and effective pet deposit receipt, include the following key elements:
- Tenant Information: Include the tenant’s full name and address.
- Pet Details: Clearly describe the pet(s), including type, breed, and age.
- Deposit Amount: Specify the amount of the pet deposit and the date received.
- Purpose of Deposit: Mention the reason for the deposit (e.g., damage prevention, cleaning, etc.).
- Landlord’s Information: Provide the landlord’s name and contact details.
- Terms of Deposit: Include conditions under which the deposit will be refunded or retained (e.g., pet damage, non-refundable fees).
- Signatures: Both parties should sign and date the receipt to acknowledge agreement.
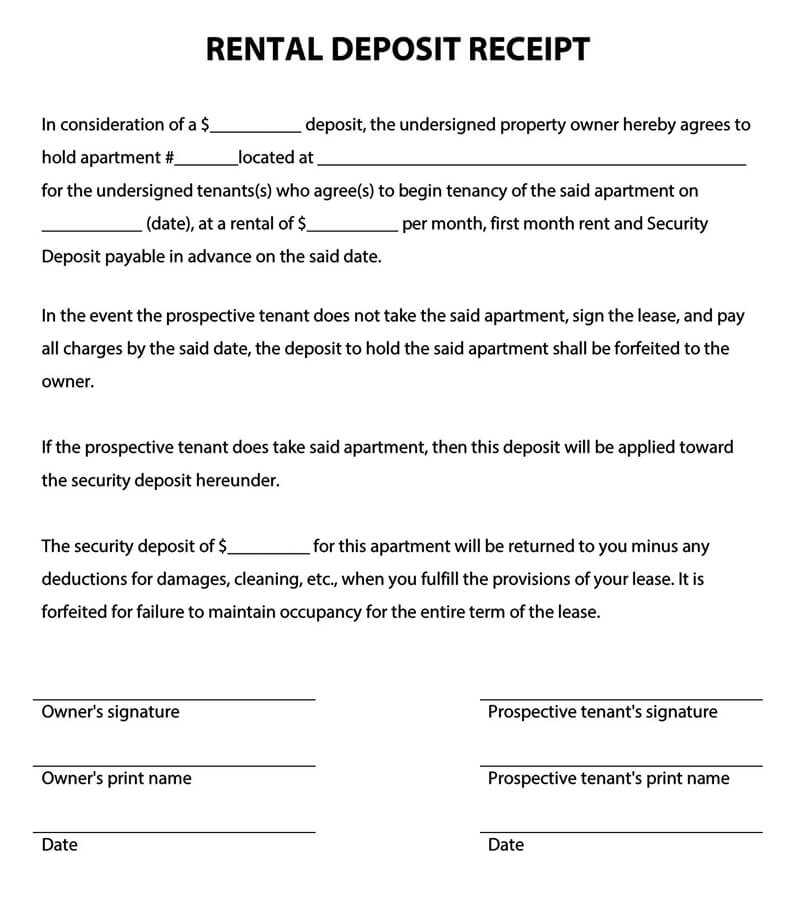
Example Template:
Below is a basic format you can adapt:
Pet Deposit Receipt
Tenant Name: [Tenant's Full Name]
Tenant Address: [Tenant's Address]
Date: [Date of Receipt]
Pet Details:
Type: [Pet Type]
Breed: [Pet Breed]
Age: [Pet Age]
Deposit Amount: $[Amount]
Purpose of Deposit: [Reason for Deposit]
Landlord Name: [Landlord's Name]
Landlord Contact: [Landlord’s Contact Info]
Terms: [Conditions for Refund or Retention]
Signature of Tenant: ____________________
Signature of Landlord: ____________________
Ensure this template covers all relevant details for clarity and legal purposes. Adjust the language as needed based on local laws and lease terms.
To create a pet deposit acknowledgment, begin by clearly stating the amount of the deposit, the date it was paid, and the reason for the deposit. This ensures both parties are aware of the financial arrangement.
Key Information to Include
Make sure to include the tenant’s full name, property address, and details about the pet (such as type, breed, and size). Specify the conditions under which the deposit will be refunded, like the return of the property in good condition, and outline any non-refundable portions if applicable.
Agreement Terms
Clearly mention any responsibilities related to damages caused by the pet. Include a clause that the tenant agrees to pay for any additional cleaning or repairs necessary due to their pet. Finally, ensure both the landlord and tenant sign and date the acknowledgment to confirm mutual agreement.
Ensure the pet deposit form includes the full names of both the landlord and tenant. Include the rental property address for clarity, specifying where the pet will stay. Clearly state the deposit amount and any conditions for its return, including details on deductions for damages. Be specific about the pet’s description–name, breed, age, and weight–so there’s no confusion about which animal is covered under the agreement.
List the pet-related responsibilities, such as cleaning up after the pet and handling any noise issues. If applicable, outline how pet damage will be assessed and repaired. Include the date the pet deposit is paid, along with the payment method for transparency. Finally, mention any rules or restrictions regarding pets, such as the number or type of pets allowed and any restrictions on areas the pet can access within the property.
Ensure clarity by using a clean layout with enough white space. Divide the receipt into sections, such as “Tenant Information,” “Pet Information,” “Deposit Details,” and “Payment Information.” This makes it easier to read and understand at a glance.
Use Bold and Clear Headings
Highlight key sections with bold headings. This helps readers quickly locate relevant details. For instance, “Amount Deposited” or “Pet Name” should stand out with bold text to avoid confusion.
Be Specific with Amounts
Clearly state the deposit amount, including both the numerical value and the written amount (e.g., “$200” and “Two hundred dollars”). This reduces any chances of misinterpretation or disputes.
Format dates and payment methods in a standardized manner to avoid ambiguity. For example, use “MM/DD/YYYY” for dates and specify if the payment was made via check, cash, or electronic transfer.
Finally, include a unique receipt number to make future references easier. It adds professionalism and ensures that each transaction is easily traceable.
Clearly define the amount of the pet deposit. Avoid vague language such as “a reasonable amount” or “an appropriate sum”. The deposit should be specific to avoid misunderstandings later.
1. Not Stating the Purpose of the Deposit
Specify that the pet deposit is intended to cover damages or cleaning costs caused by the pet. This avoids confusion about what the deposit can be used for.
2. Failing to Include Terms for Return of the Deposit
Include a clear outline of the conditions under which the pet deposit will be returned, such as the pet causing no damage or excessive wear. Lack of this detail could lead to disputes.
3. Not Addressing Pet Behavior or Restrictions
Clearly list any behavioral issues that could affect the deposit, like aggressive behavior or excessive noise. Restrictions on pet types or sizes should also be mentioned to prevent misunderstandings.
4. Ignoring State or Local Laws
Ensure the document aligns with local laws regarding pet deposits. Some areas may have limits on deposit amounts or specific rules about what can be charged.
5. Lack of Documentation for Pet Condition
Before accepting the pet deposit, document the pet’s condition with the tenant. This helps establish a baseline in case any issues arise during the tenancy.
| Common Mistakes | How to Avoid |
|---|---|
| Vague deposit amount | Specify the exact amount of the deposit |
| Unclear deposit purpose | State the deposit is for damages or cleaning |
| No terms for return of the deposit | Clarify the conditions for returning the deposit |
| Not addressing pet behavior | List pet behavior restrictions and responsibilities |
| Not following local laws | Check state or local regulations before writing the document |
| No pet condition documentation | Document the pet’s condition before the lease begins |
Always check your local laws before asking for a pet deposit. Some states or cities limit the amount you can charge or require specific conditions for its use. Make sure your pet deposit aligns with these legal requirements to avoid disputes or fines.
Amount Limits
Many areas impose a cap on pet deposit amounts. For example, the deposit may be restricted to a certain percentage of the rent or a flat amount. Ensure that your deposit fee does not exceed these legal limits.
Refund Conditions
In most jurisdictions, the pet deposit must be refundable if no damage occurs. If you retain any portion of the deposit, you need to provide an itemized list of damages. Failure to do so may lead to legal challenges from tenants.
- Check the refund conditions for your area before including them in your lease agreement.
- Make sure to document the condition of the rental property before and after the tenant moves in and out.
- Ensure that the lease outlines how the deposit will be returned or deducted for damages.
Including clear, legal terms about the pet deposit in your lease agreement helps avoid potential conflicts with tenants and keeps you compliant with local regulations.
Issue a pet deposit receipt immediately after the tenant pays the deposit. This ensures both parties have proof of the payment and the terms of the deposit are clear. Keep a copy for your records and provide one to the tenant.
- After initial payment: As soon as the tenant provides the deposit, give them a receipt for verification.
- During lease signing: Include the receipt if the pet deposit is paid during the lease agreement’s signing.
- When renewing the lease: If a pet deposit is required at lease renewal, issue a new receipt to reflect the updated terms.
Always issue the receipt before the tenant moves in, especially if the deposit is meant to cover potential damage caused by pets. This protects both you and the tenant in case of disputes.
Pet Deposit Receipt Template
Use this simple template to ensure clarity and transparency when collecting a pet deposit from tenants. It should include all necessary details to avoid misunderstandings and protect both parties.
Basic Details
The receipt must contain the following information:
- Tenant’s name
- Landlord’s name
- Pet description (type, breed, name)
- Deposit amount
- Date of payment
- Terms for deposit refund
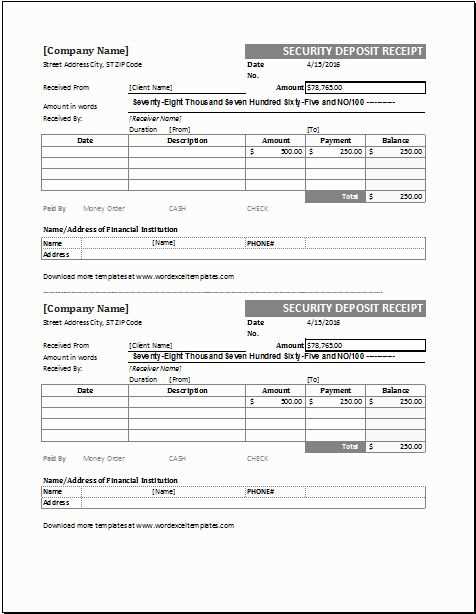
Template Example
Here’s a sample layout you can use:
| Tenant Name | [Tenant Name] |
|---|---|
| Landlord Name | [Landlord Name] |
| Pet Description | [Pet Type, Breed, Name] |
| Deposit Amount | $[Amount] |
| Date of Payment | [Date] |
| Refund Terms | [Conditions for Refund] |
This template ensures both parties are on the same page, reducing confusion and setting clear expectations about the pet deposit and refund process.