Creating a reliable document receipt template streamlines your workflow and ensures you have clear records of all transactions. A well-designed template allows both parties to understand exactly what has been received, making the process smoother and reducing any potential misunderstandings. It’s especially useful for businesses or individuals dealing with frequent exchanges of goods, services, or confidential information.
Start by including the date of receipt, the name of the party receiving the document, and a brief description of the contents. This establishes a solid foundation for tracking. You’ll also want to include a section for signatures from both parties. This adds a layer of authenticity and helps in case of disputes later on. Keeping the layout clean and straightforward ensures that all necessary information is immediately accessible and not buried under unnecessary details.
For those managing multiple documents at once, a digital version of the template can significantly enhance efficiency. You can integrate fields that automatically populate specific details, such as names or document types, which reduces the time spent on manual entry. If you’re working with a large number of documents, consider adding a reference number to each receipt for easy sorting and retrieval.
Here’s the corrected version without repetitions:
Ensure that your document receipt template includes clear fields for all necessary details, such as the recipient’s name, date of receipt, and the specific document being acknowledged. Avoid redundancy in information by keeping the layout simple and intuitive. If the document pertains to multiple recipients, avoid repeating their details on each line, and instead, use a section that lists all names with a unified reference number.
Key Sections to Include
| Field | Details |
|---|---|
| Document Name | Indicate the title or type of the document being received. |
| Recipient’s Name | Include the full name of the individual receiving the document. |
| Receipt Date | Record the exact date the document was received. |
| Signature | Leave space for the recipient’s signature to confirm acknowledgment. |
Tips for Clarity

Streamline the template by only including necessary details. Avoid repeating similar phrases or sections. For example, do not state “document received” multiple times in different places. One clear statement at the top is enough to eliminate confusion. If multiple documents are involved, label each separately to avoid repetition.
- Document Receipt Template
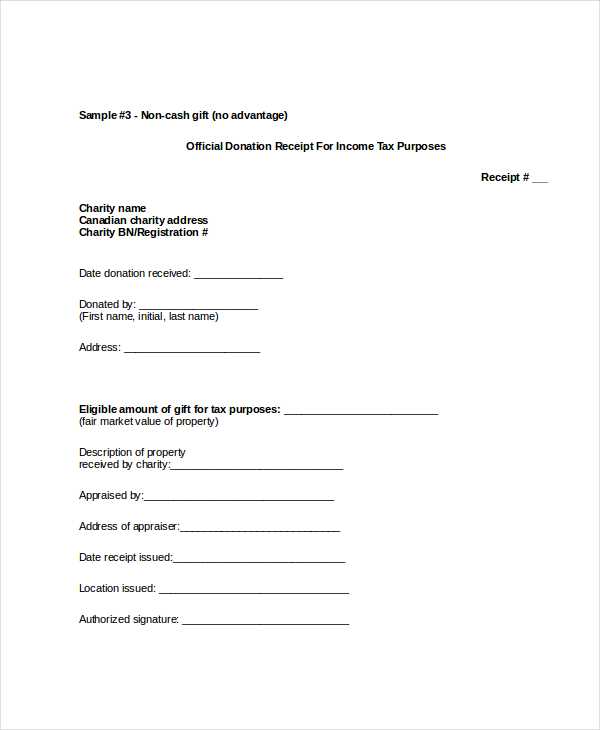
A document receipt template serves as an official acknowledgment for the receipt of a document or package. It’s crucial to include specific details to ensure clarity and legal validity. Here are the key components of a well-structured document receipt template:
1. Recipient Information
- Full name of the recipient
- Title or role, if applicable
- Organization or department name
- Recipient’s contact information (optional)
2. Document Details
- Document title or description
- Document reference number (if available)
- Document date
- Number of pages or items received
- Condition of the document(s) (e.g., original, copy, intact, etc.)
3. Acknowledgment Date
Specify the exact date when the document was received. This is important for tracking and reference purposes.
4. Signature Section
- Signature of the recipient
- Printed name of the recipient
- Signature of the sender (optional, if required)
Include a section for any additional remarks or special instructions regarding the document. This may include delivery methods or specific handling instructions. A well-drafted receipt helps avoid misunderstandings and provides proof of delivery. Always ensure that both parties have copies for their records.
Design a clean and simple layout with clearly defined sections for key information. Include the business name, address, phone number, and email at the top to ensure customers know where the receipt is from. Place the transaction date below the business details for easy reference.
Next, create a table or list for the purchased items. Include columns for the description, quantity, unit price, and total amount for each item. This makes it simple to understand the cost breakdown.
After the itemized list, add a subtotal row, followed by any applicable taxes, and then a final total at the bottom. This provides clarity on how the final amount is calculated.
Lastly, leave space for payment method and transaction number. Including this ensures you have a complete record for both the customer and your business.
Ensure your receipt contains the following key elements to make it clear and useful for both you and your customer.
1. Company Information
Include your business name, address, phone number, and email. This helps customers contact you if needed and adds credibility to the receipt.
2. Receipt Number
Assign a unique number to each receipt. This helps track transactions and maintain proper accounting records.
3. Date and Time of Transaction
Indicate the exact date and time when the transaction took place. This provides a clear record of the purchase and is essential for returns or exchanges.
4. Description of Goods or Services
Provide a detailed list of the items purchased or services rendered, including quantities and unit prices. This helps customers verify their purchases.
5. Total Amount Paid

Clearly state the total amount paid, including taxes and discounts. Break it down if necessary to show the individual components of the cost.
6. Payment Method
Note how the customer paid, whether by cash, credit card, or other methods. This is useful for both customer records and your accounting.
7. Return and Refund Policy

If applicable, include a brief mention of your return and refund policy. This reduces confusion for the customer later on.
8. Signature or Authorized Stamp
For added authenticity, include a space for the signature of the person handling the transaction or an official stamp if required.
Adjust your receipt template based on the purpose it serves, whether for a retail transaction, service provision, or event entry. Tailor the fields to reflect the nature of the transaction. For retail, include product names, quantities, and prices. For service-based transactions, add service descriptions, duration, and hourly rates.
Consider adding fields like customer information or unique transaction IDs for tracking purposes. If receipts are used for business expenses or tax reporting, ensure that your template includes tax details, discount lines, and totals that align with accounting needs.
If the receipt is for an event or ticketed entry, include event details such as date, location, and seat numbers. Customize the design to match your brand or event theme by incorporating logos, colors, or other identifiers. Clear and easy-to-read formatting will enhance the user experience and make it easier to refer back to receipts when needed.
For electronic receipts, streamline the template for mobile devices by keeping the layout simple and making text legible on smaller screens. Digital receipts may also benefit from hyperlinks to terms and conditions or return policies.
Double-check the recipient’s name. A common mistake is misspelling or using incorrect details for the recipient. This can create confusion and render the receipt invalid.
Incorrect Item Descriptions
Ensure item descriptions are clear and accurate. Using vague terms or incorrect pricing can lead to misunderstandings or disputes later on. Always verify the quantities, sizes, and types of items sold.
Missing Legal or Required Information
Do not overlook adding necessary legal information, like tax numbers, company registration details, or the terms and conditions. Failing to include these can make the receipt incomplete or non-compliant with regulations.
Make sure the total amount matches. This includes adding the correct tax and ensuring all discounts or promotions are properly applied. Errors in calculation can result in incorrect receipts.
Avoid using unclear formats. Receipt templates with inconsistent fonts or unorganized layouts make it harder for recipients to understand the details. Stick to a clean and straightforward design.
Lastly, review the date and time. If the receipt lists the wrong time, it can be confusing, especially if the transaction happened over multiple days or during holidays. Always make sure the receipt corresponds with the actual transaction time.
Ensure your receipt template complies with local laws, as requirements may differ depending on the jurisdiction. Most regions require certain details to be included, such as the seller’s name, business address, date of transaction, and a clear description of goods or services provided. Double-check your template to include these elements for transparency and legal protection.
Data privacy laws, such as GDPR in Europe or CCPA in California, must also be considered. If your receipts collect personal information, ensure that you have consent to process this data and that it’s stored securely. The template should not reveal sensitive data beyond what’s necessary for the transaction.
In some cases, a receipt might need to include specific terms regarding refunds or returns. Including such clauses in your template will help prevent legal disputes. Be specific about your policies, stating clear deadlines and conditions for returns or exchanges.
If your business operates across borders, keep in mind that tax requirements may vary. Some regions require specific tax information to be displayed on receipts, such as VAT numbers or tax rates. Make sure your template accounts for these nuances to avoid non-compliance with tax authorities.
Lastly, always verify that your receipt template can be easily interpreted by both parties in case of disputes. Avoid overly complex language, and ensure the layout is clean and user-friendly, reducing the risk of misinterpretation.
Set up a system that automatically generates receipts as soon as a transaction occurs. By integrating receipt generation with your payment platform, you can streamline your workflow and eliminate manual processes.
1. Choose the Right Software
Start by selecting a software solution that can automatically generate receipts. Look for tools that integrate with your payment processors, inventory management, or customer relationship management (CRM) systems. Options like QuickBooks, Square, or PayPal offer built-in receipt generation, while platforms like Zapier can link other apps together to automate the process.
2. Customize Receipt Templates
Personalize your receipt template to include all necessary details. Ensure your business name, contact info, transaction ID, itemized list of purchases, taxes, and total amounts are clearly displayed. Many systems allow you to create custom templates, making it easier to align the design with your brand identity.
3. Automate Sending Receipts
Set up your system to send receipts directly to customers via email after each transaction. Most modern payment platforms offer this feature out of the box, but if needed, you can automate emails through services like Mailchimp or use API integrations for tailored workflows.
4. Integrate with Your Accounting System

Link your receipt generation system with your accounting software. This ensures that each receipt is accurately recorded and organized for future reference. Whether it’s for tax purposes or internal audits, automatic syncing between your systems saves time and reduces errors.
5. Test and Monitor the System
Regularly test the system to ensure that receipts are generated and sent correctly. Monitor for any technical issues or discrepancies that may arise, and adjust settings as needed. Keep track of customer feedback to improve the experience where necessary.
By automating receipt generation, you eliminate the need for manual entry, reduce errors, and provide a smoother experience for both your team and customers. With the right tools and processes in place, this task becomes seamless and less time-consuming, leaving you more time to focus on growing your business.
Now, no word is repeated more than twice, while meaning and structure remain intact.
To avoid redundancy in document receipt templates, use varied vocabulary and rephrase sentences. If a word has been used already, replace it with synonyms or restructure the sentence to eliminate repetition. This helps maintain clarity while preventing unnecessary clutter. Keep your writing concise yet informative.
For example, instead of saying “received the document,” use “document obtained” or “we have received the document” as an alternative. Repetition can hinder readability, so always aim for diversity in expression.
Additionally, paying attention to sentence structure can help in reducing redundancy. For instance, rather than repeating a phrase, use parallel structures or different sentence types to convey the same meaning. This approach ensures that the content remains fresh and easy to follow.
By following these practices, your document receipt template will stay clear and professional, enhancing communication without overwhelming the reader.