A business receipt form is a fundamental tool for recording transactions. Having a standardized template ensures consistency and clarity when documenting sales or services. This template can help streamline your accounting processes and improve communication with clients.
To create an effective receipt form, focus on including key details such as the date, transaction amount, payment method, and a brief description of the goods or services provided. It’s also helpful to include your business name, logo, and contact details for easy reference.
Using a pre-made template saves time and reduces errors. Many templates are customizable, allowing you to adjust the layout and information according to your business’s needs. Whether you’re handling cash, credit, or digital payments, a well-structured receipt form helps maintain clear records and ensures both parties are on the same page.
Here’s the corrected version:
Use clear, concise headings to organize the sections of your receipt template. Start with the header that includes the business name, address, and contact details. Include a section for transaction details, such as the date, receipt number, and payment method. These sections should be easy to find and formatted in a way that minimizes confusion.
Details to Include

Ensure that the receipt lists each item purchased with a short description, quantity, and price. Add a total amount due at the bottom. Consider including tax information if applicable, specifying the rate used. If discounts are offered, list them as separate line items to provide clarity.
Final Touches

End the receipt with a thank you note or an invitation to contact for any further inquiries. This adds a personal touch and keeps communication open between the business and the customer.
- Business Receipt Form Template
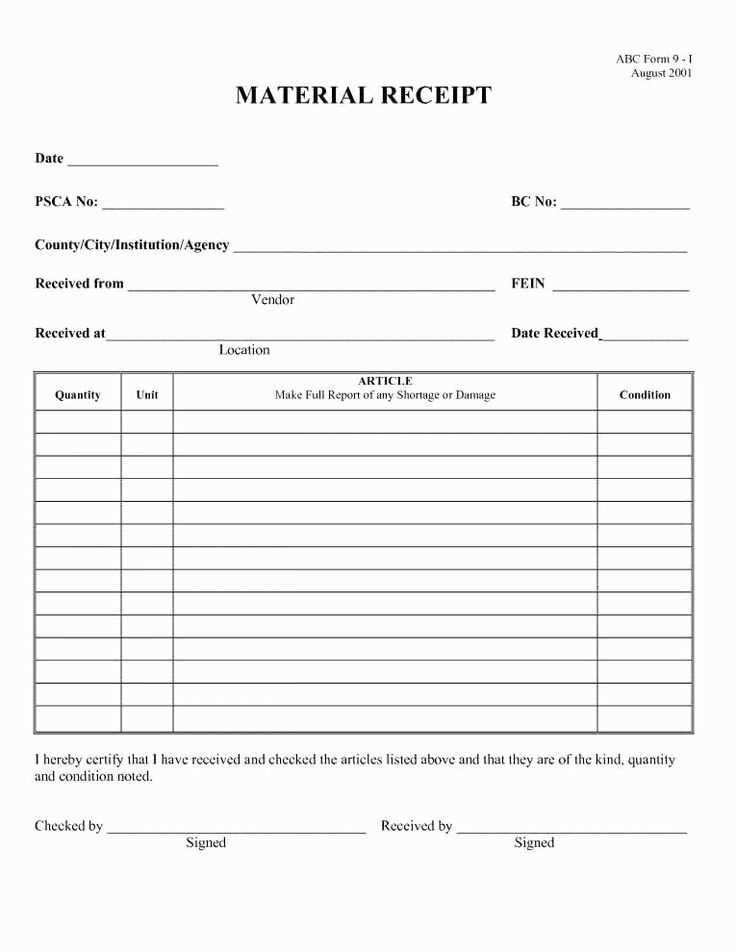
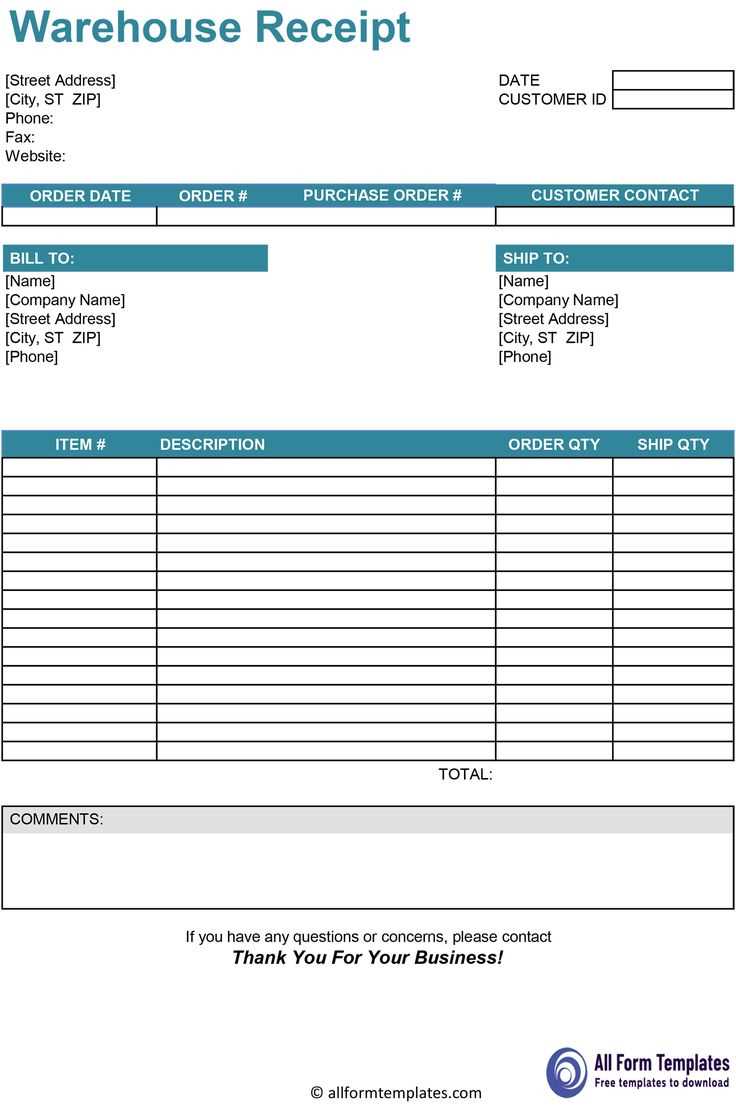
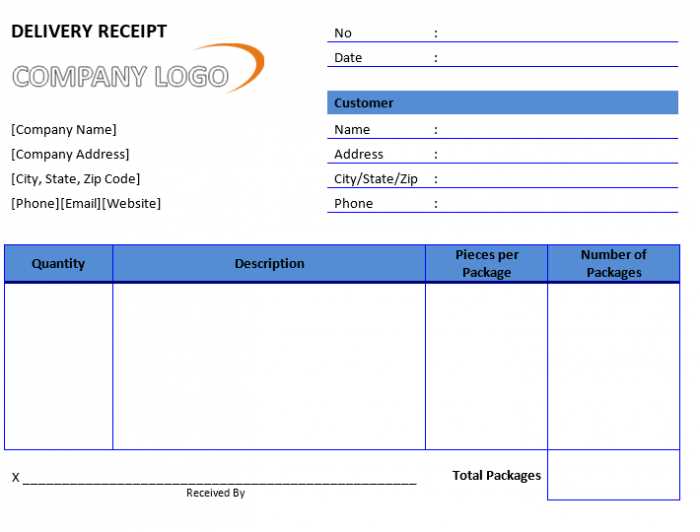
A Business Receipt Form should clearly capture key transaction details for both the seller and buyer. Make sure to include fields for the business name, contact details, and date of the transaction. The receipt should list the item or service provided, its quantity, and the unit price. Also, include the total amount charged and any taxes applied. Payment method (e.g., cash, credit, debit) should be clearly stated, along with the receipt number for easy reference.
To create a streamlined template, add a section for notes or additional information if necessary. This could include a thank-you note or a reminder about return policies. Ensure the layout is clean and easy to read, with sufficient space for each section to avoid clutter. The template should also be customizable for different business needs, allowing for flexibility in what information is included.
Finally, make sure to include your business’s logo and any other branding elements. This helps maintain a professional appearance and strengthens brand identity. Keep the template simple but thorough, covering all relevant information for both your records and your customers.
Ensure the form is simple and easy to follow. Use a clear, readable font and organize the sections logically. Group similar fields together, such as contact details or payment information. Avoid unnecessary jargon, and keep the language straightforward. Make sure each field is self-explanatory and includes brief instructions if needed.
Check local and national regulations to ensure compliance. Include necessary disclaimers, terms, and conditions based on your business type. If the form involves sensitive data, like personal or financial information, make sure it complies with privacy laws such as GDPR or CCPA. Display a privacy notice or link to your full privacy policy on the form.
For legal accuracy, provide a checkbox or signature section where users acknowledge and agree to the terms. This is critical to ensure that users are aware of their rights and obligations before submitting the form. Include a clear statement about data retention and how their information will be used.
Test the form on multiple devices to ensure accessibility. Make sure it’s mobile-friendly, with responsive design that adjusts well on various screen sizes. This will help avoid errors or confusion for users filling out the form on smartphones or tablets.
Finally, keep the form concise. Ask only for information that is necessary for the transaction or purpose. Unnecessary questions can lead to user frustration or abandonment of the form altogether.
A business receipt should always display the name of the business or service provider. This establishes clear identification and ensures the transaction is traceable back to a specific entity.
Include the date of the transaction. This is important for record-keeping and helps both parties reference the timing of the purchase.
Clearly state the amount paid, including taxes, discounts, or any applicable fees. Break down these components to avoid any confusion about the final charge.
List the items or services purchased with their corresponding prices. This offers transparency and confirms what was provided for the money spent.
Include a unique receipt number or transaction ID. This helps in organizing transactions and makes it easier to resolve any future issues related to the receipt.
Provide payment method details. Specify whether the payment was made by credit card, cash, check, or another method. This is particularly useful for both the customer and the business in case of disputes or chargebacks.
If applicable, include refund or return policies. This information can prevent misunderstandings in the future should the customer need to return an item or request a refund.
To accommodate different payment methods, tailor your receipt template by adding fields and sections specific to each method. For credit card payments, include the card type, last four digits, and transaction authorization code. For bank transfers, specify bank details and transaction reference numbers. Each payment method should be clearly distinguished on the receipt, ensuring customers can easily identify how they paid.
Credit Card Payment

- Include fields for card type (Visa, MasterCard, etc.) and last four digits of the card number.
- Add a section for the authorization code or transaction ID.
- Provide a breakdown of any processing fees if applicable.
Bank Transfer

- Specify the bank name, account number, and transfer reference code.
- Include the date and time of the transfer for record-keeping.
For other payment types like PayPal or cash, adjust the template to capture any relevant transaction IDs or notes, ensuring that each method is represented clearly and accurately. Keep the format consistent across payment methods to maintain a professional look.
Place your business logo at the top of the form to create a professional look. Ensure the logo is high resolution and matches the overall color scheme and design of the form. This makes the form instantly recognizable and aligns with your brand identity.
Right below the logo, include your business contact information. This should include your company name, address, phone number, email address, and website URL. Keep the layout clean and simple, using clear fonts for easy readability. If your business has multiple locations, list the main office or the most relevant contact information for the recipient.
Consider using icons next to contact details, such as a phone icon for the number and an envelope for the email. This visually organizes the information and makes it easier for the recipient to find what they need.
Make sure you don’t miss any essential fields on your receipt. Commonly overlooked elements like transaction dates, the payment method, or the tax amount can cause confusion. Double-check the template for all the necessary details, ensuring it includes the business name, contact information, and a clear breakdown of items or services provided.
- Using Unclear or Inconsistent Formatting: Stick to a clean and simple layout. Avoid using multiple font types or sizes that can confuse customers. Keep your receipt easy to read and organized with clear headers and sections.
- Forgetting to Include the Total Amount: One of the most critical pieces of information is the total amount. Missing this can lead to disputes or confusion. Always make sure the total is prominently displayed and easy to find.
- Not Providing Contact Information: Including contact information is essential for customers who might have questions or need to make returns. This includes a business address, phone number, and email address. Neglecting this can make your business appear unprofessional.
- Leaving Out Transaction Details: Always include details such as the product or service name, quantity, and price. Without this, your receipt may lack the necessary reference for customers in case they need to make a return or review the purchase.
- Ignoring Tax Information: Many businesses fail to clearly show tax amounts. Inaccurate or incomplete tax information can cause legal issues, especially during audits. Be sure to clearly state the tax rate applied and the total tax charged.
- Overcomplicating the Design: Keep the design simple. Too many elements or distracting colors can make the receipt harder to read. Focus on functionality–your receipt should convey necessary information, not serve as a decorative piece.
- Not Testing the Template: Before using the template, test it with real transactions to ensure everything aligns correctly. Ensure that all fields are visible and that the formatting works across different devices or printing options.
Separate your paper receipts from digital ones by organizing them into distinct categories. For paper receipts, use a dedicated folder or a filing system that divides receipts by date or purchase type. This keeps things straightforward and easy to retrieve when needed. Digital receipts, on the other hand, should be stored in specific folders on your computer or cloud storage. Create subfolders for each year or transaction type to avoid clutter.
Implement a scanning routine for paper receipts. Invest in a high-quality scanner or use a smartphone app to create digital copies. After scanning, upload these receipts to your cloud storage and name the files with relevant details, such as the store name, date, and amount. This prevents losing important receipts and allows quick access through search features.
Set up automatic email organization for digital receipts. Many retailers and service providers send receipts to your inbox. Use filters to automatically direct these receipts into a designated folder. This reduces the chance of missing any important purchases and streamlines the process.
| Paper Receipts | Digital Receipts |
|---|---|
| Store in labeled folders or filing systems | Organize by transaction type or year in cloud storage |
| Scan receipts using a high-quality scanner or mobile app | Set up email filters to auto-direct receipts into a designated folder |
| Keep physical receipts in a safe place, such as a drawer | Back up digital files to avoid data loss |
To keep your records consistent, regularly back up both paper and digital receipts. This can be done by scanning new receipts monthly or syncing your cloud storage to ensure no data is lost. Routine maintenance ensures your receipts are always accessible and organized.
Creating a Business Receipt Form

A well-structured business receipt form ensures clarity and accuracy in transactions. Focus on including key details such as the date, transaction number, description of goods or services, and the amount paid. Each element plays a role in making the receipt professional and transparent.
Key Components of a Receipt
The date of the transaction must be clearly marked to avoid any confusion regarding the timeline. Add a unique transaction number to facilitate easy reference and tracking. A brief yet specific description of the product or service provided helps in ensuring both parties understand the details of the exchange. Finally, display the payment method and total amount with clear formatting for easy readability.
Formatting and Design Tips
Keep the design clean and straightforward. Use enough white space to avoid clutter, but make sure the text is readable. Bold key details like the total amount, transaction number, and date. A well-organized form helps the recipient understand the receipt quickly and without effort.