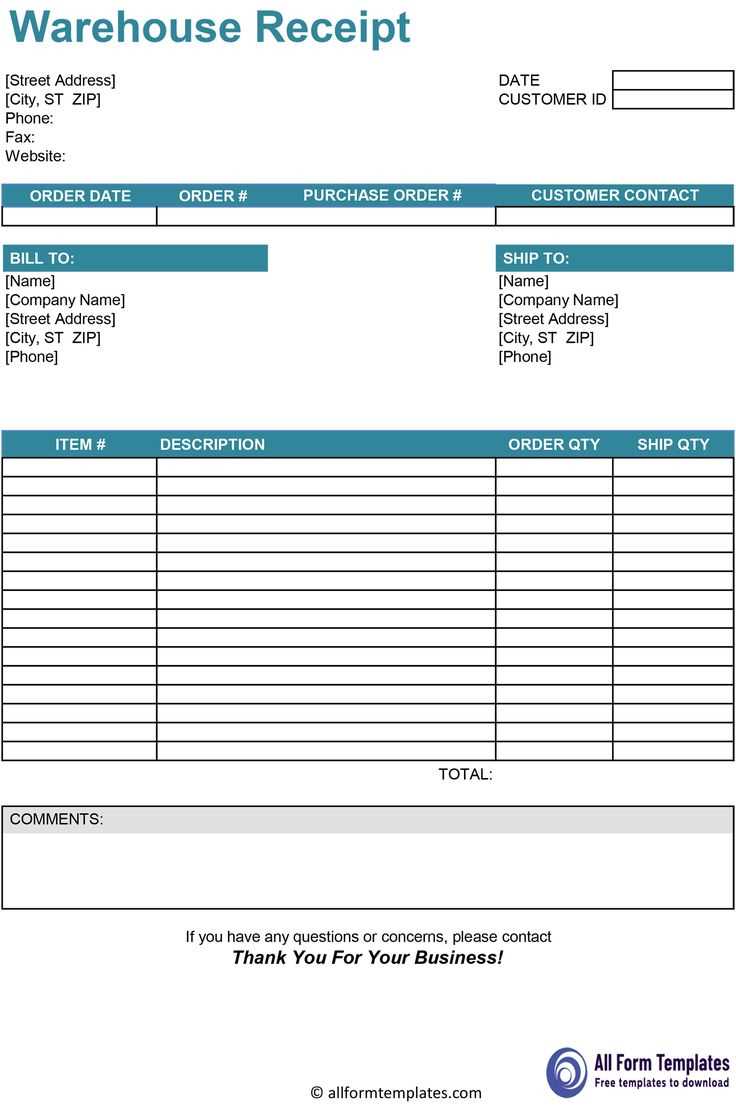
Ensure that your material receipt template matches the specific requirements set by your organization and industry standards. An effective template will help streamline the process of receiving materials and prevent errors in inventory management. The accuracy of information such as the supplier’s details, material descriptions, quantities, and receiving dates is fundamental for traceability and audit purposes.
Start by including clear fields for supplier information and purchase order references. This ensures the materials received can be directly matched to the corresponding order and supplier. Avoid ambiguity in material descriptions; use standardized codes or specific terminology to prevent misinterpretations. Each material entry should have space for quantity, unit of measure, and any additional notes that may indicate discrepancies or special conditions regarding the delivery.
Set up sections for inspection status and quality control checks, where necessary. A designated area for signatures from both the receiving personnel and the supervisor can also help confirm the accuracy and completeness of the receipt. Having this documentation in place improves accountability, minimizes disputes, and simplifies inventory tracking and reconciliation.
Here’s the revised version with repetitions removed:
The template for material receipt must be clear, concise, and free from redundancies. Avoid using the same information in multiple places. This not only improves the clarity but also reduces errors during the data entry process. For instance, ensure that each field is used only once and doesn’t duplicate previous sections or entries.
Ensure that the header section is straightforward, with a clear label for each type of information. Use columns for material type, quantity, supplier name, and date received. This format allows easy data extraction while eliminating unnecessary repetition.
| Field | Description |
|---|---|
| Material Type | Indicate the material’s description or code |
| Quantity | Enter the total amount received |
| Supplier Name | List the name of the supplying entity |
| Received Date | Provide the date the material was received |
Ensure data accuracy by using drop-down lists or predefined options in the template wherever possible. This will help avoid typographical errors and further eliminate repetition. Each section should be independent but aligned to make the data entry process smoother.
- Conformity of Material Receipt Template
Ensure that your Material Receipt Template (MRT) aligns with organizational standards and regulatory requirements. Start by verifying that all necessary data fields are included, such as the material description, quantity, supplier details, date of receipt, and the name of the receiving personnel. Accurate documentation of each of these fields prevents discrepancies and improves traceability.
Standardization of Fields
To maintain uniformity, use a standardized format across all departments. This includes consistent units of measurement, material codes, and reference numbers. A well-structured template will support quick and accurate data entry, reducing the likelihood of human error and making the auditing process easier. Ensure that the template allows for easy cross-checking of received materials against purchase orders or inventory records.
Electronic Integration and Data Validation
Consider integrating the MRT with your inventory management software. This integration allows for automatic updates to stock levels, improving real-time visibility. Additionally, implement data validation rules in your template to prevent incorrect or incomplete entries. This might include checks for valid part numbers, date formats, and predefined quantity ranges to ensure data consistency across the system.
Make sure that the template is easily accessible to all personnel involved in the receipt process, whether through an online platform or as a printed document. Regular reviews and updates to the template will guarantee that it adapts to any changes in the material receipt workflow or compliance requirements.
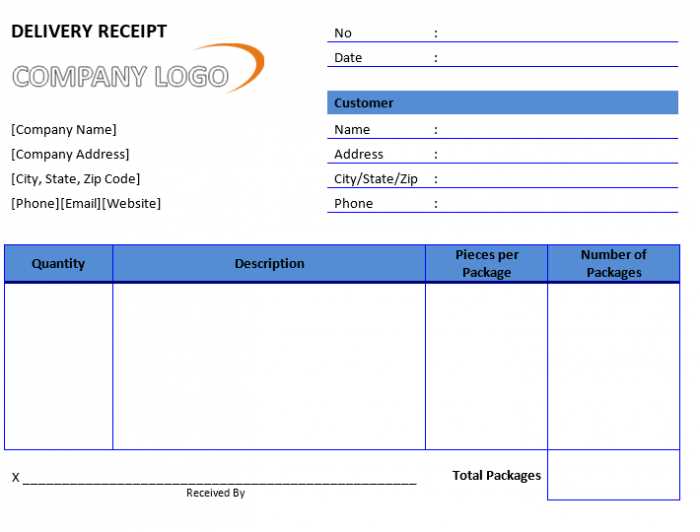
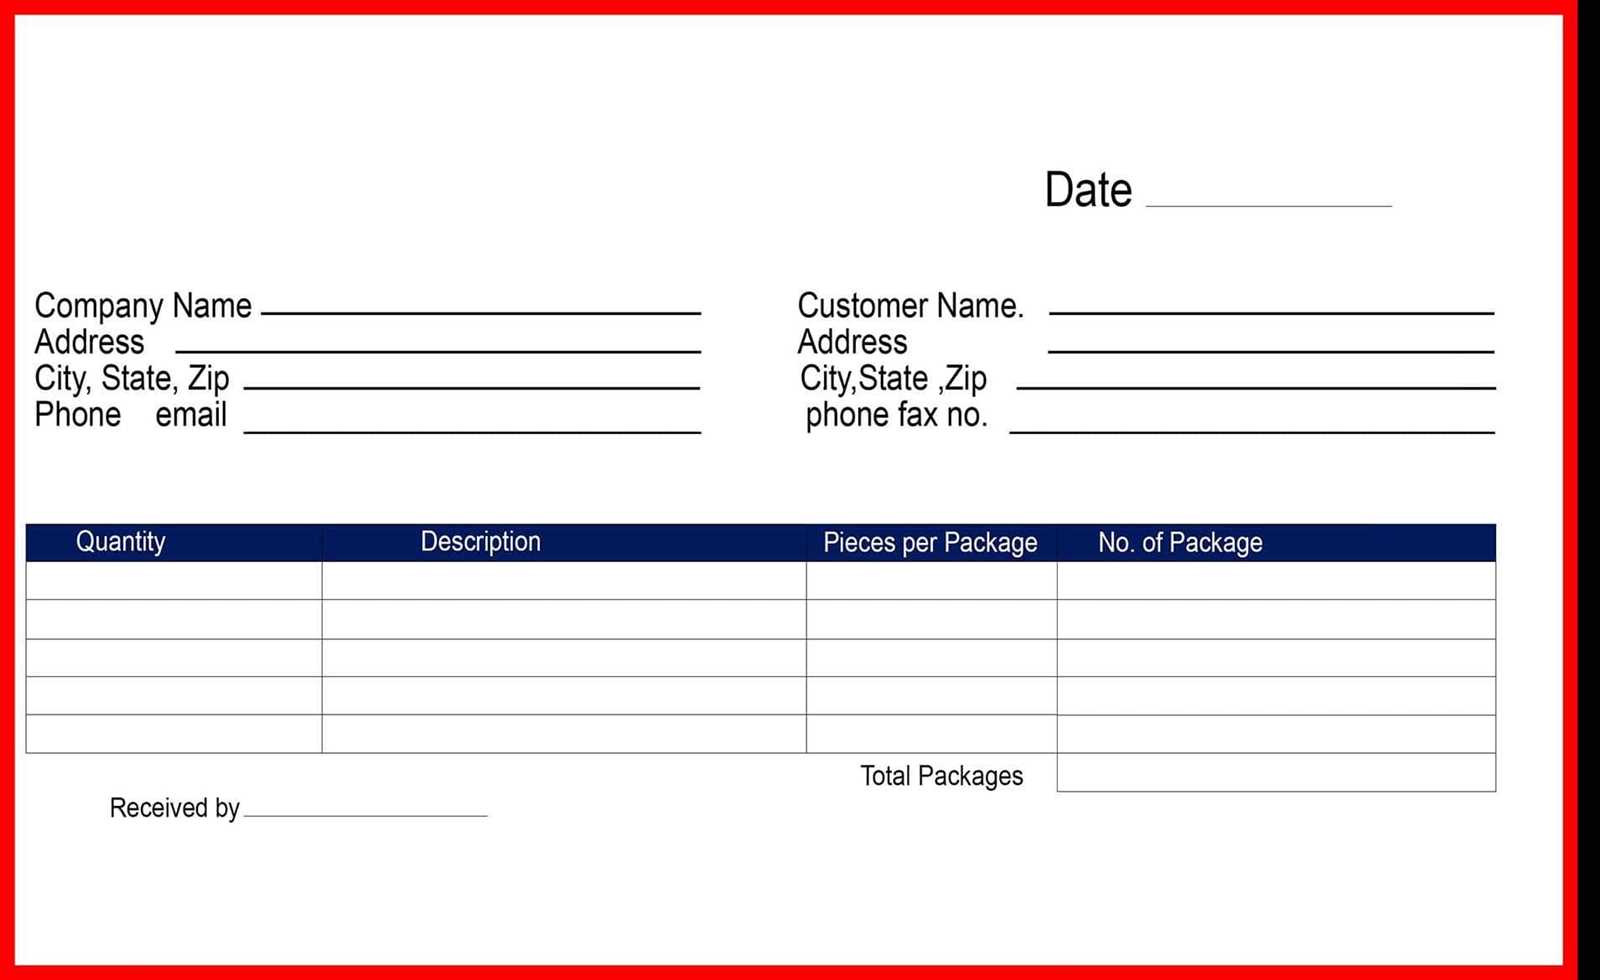
Ensure the receipt template includes key elements like the name of the supplier, the recipient’s name, and a clear description of the materials received. Each material should have a unique identifier or SKU, quantity, and unit of measure listed in a legible format.
Incorporate Standard Legal and Regulatory Information
Check that your template includes any legal or regulatory details required by your region or industry. This could involve tax information, business registration numbers, and terms for returning or exchanging materials. Adding these details ensures your receipt complies with local standards and helps avoid complications in case of audits or disputes.
Ensure Clarity and Accuracy
For clarity, use a structured layout with sections for each key piece of information. Include fields for the date of receipt, the purchase order number, and the signature of the person receiving the materials. This will streamline record-keeping and ensure accuracy when reconciling materials against orders.
Using clear and distinct fonts will help minimize confusion, and if applicable, consider adding barcode or QR code support for easier tracking and integration with inventory management systems.
Ensure that every material receipt is accompanied by a clear and accurate document, detailing the goods or materials received. Legal compliance starts with properly identifying the receiving party, typically the company or department accepting the goods, and noting the transaction date.
1. Accurate Description of Materials
Include a precise description of each item received, such as name, quantity, and specifications. This will help resolve discrepancies between ordered and delivered items. Additionally, ensure that unit measures are consistent with those stated in purchase orders.
2. Documentation of Signatures
Both the sender and the receiver should sign the material receipt, confirming the exchange of goods. The signature of the receiving individual is critical to validate the transaction. Electronic signatures may be acceptable, but confirm local regulations regarding their legality.
3. Purchase Order Reference
Reference the relevant purchase order number on the material receipt. This cross-referencing helps verify that the materials were ordered according to the agreed terms and aligns the receipt with the purchase agreement. It prevents disputes related to quantities or pricing discrepancies.
4. Compliance with Local Regulations
Check the specific requirements for material receipt documentation in your jurisdiction. Local laws may dictate certain formats, mandatory inclusions, or retention periods. Always keep up-to-date with regulatory changes to avoid potential penalties.
5. Proof of Delivery
Ensure the receipt contains proof that the materials were physically delivered to the correct location. This might include a delivery note or tracking number, providing additional verification of the transaction.
6. Record Keeping and Retention
Follow statutory guidelines on record retention. Generally, material receipts should be kept for a period outlined by local laws, typically ranging from 3 to 7 years, depending on the type of materials or the business sector. Proper archiving is necessary in case of audits or legal disputes.
By adhering to these requirements, businesses reduce the risk of legal challenges and maintain a transparent, accountable process for material receipt documentation.
Double-check the quantity of materials received before recording. Compare the physical count with the amount listed in the purchase order or delivery note. Any discrepancies should be resolved immediately with the supplier or warehouse team.
Ensure the correct part numbers and descriptions are entered into the system. Cross-reference with the original purchase order or product catalog to avoid any mix-ups, especially with items that have similar codes or names.
Verify that the unit of measurement (UOM) matches the documentation. Sometimes, materials can be recorded in different units (e.g., kilograms vs. pounds, meters vs. yards), so it’s essential to confirm that the UOM is consistent across all records.
Ensure all required fields are filled out in the material receipt template. Missing information such as batch numbers, supplier names, or delivery dates can lead to confusion during audits or future orders.
Use barcode scanning or RFID technology to speed up the data entry process and reduce human errors. Scanning directly from the physical labels minimizes the chances of input mistakes and ensures faster and more accurate entries.
| Step | Action |
|---|---|
| Step 1 | Check received quantity against delivery notes |
| Step 2 | Verify part numbers and descriptions |
| Step 3 | Confirm the unit of measurement (UOM) |
| Step 4 | Fill out all required fields in the receipt template |
| Step 5 | Utilize barcode scanning for accuracy |
Keep a clear record of any adjustments or returns made to the material receipts. This will help track discrepancies and assist with inventory reconciliation at the end of each month or year.
Train staff on how to properly handle material receipt documentation. Regular training reduces the chances of errors and keeps everyone aligned with best practices for accuracy.
Integrating Supplier Information into Receipt Templates for Materials
Incorporating supplier details into material receipt templates ensures accurate tracking, improves accountability, and reduces errors during material receipt processes. Supplier information should be systematically organized in templates to facilitate smooth workflow and provide clear references for inventory management and invoicing. Here’s how to integrate supplier details into your material receipt templates:
Key Supplier Information to Include

- Supplier Name: Clearly state the supplier’s name for easy identification.
- Contact Details: Include phone numbers, emails, and addresses in case follow-up is needed.
- Supplier ID: Each supplier should have a unique identifier to avoid confusion between similar names or multiple branches.
- Order Number: Link the receipt to the specific purchase order or reference number to track transactions accurately.
- Shipping Method: Document how materials were shipped, especially for urgent orders or custom deliveries.
- Expected Delivery Date: Align the delivery date with supplier commitments to confirm the timeliness of materials.
Best Practices for Integration

- Standardize Templates: Create a consistent format for all supplier receipts, reducing confusion and ensuring clarity for both the receiving team and accounting department.
- Use Automated Systems: Employ software or ERP tools to populate supplier information into templates automatically, minimizing manual data entry and the risk of errors.
- Maintain Data Accuracy: Double-check supplier details regularly to prevent outdated or incorrect information from affecting processes.
- Track Supplier Performance: Use receipt templates to track delivery times, quality of materials, and any issues, which will help in evaluating supplier reliability over time.
By seamlessly integrating supplier details into your receipt templates, you can streamline material management, improve supplier communication, and maintain a smooth operation across various departments.
To address discrepancies in material receipt templates, begin by creating a clear process for verification. Establish a routine check at each stage: from the supplier’s document to internal receipt records. Regularly cross-check the quantities, descriptions, and specifications to ensure accuracy. If discrepancies arise, involve the relevant stakeholders early on to resolve them before they affect inventory or financial records.
Quick Resolution Steps
When discrepancies are identified, perform an immediate audit of the materials received. Compare the original order with the received goods and any supporting documents like shipping receipts or packing lists. If a mismatch is found, flag it and follow up with the supplier for clarification. Make use of a tracking system to document all communications and resolutions.
Preventive Measures

To reduce future discrepancies, enhance the template’s accuracy by standardizing data entry fields and specifying detailed product descriptions. Utilize barcode or RFID scanning technology during receipt, which can reduce human error. Regularly update training materials for staff involved in the receipt process, ensuring they understand the importance of attention to detail and accuracy.
Store material receipts in a secure, centralized digital system to ensure easy retrieval and organization. Implement a consistent naming convention for receipts, which should include relevant details like the date, supplier, and material type. This method simplifies searches and reduces the risk of losing important records.
- Use cloud storage for quick access from any location, ensuring the data is protected by encryption.
- Organize receipts by categories such as material type, project, or department for faster sorting and retrieval.
- Establish clear guidelines on how receipts are scanned, uploaded, and categorized to maintain consistency across your organization.
Regularly back up receipts to avoid data loss. Set automated backup intervals to maintain up-to-date copies of receipts in multiple secure locations. Implement version control to track changes or updates to any material receipt.
- Set up a permission-based access system to ensure that only authorized personnel can modify or delete receipts.
- Train staff on proper receipt handling procedures to maintain data accuracy and compliance.
- Regular audits will help confirm that all receipts are properly stored and correctly labeled.
Leverage search functions within your storage system to find receipts quickly. Ensure your system supports advanced search options such as keyword searches, filtering by date range, or supplier name.
- Use metadata tagging to enhance search functionality and streamline the retrieval process.
- Consider integrating barcode or QR code scanning to track receipts directly from physical materials to your digital system.
Keep a backup of physical receipts for compliance purposes, particularly in industries where hard copies are required for audits or inspections. Store these receipts in fireproof cabinets to prevent damage.
By following these practices, you’ll create a reliable and accessible system for storing and accessing material receipts, improving organization, reducing errors, and ensuring compliance with industry regulations.
Material Receipt Template Conformity
Ensure your material receipt template is simple, clear, and standardized. Use a structured layout to provide quick access to key data, such as material description, quantity, and receiving date. Remove any unnecessary fields that could create confusion. Consistent terminology across the template reduces errors and speeds up the process.
Focus on aligning the template with company standards. This includes the consistent use of fonts, spacing, and data fields to make the receipt easy to read and fill out. Clear labels and guidance help prevent mistakes during data entry.
Integrate space for tracking serial numbers or lot codes for materials that require further inspection or specific handling. It’s crucial for traceability and compliance with quality standards. Make sure there is room for notes if additional handling or checks are needed for certain items.
Ensure compatibility with your inventory management system. This includes using the same naming conventions and formats to reduce manual entry or mismatches when transferring data to the system. Regularly review and update the template to keep it aligned with any changes in internal processes or external regulations.
Include fields for approval signatures to confirm the receipt of materials. This step guarantees that there is a formal acknowledgment of the goods delivered, which is critical for maintaining accountability within the process.