For electricians and contractors, keeping clear and professional records of completed work is essential. A well-structured receipt helps maintain transparency and can be a vital tool for managing finances and client expectations. Using a free electrical work receipt template in Word format simplifies this process, offering a fast, convenient, and reliable solution.
The template includes all necessary fields such as client information, work performed, time spent, and total cost. This ensures you capture all relevant details for future reference. Customizable to suit specific needs, it allows quick adjustments to suit various types of electrical services.
By downloading a free template, you save time that would otherwise be spent creating receipts from scratch. This gives you more focus on the job itself and offers clients a professional, printed receipt right on the spot.
Here’s the corrected version:
When creating an electrical work receipt, include the following elements to ensure clarity and accuracy:
1. Service Description
Clearly outline the specific electrical tasks performed, including any installations, repairs, or inspections. Be concise, listing each job done along with the associated materials used.
2. Pricing Breakdown
Provide a detailed cost structure. Include the labor rate, hours worked, and prices for parts or materials. This helps clients understand the charges and avoids any confusion.
Make sure to include the payment method used and the total amount due. Having this information upfront can prevent misunderstandings and streamline the process for both parties.
- Electrical Work Receipt Template Word Free
To quickly create an electrical work receipt, use a free Word template. A good template streamlines the process of documenting services rendered, making it easier for both electricians and clients. Look for templates that include space for job details, materials used, hourly rates, and total costs.
Where to Find Free Templates
You can easily find free electrical work receipt templates by searching online or visiting websites offering downloadable forms. Websites like Microsoft Office’s official site or template repositories provide ready-to-use templates that can be customized for your specific needs. These templates are typically designed to meet industry standards, ensuring you capture all the necessary information accurately.
Customizing Your Template
After downloading the template, personalize it with your business information, such as your company name, address, and contact details. Add a section for the client’s name and job description. Be sure to include fields for the date, payment method, and any additional terms or conditions related to the job. Keep the design simple and easy to read for quick reference.
Open Microsoft Word and select a blank document. Begin by setting up a header that includes your company name, address, and contact details. This gives a professional look and makes it easy for clients to reach you.
Step 1: Add Customer Information
Under the header, create fields to capture the customer’s name, address, phone number, and email. This ensures accurate documentation of client details for future reference.
Step 2: Include Work Description and Date
List the type of electrical work performed, specifying services like installation, repairs, or inspections. Add a section for the date of service, which helps track the timeline of completed jobs.
Step 3: Outline Charges and Payment Terms

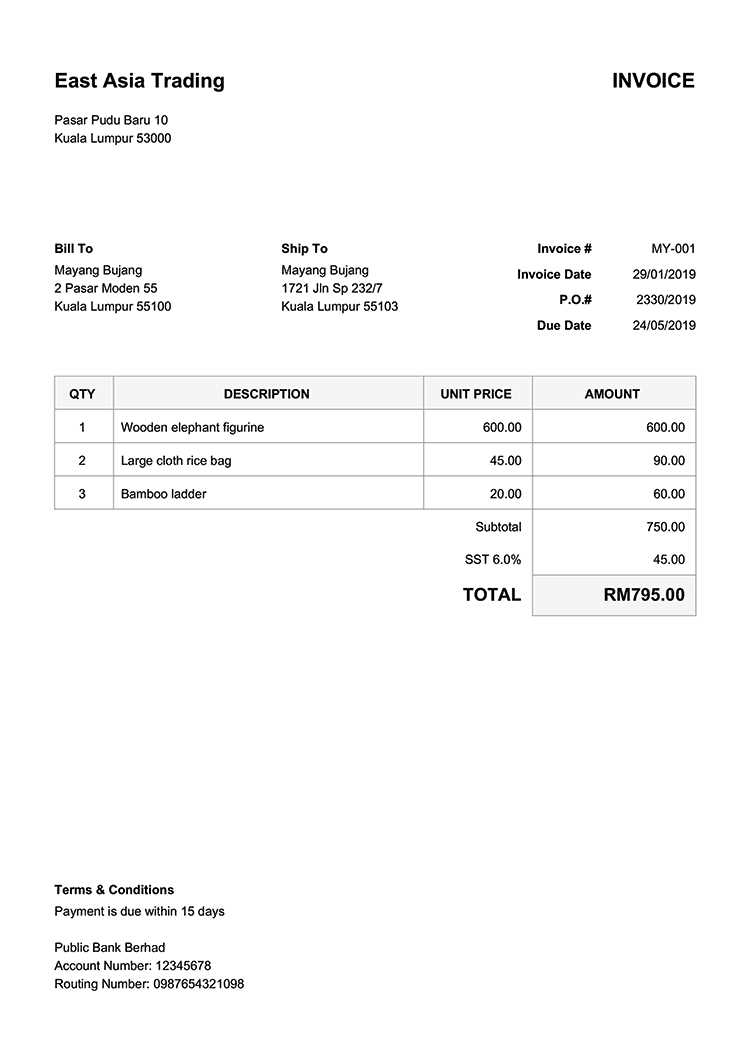
Create a table to clearly break down the costs of labor, materials, and any additional fees. Include a section for taxes and discounts, if applicable. Below the table, specify payment terms, such as due dates and accepted payment methods.
| Service Description | Quantity | Unit Price | Total |
|---|---|---|---|
| Electrical wiring installation | 1 | $200 | $200 |
| Material cost | 1 | $50 | $50 |
| Labor fee | 5 hours | $30/hour | $150 |
| Total | $400 |
Step 4: Finalize the Template
Add a section for the customer’s signature, confirming that the work was completed and the charges are accepted. Save the template for future use by selecting “Save As” and naming the document. You can then easily customize the template for each new job.
For a precise and clear electrical work receipt, include these critical elements:
1. Service Details
Specify the type of work performed, such as installation, repair, or maintenance. List each task in a straightforward manner to avoid ambiguity. Providing clear service descriptions ensures both parties understand what was done.
2. Materials and Parts Used
Record all materials, components, or equipment involved, including part numbers or serial numbers if applicable. This helps establish transparency and clarifies any costs associated with the materials used in the job.
3. Labor Charges
Include the number of hours worked and the hourly rate. If applicable, indicate any fixed charges for specific tasks. Clear labor charges prevent confusion and allow for straightforward billing.
4. Total Cost
Provide a breakdown of the total amount due, incorporating service, parts, and labor costs. This section should match the agreed-upon pricing and show the final total for the work completed.
5. Date and Location

Include the date the work was completed and the specific location of the project. This information helps verify the details of the service and establishes a timeline for any potential follow-ups.
6. Contact Information

List both the service provider’s and the customer’s contact information. This ensures that both parties can easily reach each other for any inquiries or follow-up actions.
To save your electrical work template, first ensure it is properly formatted in Word. After finishing the template, click “File” in the upper-left corner, then select “Save As.” Choose the desired location on your computer or cloud storage. For easy access, label the template with a descriptive name and consider saving it in a folder dedicated to similar documents.
If you want to share your template, open the saved document and click “Share” at the top-right corner in Word. Choose whether to send a link to collaborators or directly attach the file via email. For better organization, you may also upload the template to a file-sharing platform like Google Drive, Dropbox, or OneDrive. These services allow you to manage permissions, making it easier to control who can view or edit the file.
For future use, you can also create a backup of your template by copying it to an external drive or cloud backup service. This ensures you’ll always have access to it, no matter what happens to your device. Regularly check and update the template if your electrical work requirements change over time, keeping it relevant and useful for upcoming projects.
How to Create an Electrical Work Receipt Template in Word
For a clear and organized record of electrical work done, create a simple receipt template in Word. This will help you maintain transparency and professionalism when dealing with clients. Here’s a step-by-step guide:
- Open a Blank Document: Start with a new document in Microsoft Word. This ensures your template will be customized to your specific needs.
- Add Company Information: Include your business name, address, phone number, and email at the top of the document.
- Client Information: Below the company details, provide a section to input the client’s name, address, phone number, and email.
- Date of Service: Include a field where you can enter the date the work was completed. This helps to keep records accurate.
- Detailed Description of Work: Create a list of the tasks completed. Use bullet points or a simple table to list the services and materials used.
- Pricing Section: Provide a breakdown of costs, such as labor charges, materials, and any additional fees. Add a subtotal and a final total to make it easy to understand.
- Payment Information: Indicate the payment method (e.g., cash, credit card) and the amount received. Add space for the client’s signature for confirmation of payment.
Once your template is ready, you can save it and easily fill it out for each new job. This helps streamline the invoicing process and keeps your records organized.