If you’re looking for a simple way to create professional checkout receipts for your business, download a free Excel receipt template now. This template allows you to generate clear, organized receipts with just a few clicks. Whether you run a retail store or an online shop, customizing this receipt form will save time and ensure accurate record keeping for each transaction.
With the Excel format, you can easily adjust fields like item names, prices, and quantities to fit your business needs. The template also includes space for taxes, discounts, and totals, ensuring all necessary information is captured in one place. You’ll have the flexibility to modify colors, fonts, and layout, making it perfect for both personal and professional use.
Download the template today and start creating receipts that reflect your brand. It’s a practical solution that will help streamline your checkout process, improve customer satisfaction, and maintain organized financial records for future reference.
Here’s the corrected version:
To create a simple and functional Excel checkout receipt template, ensure that the layout is clean and easy to fill out. Start by organizing the fields: include the date, receipt number, item description, quantity, price per item, and total cost. Use formulas to calculate totals automatically, like SUM for prices and quantities. Consider adding a tax field that can be adjusted based on your location or requirements. Keep the design minimal, but include enough space for customization. Add a section for customer information if necessary, but avoid overcrowding the layout.
For better user experience, format cells for easy entry–use drop-down lists for categories or items. Protect cells with formulas to avoid accidental editing. If your receipts involve discounts, make sure there’s a section for discount codes or percentage adjustments. Remember to adjust column widths to fit all information neatly and consider including a simple logo or company name for branding.
Downloadable templates are widely available and can be customized to fit various business needs. Select a template that offers flexibility and matches your checkout system. Make sure it’s compatible with the version of Excel you’re using, and adjust formatting based on personal preferences or business requirements.
- Free Excel Checkout Receipt Template Download
Get your hands on a customizable Excel checkout receipt template that suits your business needs. This simple tool lets you track transactions, generate receipts, and streamline your checkout process. Whether you run a retail store, e-commerce platform, or service-based business, this template can save you time and improve customer experience.
How to Use the Template
Download the template and open it in Excel. The document is designed to be intuitive and ready for use right away. You can adjust fields like item descriptions, quantities, prices, and taxes to match your offerings. Once you fill in the necessary details, the total amount will automatically calculate, making the receipt ready for print or email to your customers.
Key Features of the Template

| Feature | Description |
|---|---|
| Customizable Fields | Change item names, prices, taxes, and other details to fit your business. |
| Automatic Calculations | The template calculates totals, taxes, and discounts automatically. |
| Professional Layout | The clean and organized design ensures your receipts look professional. |
| Printable and Shareable | Once filled, receipts can be printed or emailed directly to customers. |
Having a ready-made Excel receipt template helps simplify your sales process. Save time and reduce errors with this practical tool that can be used for all kinds of transactions.
Customize your Excel checkout receipt to fit your business needs by focusing on design, product details, and payment information. The layout should be clear, organized, and aligned with your brand’s style.
1. Add Your Business Information
Place your company name, logo, address, and contact details at the top of the receipt. This keeps your branding consistent and allows customers to contact you easily. Ensure your logo is properly sized, and use bold or larger text for your business name to make it stand out.
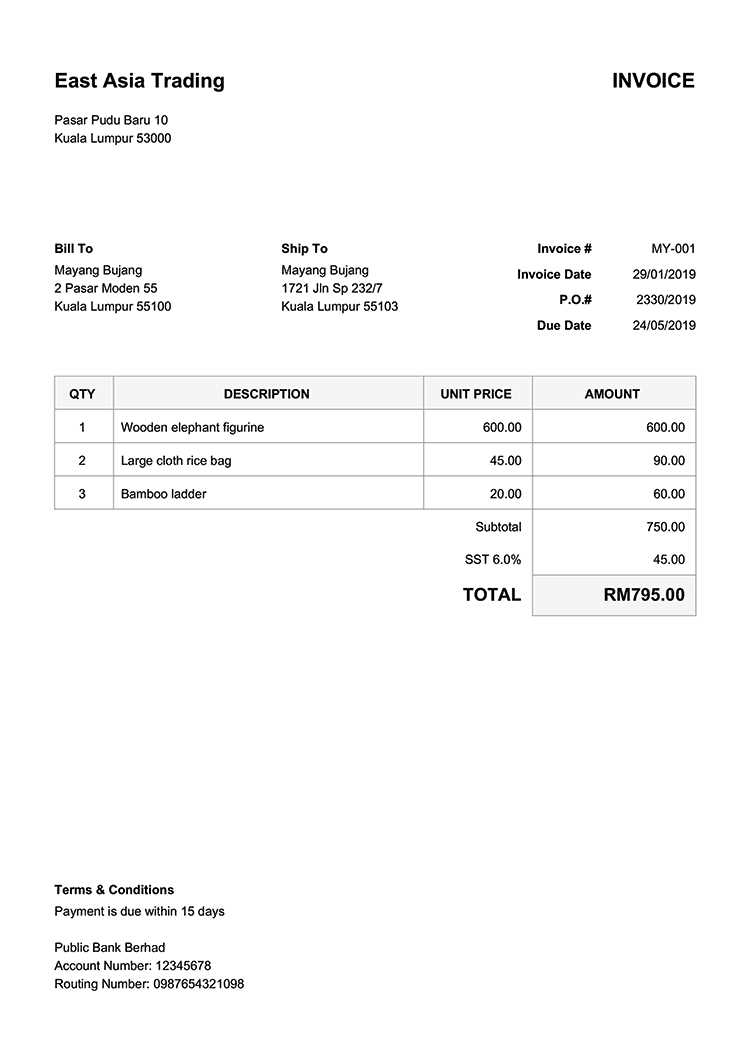
2. Organize Product and Pricing Details
List the products or services purchased along with quantities, unit prices, and total costs. Use Excel’s formula features to automatically calculate totals and taxes, reducing manual entry and errors. Ensure columns are wide enough for the information to be clearly visible and easy to read.
3. Customize Discount and Tax Sections
If your business offers discounts, create a field for entering discount codes or percentages. Set up tax fields based on your local tax rates. Excel formulas can be set to calculate these automatically, ensuring accuracy during checkout.
4. Include Payment Method and Transaction Details

Include a section that specifies how the customer paid–whether by cash, card, or online payment. You can also add transaction or approval numbers for record-keeping, which helps with payment tracking and transparency.
5. Personalize the Layout and Design

Modify fonts, colors, and borders to align with your business’s brand identity. Adjust the alignment of text and numbers for a clean, professional look. Excel offers many formatting options to make your receipt easy to read while maintaining a polished appearance.
Once you’ve customized the template, save it as a reusable file for future use. This will streamline the checkout process, saving you time and ensuring consistency in your receipts.
To find the best free Excel receipt templates, head over to platforms that specialize in downloadable business resources. Websites like Vertex42 and Template.net offer a variety of free receipt templates designed for quick use and easy customization. These sites ensure their templates are well-organized and ready to download with minimal effort.
1. Vertex42

Vertex42 provides a wide range of free, editable receipt templates in Excel format. Their templates include pre-built formulas for tax calculations and customizable fields, making it simple to adapt them for various business needs. You can download the templates directly and start using them instantly.
2. Template.net
Template.net offers a broad collection of Excel receipt templates tailored to different industries. Whether you need a basic receipt or a detailed invoice receipt, Template.net allows users to download Excel files for free with an easy-to-use interface. The templates are professional-looking and customizable to fit your brand.
For a broader selection, check out sites like Microsoft Office Templates and Smartsheet. These platforms offer a mix of free and premium options, providing a solid base for any business needing streamlined receipt templates. Browse through different styles and formats, and download the ones that meet your specific requirements.
To streamline sales transactions, use an Excel checkout receipt template. It saves time, reduces errors, and keeps records organized. Here’s how to make the most of it:
1. Open the Template
Start by downloading the Excel checkout receipt template. Open it in Excel to see a structured layout with fields for customer information, items purchased, quantities, prices, and totals. Most templates also come with formulas to automatically calculate subtotals and taxes.
2. Customize for Your Business
Adjust the template to fit your needs. Replace placeholder text with your business name, logo, and address. If you offer specific services or products, include them in the description section. This personalization helps make the receipt official and branded.
3. Input Transaction Details
For each sale, enter the customer’s name, the products or services they purchased, the quantity, and unit prices. Excel will automatically calculate the subtotal for each line item and the grand total. This saves you the hassle of manual calculations and minimizes the chances of mistakes.
4. Check Totals and Taxes
Ensure that the tax rate is set correctly in the template. The receipt template usually has a designated field for taxes, so input the percentage based on your location or tax rules. Verify that all totals are accurate before finalizing the receipt.
5. Save or Print the Receipt
Once you’ve entered all the necessary details, you can either print the receipt directly or save it as a PDF. This makes it easy to keep digital records or send receipts via email to customers.
6. Repeat for Future Transactions
For future sales, simply reuse the template. All calculations will be done for you, and you can input new customer details and transaction information. This ensures consistency and efficiency with each transaction.
Choose a simple yet functional Excel checkout receipt template to streamline your transaction process. These templates are designed to fit your needs and allow for easy customization. Whether you’re handling small sales or running a business, a downloadable template helps maintain accuracy and professionalism in your receipts.
Why Excel Templates Work Well

- They’re customizable: Adjust fields, fonts, and layout to match your brand.
- They’re easy to use: Simple design allows for quick data entry without steep learning curves.
- They’re accessible: Most people are familiar with Excel, making it a practical choice for everyday use.
Steps to Download and Use an Excel Checkout Receipt Template
- Search for a template that meets your requirements. Look for templates that offer the basic fields: product names, quantities, prices, tax, and total cost.
- Download the template and open it in Excel.
- Fill in your business details like name, address, and contact information. Customize the invoice logo and colors if needed.
- Save the file for future use. If you regularly handle transactions, consider creating a master template to speed up the process.
By following these steps, you’ll have an organized and easy-to-use checkout receipt system that saves you time and keeps your transactions clear and professional.