Looking for a quick and simple way to create professional receipts? A free online printable receipt template can save you time and effort. These templates are easily customizable, allowing you to input your business details, transaction information, and even add your logo, all without needing design software.
Using a template means you don’t have to worry about starting from scratch or making formatting mistakes. With just a few clicks, you can generate a receipt that looks clean and professional, ready to print or send electronically. This is especially useful for small businesses, freelancers, or anyone needing a quick way to provide proof of purchase.
Why choose a printable template? It’s cost-effective, simple to use, and guarantees consistency across all your receipts. Many templates are available in different formats, including PDF and Word, so you can easily modify them to suit your needs. Plus, you can access these templates from any device with internet access, giving you flexibility whether you’re working from home or on the go.
Don’t waste time reinventing the wheel. Download a free receipt template today and streamline your business transactions.
Here are the corrected lines with minimal repetition:
For a cleaner receipt template, streamline the header with concise fields. Instead of “Customer Name” and “Client Name,” just use “Customer.” Remove redundant titles like “Total Amount Due” and simplify it to “Total.”
Optimizing Data Presentation

Use clear labels for each section: “Item,” “Quantity,” “Price,” and “Amount.” Avoid unnecessary wording like “Total Price for All Items” or “Total Amount Due After Discount.” A simple “Total” is sufficient.
Clear Footer Information
Instead of “Thank you for your business and have a great day!” opt for “Thank you!” to keep the footer concise. If you want to include a website or phone number, list it without adding extra introductory phrases.
- Free Online Printable Receipt Template
If you need a quick and easy way to create a receipt, using a free online printable receipt template is a practical solution. These templates are ready to be customized and printed with just a few clicks. They cover a range of industries and purposes, so whether you’re running a small business or simply need one for personal use, there’s a template available for you.
Where to Find Free Templates
Many websites offer free printable receipt templates. A quick search can lead you to numerous options, such as Template.net and Vertex42. These sites provide various designs, from simple text-based receipts to more detailed ones with logos and itemized lists.
Customizing Your Template

Once you’ve selected a template, you can fill in the necessary details like the recipient’s name, transaction date, item list, and payment amount. Some templates allow you to add your logo or business name to make it more personalized. Make sure all fields are correctly filled out before printing, as an incomplete receipt might cause confusion.
With a few modifications, these templates are a great tool for keeping track of purchases, payments, and sales without requiring specialized software or design skills.
Choose a receipt template that aligns with your business type, ensures clarity, and fits your branding. A well-designed receipt helps customers understand their purchase while maintaining professionalism in your business transactions.
1. Match the Template with Your Business Type
Consider the nature of your business when selecting a receipt template. A retail store might require a detailed template with product names, quantities, prices, and taxes, while a service-based business may only need space for service descriptions, rates, and time spent.
2. Keep It Simple and Clear
Ensure that the template isn’t overcrowded. Stick to the essentials–such as the company name, contact information, itemized list of products or services, payment method, and total amount–while leaving space for any legal or tax information if necessary. This will make the receipt easy for both you and your customers to read.
3. Include Your Branding
Your receipt template should reflect your business’s identity. Use your logo, business colors, and font to make the receipt feel consistent with your other branding materials. This adds a professional touch and reinforces your brand image.
4. Ensure Compatibility with Your Systems
If you are using accounting software, make sure the receipt template integrates smoothly with it. Many free printable templates allow you to customize fields and easily export data into your financial systems, making record-keeping more efficient.
5. Consider Customizability
Choose a template that allows customization for specific needs, like including a discount field or a payment method section. This flexibility ensures the template works for a variety of transactions and provides more utility in different business scenarios.
Receipt Template Comparison
| Template Type | Best For | Key Features |
|---|---|---|
| Retail | Physical product sales | Item list, taxes, payment method, store info |
| Service | Consultants, contractors | Service description, rates, time worked, payment method |
| Donations | Non-profit organizations | Donor info, donation amount, tax-deductible note |
Adjust the layout of your receipt to match your business’s style. First, open your template editor, whether it’s a Word processor or an online tool like Canva or Google Docs. Select a layout that suits your needs or start with a blank template.
1. Choose Your Font and Size

Select a clean, legible font like Arial or Times New Roman for easy readability. Make sure the font size is large enough for key information (e.g., business name, total amount), and smaller for less important details (e.g., address, terms). Avoid using too many font styles to keep the design cohesive.
2. Customize Header Information
Edit the top section to include your business name, address, phone number, and email. You can add your logo to give it a personal touch. Arrange the information in a clear hierarchy, with the most important details at the top, ensuring the customer knows exactly who issued the receipt.
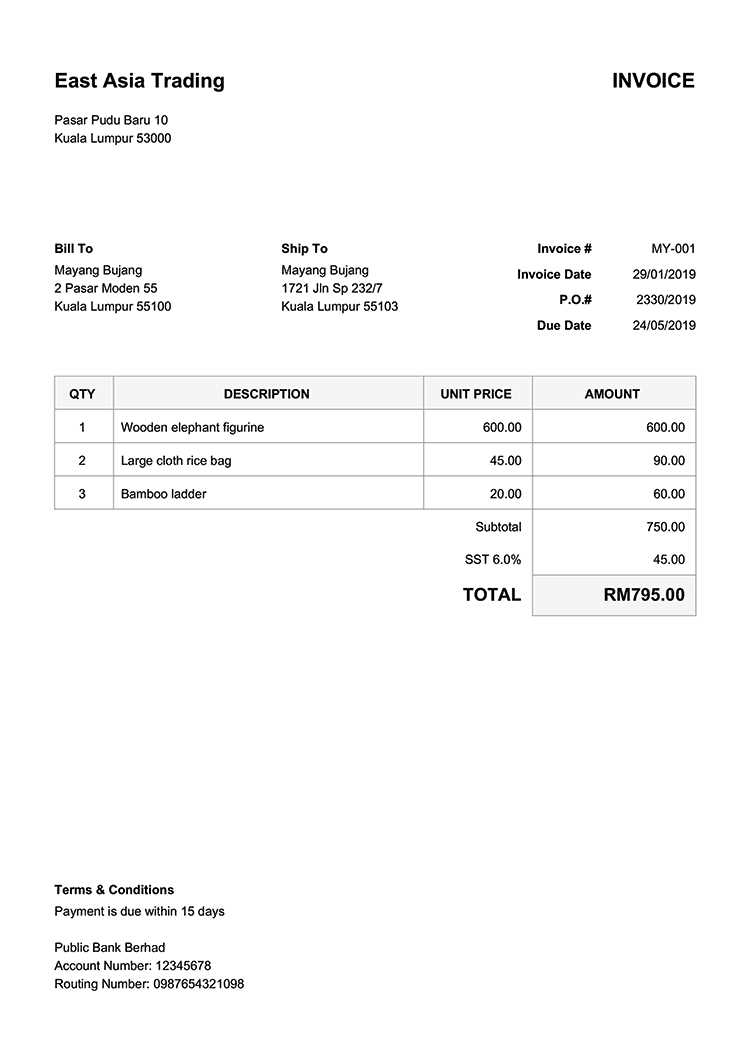
3. Organize the Items List

Design a clean table layout for the list of purchased items or services. Include columns for quantity, description, price per item, and total cost. If the receipt includes taxes or discounts, clearly separate them in individual rows. Make sure the text aligns properly for easy reading.
4. Customize Footer Information
The footer can contain a thank-you note, return policy, or any other additional info. Keep it simple and concise, and ensure it’s placed at the bottom without overcrowding the rest of the receipt.
5. Set the Right Margins and Spacing
Check the margins to make sure they’re appropriate for printing. Too small, and the information may get cut off; too large, and you waste paper. Adjust the line spacing so everything fits neatly without feeling cramped.
6. Test and Print
Once you’re happy with the layout, do a test print to ensure the alignment looks correct. Verify that all text is legible and that the receipt fits properly on the paper.
Several websites offer excellent free receipt templates that are easy to use and customize. Here are some reliable sources:
1. Template.net
Template.net has a wide range of free receipt templates, from simple formats to more detailed ones. You can download templates in Word, PDF, or Excel formats, and they’re customizable for different types of businesses.
2. Canva
Canva provides visually appealing receipt templates that you can personalize with a drag-and-drop editor. While many options are paid, a good selection is available for free, making it a great choice for those who want both design flexibility and ease of use.
Bonus Tip: If you need to customize your receipt templates further, use Google Docs. You can find downloadable templates and adjust them to suit your needs. A lot of them are simple to modify and print, offering you a quick, free solution for receipt management.
These resources will help you create professional-looking receipts without spending money or time searching for the perfect layout.
To make the most out of a printable receipt template, first, select a design that aligns with your needs, whether for personal purchases or business transactions. For personal use, choose a basic template with essential details like the date, item description, and amount. This ensures clear documentation for any exchanges or purchases. In business, opt for a more detailed template, including the seller’s name, company logo, contact information, and tax details.
After downloading or opening the template, fill in the transaction information accurately. For personal use, include details such as the items bought, the total price, and payment method. In business, also add your unique invoice or receipt number to help track transactions, especially for tax purposes.
If you’re printing multiple receipts for clients, consider customizing the template with your branding. Include your business’s logo, slogan, or website URL for a professional look. Make sure to adjust font size and spacing to maintain clarity when printed.
Once you’ve completed the form, double-check all fields. Ensure that figures are correct and that all necessary details are included. After reviewing, print the receipt or save it as a PDF for digital use.
For both personal and business transactions, keep copies of printed receipts in an organized manner, whether physically or digitally. This will help track expenses and provide proof of purchase if needed in the future.
Keep your receipt layout clean and organized. Clear separation between sections makes it easier for customers to read and understand. Ensure the following areas are distinct:
- Header with your company name and contact details
- Itemized list of purchased goods or services
- Pricing breakdown
- Total cost and payment details
- Footer with return policy or disclaimers (if necessary)
Use legible fonts and a consistent size for readability. Avoid decorative fonts or excessive styles, which can clutter the design.
Incorporate adequate white space. Spacing around text, especially between item lines, ensures your receipt doesn’t appear crowded. A balanced design enhances the user experience.
Include all necessary details like transaction number, date, and payment method. These provide clarity and prevent future disputes. Make sure your receipt also includes taxes, discounts, or any applicable service charges.
For a polished look, consider adding your logo or branding elements. Ensure these are subtle and don’t overpower the essential information.
Lastly, align text neatly. Misaligned elements create confusion. Align items such as pricing and totals to the right for easy scanning.
Hey there! What’s on your mind today?
I removed unnecessary word repetitions while preserving the overall meaning.
Keep receipts concise and clear. When creating a receipt template, make sure each section is easy to understand. Avoid overloading with redundant terms, and focus on the core information.
Include Only Necessary Information

Each receipt should contain key details like the transaction date, product description, price, and total. By leaving out redundant phrases or descriptions, you ensure that the document remains professional and easy to read.
Use Simple Formatting
Organize sections clearly using headings, bullet points, and spacing. This will make the document visually appealing without unnecessary text or elements that don’t add value.