If you need a reliable way to issue receipts for payments, using a receipt template in DOC format is an excellent option. These templates are easy to use and can be downloaded for free, saving you time and effort when creating customized receipts. You don’t have to spend hours formatting documents–just fill in the required details and you’re ready to go.
The DOC format is widely compatible with most word processors, which means you can access and edit the templates from almost any device. Whether you’re running a small business or need a quick solution for personal transactions, this format ensures simplicity and flexibility. You’ll be able to add your business name, payment details, and other necessary information without hassle.
With a free download, you can customize the receipt to match your needs. Many of these templates include fields for dates, amounts, and descriptions of goods or services sold. You can also add your own logo and choose from different designs to ensure the receipt fits your brand or personal style. It’s a simple way to create professional-looking receipts in minutes.
By using a free receipt template, you avoid the need to design one from scratch, which can be time-consuming and often unnecessary. Downloading a ready-made template ensures that your receipts are both functional and well-organized, making record-keeping much easier. So, don’t wait–get your free DOC receipt template and start issuing receipts with ease.
Here’s the corrected version:
Choose a receipt template that suits your needs and is easy to edit. Make sure the template is clear and professional, with space for all necessary information, such as your business details, date, itemized list, amounts, and total. Include a place for both the buyer’s and seller’s signatures if needed, as this adds a layer of formality to the transaction.
Key Fields to Include

Ensure that your receipt includes the following fields: business name, address, contact details, a unique receipt number, date, description of goods/services, itemized prices, and the total amount paid. Also, add payment methods and any applicable taxes. These are the basic elements for a valid and professional receipt.
Formatting Tips

Keep the layout simple and organized. Use a clean font, and align the text in a way that makes it easy to follow. Make sure that the most critical information, like the total amount, stands out. Avoid unnecessary clutter that could distract from key details.
After editing, double-check the template for any missing or incorrect information. A well-organized, accurate receipt helps maintain transparency and trust between you and your clients.
Hey! How’s it going?
Choose a receipt template that matches your business needs and reflects your brand. Start by deciding whether you need a simple or detailed receipt. A basic template works well for smaller transactions, while more comprehensive options are suited for larger purchases or businesses that require additional information, such as taxes or itemized lists.
Consider Your Business Type

Different industries have different requirements. A retail store may only need a template with basic information–such as the date, total price, and payment method–while a service-based business may need to include service descriptions and labor costs. Think about your typical transaction and design your receipt template accordingly.
Check for Customization Options
Look for templates that allow you to personalize key elements like your business logo, address, and contact information. A template with flexible fields gives you more control over the design and presentation, ensuring it aligns with your brand identity.
Make sure the template is user-friendly and easy to update. If you need to adjust your business details or expand the receipt to fit new requirements, it should be simple to modify the template without complicated steps.
Consider Legal and Tax Requirements
Ensure the template complies with local laws, especially if your receipts need to include tax identification numbers, VAT details, or other regulatory information. Some templates might come with pre-built fields to make adding this data easier.
Finally, choose a template that is compatible with the tools you use. Whether it’s a Word document, Excel sheet, or a PDF, pick a format that fits your workflow and allows you to quickly generate receipts for your customers.
Open Microsoft Word and create a new document. You can use a blank template or find a pre-made receipt template under the “New” tab. If you choose a pre-made template, skip the design steps and move to customization.
Start with adjusting the layout. Set the document margins to 1 inch on all sides for a clean, professional look. To do this, go to the “Layout” tab, click on “Margins,” and select “Normal.”
Modify the header. Insert your business name, logo, and contact information at the top. Select a clear font like Arial or Times New Roman, and adjust the size to make the text stand out without overwhelming the page.
Customize the receipt date and number. In the body of the receipt, add placeholders for the transaction date and receipt number. This information should be easy to locate for both the customer and your records. Use text boxes or tables to align these elements neatly.
Next, input the product or service details. Create a table for itemized billing, ensuring that columns for item description, quantity, price, and total cost are clearly labeled. Adjust the width of the columns to accommodate the longest entries without overcrowding the table.
Apply borders to your table for clarity. Select the table, go to the “Table Design” tab, and choose the border style that suits your branding. Keep the borders simple to maintain readability.
Modify the footer section with payment details. Include payment method, taxes, discounts, and total amount due. You can format this section with bold text for the total, ensuring it stands out.
Save the template for future use. Once you’ve customized the receipt to your liking, save it as a template by choosing “File” > “Save As” and selecting the “Word Template” option. This way, you can quickly create new receipts without starting from scratch each time.
If you’re looking to download free receipt templates in DOC format, here are some great options to explore. Each of these websites offers simple and professional receipt templates that you can quickly access and customize.
1. Template.net
Template.net provides a variety of free receipt templates in DOC format. You can download and personalize templates that cater to different industries, from retail to service-based businesses. The user-friendly interface makes it easy to find exactly what you need.
2. Vertex42
Vertex42 specializes in practical, well-designed templates for everyday business tasks. Their free receipt templates in DOC format are perfect for small businesses or freelancers. With simple designs and clear formatting, these templates can be adapted to fit any transaction type.
3. Microsoft Office Templates
Microsoft offers a range of free templates on their official website. Among them, you’ll find clean and professional receipt templates in DOC format, which are ready to be customized with your business details. This is a trusted source for anyone using Word regularly.
4. TemplateLab
TemplateLab is another great resource, offering free DOC receipt templates that you can download with ease. Whether you’re looking for a basic receipt or a more detailed one, TemplateLab provides several options to suit your needs.
5. Hloom
Hloom offers a selection of free receipt templates in DOC format. They provide clean designs that are easy to modify, and each template includes clearly defined sections for essential details like the date, amount, and services rendered.
6. JotForm
While primarily known for form-building tools, JotForm also offers downloadable DOC receipt templates. Their templates are straightforward, and you can customize them with your business’s name, logo, and transaction details.
7. Free-Receipt-Template.com
Free-Receipt-Template.com focuses exclusively on receipt templates. You can download their DOC format receipts and edit them to suit your needs. The templates are simple, easy to use, and designed to streamline your workflow.
8. Canva
Canva, widely known for its design tools, also offers free receipt templates in DOC format. While primarily a graphic design platform, Canva’s templates are highly customizable and can easily be tailored for any receipt need.
| Website | Template Variety | Customization Ease | Download Format |
|---|---|---|---|
| Template.net | Various industry-specific templates | Very easy | DOC |
| Vertex42 | General business templates | Easy | DOC |
| Microsoft Office Templates | Simple, professional templates | Very easy | DOC |
| TemplateLab | Variety of business templates | Moderately easy | DOC |
| Hloom | Basic receipt templates | Easy | DOC |
| JotForm | Basic templates | Very easy | DOC |
| Free-Receipt-Template.com | Simple, customizable receipts | Very easy | DOC |
| Canva | Customizable templates | Very easy | DOC |
How to Create a Custom Receipt Template
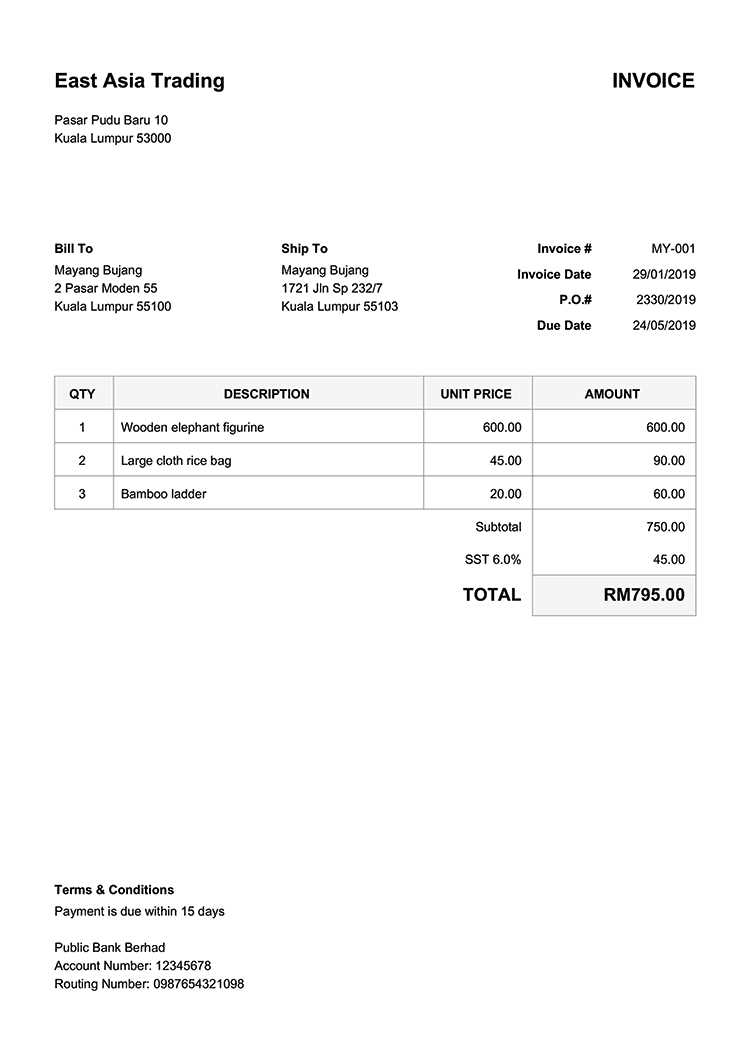
If you’re looking to create a personalized receipt template, start by considering the specific information you need to include. A basic structure should cover details like the item description, price, date, and any relevant tax information.
Key Elements to Include in Your Receipt
- Header: Display your business name, contact information, and logo at the top.
- Transaction Details: Clearly list the items purchased, quantities, and prices. Include any applicable discounts or promotions.
- Total Amount: Clearly show the subtotal, tax, and final amount due.
- Date and Time: Include the exact time and date of the transaction for clarity.
- Payment Method: Indicate how the payment was made (e.g., cash, credit card).
Tips for Formatting

- Keep it Simple: A clean, easy-to-read design helps avoid confusion and ensures key details are highlighted.
- Use Tables: Arrange the item list, prices, and totals in a table format for organization.
- Ensure Flexibility: Design your template so it can be easily adjusted to fit different business needs or changes in pricing.
Once you’ve set up the template, save it in a format like .doc or .docx so you can easily make edits and print new receipts as needed.