Looking for a free Word receipt template? You can save time and effort with a well-designed receipt format that allows you to quickly generate professional receipts for your transactions. With customizable fields, you can easily adapt the template to fit your business needs or personal requirements.
Why use a template? A Word receipt template offers a simple and practical solution for documenting payments. Whether you’re a small business owner or just need a receipt for personal use, a template can help streamline your process. You don’t need to start from scratch every time–just fill in the necessary details such as the date, amount, and payment method.
Where to find a free template? There are several websites offering free Word receipt templates that can be downloaded and customized. Many of these templates come with pre-set sections for item descriptions, taxes, and payment methods, making it easy to tailor them to your needs. With just a few clicks, you can have a functional receipt ready for use.
Once you’ve downloaded the template, you can personalize it with your company logo, address, and contact information. This allows you to present a professional and polished image to clients and customers.
Here are the corrected lines with minimal repetition:
To avoid redundancy, make sure to use concise phrasing and focus on the key message in each line. This approach ensures clarity and prevents the unnecessary repetition of words or ideas. For example, instead of writing “Please ensure you complete the form in a timely manner without delay,” use “Please complete the form promptly.” This reduces excess wording while maintaining the intended meaning.
Streamlining your content:
By removing repeated phrases, you can enhance the readability of your receipt template. For instance, instead of saying, “The total amount due is 100 dollars, which is the final amount to be paid,” simplify it to “The total amount due is 100 dollars.” This approach makes the receipt easier to understand and more professional.
Finalizing your template:
When creating your receipt template, always review your content for repetitions. If you find unnecessary phrases that don’t contribute additional information, remove them. Keeping your sentences clear and direct makes your template look polished and straightforward.
- Word Receipt Template Free: A Practical Guide
Using a Word receipt template can save time and effort when creating professional-looking receipts. Follow these steps to quickly create one:
- Choose a Template: Look for a free Word receipt template online. Sites like Microsoft Office and other template repositories offer a variety of customizable templates. Select one that fits your needs, such as a basic receipt or one with itemized listings.
- Customize Your Template: Once you’ve downloaded the template, open it in Microsoft Word. Replace default information such as company name, address, and contact details with your own. Make sure to adjust fonts and sizes to match your branding if necessary.
- Add Transaction Details: Input the specifics of the transaction, including the date, item descriptions, quantities, prices, and any discounts applied. Ensure that all information is clear and organized.
- Include Payment Information: If relevant, include payment method details, such as credit card number, cash, or check. This helps ensure transparency for both parties.
- Save and Print: After you’ve completed the receipt, save it as a Word document or PDF for easy sharing. If you need a physical copy, print it directly from Word. Consider using the template repeatedly for consistency in your receipts.
Using a Word receipt template is a fast and effective way to create receipts for your business or personal use without starting from scratch each time.
To find free receipt templates, use search engines like Google to explore a variety of websites offering downloadable templates. Look for trusted sources such as Microsoft Office templates, Template.net, or Google Docs, where you can find a wide range of free and customizable receipt formats.
Key Features of Free Receipt Templates

When searching for free receipt templates, focus on the following key features:
- Customizability: The template should allow you to edit fields such as buyer information, item description, price, and tax rate.
- Variety: Make sure the site offers multiple receipt types, from simple ones to more detailed versions for businesses.
- Compatibility: Choose templates that work with software you already use, like Microsoft Word, Google Docs, or Excel.
Where to Download Free Templates

Here are some reliable sources for downloading free receipt templates:
| Website | Description | Download Format |
|---|---|---|
| Microsoft Office Templates | Offers a selection of professional templates for personal or business use. | Word, Excel |
| Template.net | Provides free and premium receipt templates in various formats. | Word, PDF |
| Google Docs | Free templates with the benefit of cloud storage and easy sharing. | Google Docs |
Adjust the layout of your receipt template to suit different industries or use cases. If you’re running a retail business, include item descriptions, quantities, and prices in a clear, structured format. For service-based businesses, focus on adding fields for labor hours and service descriptions. You can also customize fonts and colors to match your brand’s identity, ensuring that your receipts not only serve their purpose but also align with your visual aesthetic.
Modify the header to include your company logo and contact information, making it easier for clients to reach out. Add a footer for important terms and conditions or payment instructions. For businesses that deal with taxes, incorporate a section for tax breakdowns to ensure that all financial details are transparent and clear.
If you offer discounts, include a space to reflect the discount percentage or amount and adjust the total accordingly. For online businesses, consider adding a field for tracking numbers or delivery information. Tailoring these elements can help create a more professional and personalized experience for both the business and the customer.
Adding business details to your receipt template ensures that your clients have all necessary information about your company. Follow these steps for a clear and professional layout:
- Company Name: Place your business name at the top of the receipt. Make sure it is easy to read and stands out.
- Business Address: Include the physical address where your business operates. This helps customers know where to find you if needed.
- Phone Number: Add a contact phone number for customer inquiries or support. This allows easy communication.
- Email Address: Provide a professional email address where clients can reach out for further details or questions.
- Website URL: If applicable, include the website address for additional information about your products or services.
- Tax Identification Number: Include your business tax ID for official records, especially for larger transactions or business-to-business sales.
- Payment Methods Accepted: List the methods of payment you accept, such as credit cards, checks, or online payment options.
Organize these details in a concise format so customers can easily locate them when reviewing their receipt. This adds professionalism to your documentation and enhances customer trust in your business.
Got it! How can I assist you with any of those topics today?
To save and reuse a Word receipt template for future transactions, follow these steps:
Saving the Template

After customizing your receipt template, go to “File” and select “Save As.” Choose a location on your computer where you can easily find the file again, such as a designated “Templates” folder. For better organization, name the file something clear, like “Receipt_Template.” Make sure to select the file format as “.dotx” (Word Template), which preserves the formatting and allows easy reuse.
Reusing the Template
To reuse the saved template, open Microsoft Word and select “New” from the File menu. In the “New Document” section, click “Personal” or “Custom,” depending on your version of Word. Locate your saved template, and select it to create a new receipt with the same format and design. This way, you don’t need to start from scratch every time.
Ensure all required fields are filled out. Leaving out key details, such as the buyer’s name, date, or payment amount, can make the receipt incomplete or unclear. Double-check that all information is accurate and up-to-date.
1. Using Incorrect Formatting
Formatting inconsistencies can confuse the recipient. Stick to a clear, professional layout. Ensure text alignment is uniform and all sections, like item descriptions, amounts, and totals, are easy to distinguish.
2. Failing to Customize the Template

Generic templates may not always suit your business needs. Customize the template with your logo, company name, or any other relevant information that represents your brand. This helps to give a more personalized touch to the receipt.
Keep the language simple and readable. Avoid over-complicating things with unnecessary jargon or complex terms. The recipient should easily understand the details of the transaction.
Lastly, make sure the template is compatible with the software you’re using. Some templates may not function properly on certain word processors, leading to formatting issues or missing information.
How to Customize a Free Word Receipt Template
When selecting a free receipt template in Word, focus on clarity and functionality. Look for templates that allow customization of essential details such as item description, quantity, price, and total amount. Ensure the template offers easy-to-edit fields so you can add your business name, contact information, and transaction details without hassle.
Customize Your Template

After downloading a Word receipt template, personalize it with your company’s branding. Add your logo at the top and adjust the color scheme to match your branding. Replace any default text with your specific business details. It’s helpful to include payment methods (e.g., cash, card, check) so clients know exactly how the transaction was processed.
Essential Fields to Include
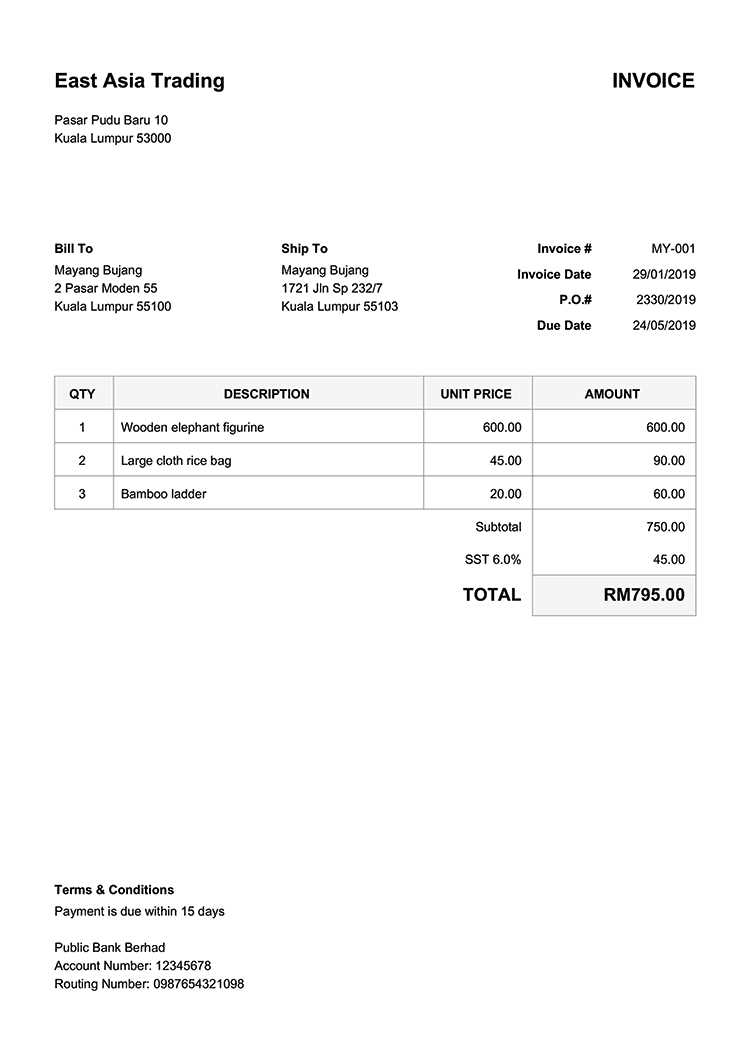
Key fields on a receipt should cover transaction specifics such as:
- Receipt number: For tracking purposes.
- Date: Always add the date of transaction.
- Itemized list: Clearly list purchased items with prices.
- Subtotal: Total before tax or discounts.
- Tax: Specify applicable tax rates.
- Total amount: Final total after all charges.
Ensure these fields are clearly labeled and organized for easy reading by the customer.
Final Touches
Double-check the layout and formatting for neatness. Consistent font sizes and spacing will make the receipt professional. Once you’re satisfied with the template, save it for future use. Each time you issue a receipt, simply open the template, fill in the necessary details, and save it as a new file.