If you need a quick way to create a clear and professional receipt for your Apple purchases, using a template is a practical solution. With the right template, you can ensure accuracy and consistency in your invoices every time, saving time and avoiding errors.
A well-designed Apple receipt template includes key details such as the date, itemized list of products or services, total cost, and payment method. It’s important to customize it with your company’s logo and contact details for a polished look. This allows you to maintain a professional image while simplifying the billing process.
For businesses, adopting an organized template can make the invoicing process more efficient. You can reduce mistakes by relying on a standardized format, which also speeds up tracking and managing your receipts. Using a template ensures you stay compliant with any required financial records while keeping your documents neat and easy to understand.
Here is the revised version with repeated words reduced while maintaining the original meaning and structure:
Focus on clear and concise content when designing an Apple invoice template. Simplify your design by including only necessary details: item names, quantities, prices, and the total amount due. Ensure the customer’s information is accurate, including the billing address and payment method. You can add your company logo at the top to maintain branding consistency. Use a clean, readable font for easy navigation through the document.
For the layout, structure your template to include separate sections for itemized charges, taxes, and the final total. This organization keeps the document clear and professional. Consider including a small footer with payment terms or contact details, but avoid cluttering the template with irrelevant information.
Lastly, save your template in a format that can be easily edited for future use. A simple, straightforward approach will help you create invoices that are both functional and easy for clients to read.
- Invoice Apple Receipt Template: A Detailed Guide
Creating an invoice using the Apple receipt template requires a few specific steps to ensure clarity and accuracy. The template helps organize key information such as product details, pricing, and purchase date. Here’s a guide to follow:
Key Elements to Include

- Business Information: Include your business name, contact details, and logo for branding. This gives the invoice a professional appearance.
- Invoice Number: Assign a unique invoice number to keep track of transactions. This is useful for future reference and accounting purposes.
- Customer Information: List the customer’s name, address, and contact details. Accuracy is key here to avoid delivery or payment issues.
- Itemized Products/Services: Detail each item or service provided, including quantity, unit price, and total price. A clear breakdown ensures transparency.
- Subtotal and Total: Include both the subtotal before tax and the final total. Make sure tax rates and calculations are accurate to avoid confusion.
- Payment Terms: Specify payment due date, preferred payment methods, and any late fees if applicable.
Formatting Tips

- Use a clean, organized layout with easy-to-read fonts and enough white space.
- Ensure that product or service descriptions are clear and concise, so there is no ambiguity.
- Highlight important numbers, such as totals and due dates, with bold or slightly larger fonts for easy identification.
By following this structure, your Apple receipt template will be both functional and professional. It provides clarity to the customer and streamlines your business transactions.
Select an invoice template that matches your business needs. Focus on simplicity and clarity, making sure that all necessary details like company name, client name, and payment terms are easy to find. A template with space for itemized services or products and their prices will help avoid confusion and ensure smooth transactions.
Match Your Brand Identity
Choose a template that aligns with your company’s branding. Customizing the colors and logo of your invoice can give a professional touch and build trust with clients. Keep the design clean and organized, avoiding too much clutter. A well-designed invoice reflects well on your business, and a consistent style creates a cohesive customer experience.
Consider Your Payment Methods
If you offer multiple payment options, choose an invoice template that includes space for all necessary payment details, such as bank account numbers, PayPal info, or credit card processing details. A clear payment section helps clients know exactly how to settle their bills, speeding up the payment process.
Adjust the layout of your receipt template to match the specific requirements of your business. Focus on the key details that need to stand out, such as product names, prices, taxes, and total amounts. Use a clean, readable font and ensure the information is logically arranged for easy comprehension.
Incorporate your brand identity by adding your logo, business name, and contact details at the top of the receipt. Make sure the logo is clear but doesn’t overwhelm the text. This helps in reinforcing your branding while keeping the document functional.
For different types of transactions, consider adding custom fields. For example, if you run a restaurant, you might want to include a server’s name or a table number. For an online store, adding order numbers, tracking information, or payment methods can provide clarity for your customers.
Set up dynamic elements in the template to automatically calculate totals, taxes, and discounts based on the items purchased. This reduces the chances of errors and saves time when generating receipts.
Finally, adjust the colors and fonts to suit your brand’s style guide. Choose a color palette that aligns with your overall aesthetic while ensuring that the text remains legible. Avoid using too many colors or overly complicated designs that could distract from the essential information.
Integrating Apple templates with payment systems offers a seamless way to enhance the invoicing process. Begin by ensuring compatibility with popular payment gateways like PayPal, Stripe, or Apple Pay to make payments easy for your customers. Apple’s invoice templates can be directly connected with these systems, allowing users to automatically update payment statuses once a transaction is completed.
Automatic Data Sync
By setting up an API connection between the Apple template and the payment gateway, all transaction details such as payment amount, date, and status will sync instantly. This eliminates the need for manual input, ensuring that your records are accurate and up-to-date without additional effort.
Customizable Payment Options
Apple templates support the integration of various payment buttons and links that can be customized for different payment methods. You can embed a direct “Pay Now” button within the invoice template, which links to the preferred payment system, streamlining the checkout process for your clients. This integration can be adjusted according to specific business needs or preferences.
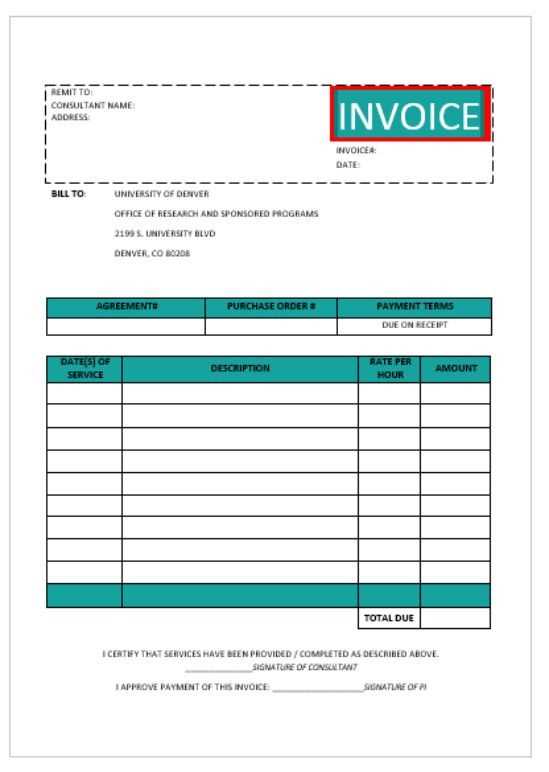
Begin by entering your company name and contact information at the top of the invoice. Include your address, phone number, email, and website if applicable.
Next, input the recipient’s details: the customer’s name, address, phone number, and email. Ensure this section is accurate to avoid issues later.
For the invoice number, assign a unique number to each invoice. This will help track payments and correspondence easily.
Set the invoice date to the day it is being issued. Include the due date to clearly indicate when payment is expected.
List the products or services provided. Include a description, quantity, unit price, and total for each item. Break down the total amount clearly to avoid confusion.
If applicable, add any discounts or taxes. Ensure tax rates and amounts are correct and clearly stated.
In the payment terms section, include your preferred payment methods, such as bank transfer, PayPal, or credit card. Be clear about any late fees or interest for overdue payments.
Finally, add a thank you note or a brief message, expressing appreciation for the customer’s business.
Ensure the information is accurate. Double-check details such as item descriptions, prices, and tax rates. Mistakes in any of these can lead to confusion or disputes later. Pay close attention to the date, as it’s a common oversight when generating receipts.
Incomplete or Missing Information

Leaving out key details like payment methods or seller contact information is a frequent mistake. Without these, the receipt may not serve as proof of purchase in case of a return or audit. Always include the transaction number for tracking purposes.
Incorrect Formatting

Stick to a clean and organized layout. Cluttered templates or inconsistent fonts can make the receipt hard to read. Make sure the information flows logically, from the seller’s name to the transaction details, making it easy for customers to review.
Legal Considerations When Using an Invoice Template for Transactions
Ensure that the invoice template includes accurate business information, such as your company name, address, and tax ID number. This is crucial for legal validity, as it provides a clear record of the transaction. Additionally, invoices should clearly identify both the seller and buyer with their respective contact details.
Verify that the invoice reflects the correct amounts for goods or services rendered, including any applicable taxes or fees. Misrepresentation of prices, even unintentionally, can result in legal complications. Keep track of your jurisdiction’s tax laws, as incorrect tax rates could lead to penalties or audits.
Ensure that the payment terms are clearly defined. Specify the due date for payment, any late fees, and the method of payment. This helps avoid disputes and provides a legal basis for enforcing payment terms if necessary.
It is vital to include an invoice number for record-keeping. Sequential numbering helps avoid confusion and enables both parties to track payments accurately. Keep a copy of every invoice issued for future reference and tax purposes.
Be aware of the regulations surrounding data protection. Avoid sharing sensitive personal information unless it is absolutely necessary for the transaction. Familiarize yourself with the data protection laws in your area to avoid non-compliance risks.
| Legal Aspect | Recommendation |
|---|---|
| Accurate Business Information | Include company name, address, and tax ID number. |
| Correct Pricing and Tax Information | Verify pricing and applicable taxes to ensure accuracy. |
| Payment Terms | Define payment due dates and late fees clearly. |
| Invoice Numbering | Use sequential invoice numbers for easy tracking. |
| Data Protection | Follow local data protection laws and only share necessary information. |
By keeping these points in mind, you can avoid legal pitfalls and ensure that your invoices are not only valid but also meet regulatory requirements.
How to Create an Invoice Apple Receipt Template
Creating an invoice Apple receipt template requires attention to detail. Follow these steps for a simple and functional layout:
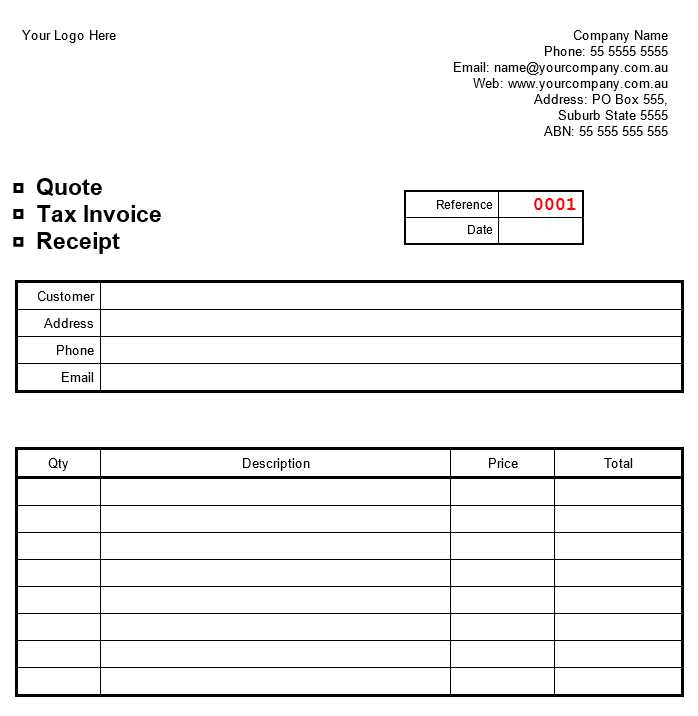
- Header Section: Include the name of your business, logo, and contact details at the top. Place the title “Invoice” clearly for immediate identification.
- Invoice Number: Assign a unique number to every invoice for easy reference and tracking.
- Date of Issue: Insert the date of issue next to the invoice number, ensuring it matches the transaction date.
- Recipient Information: Include the buyer’s name, address, and contact information. This helps in case of any issues or returns.
- Itemized List: Break down the products or services with descriptions, quantity, price, and total cost. Use a table for better organization.
- Taxes and Discounts: Clearly list any applicable taxes or discounts. Show these calculations before arriving at the final amount due.
- Final Amount: Highlight the total amount owed at the bottom, making sure it’s easily readable.
- Payment Instructions: Specify the methods of payment accepted, including bank details or online payment links if relevant.
- Footer: Include terms and conditions, return policy, and any other relevant information at the bottom.
Tips for Formatting
- Ensure all text is legible with clear fonts and appropriate sizes.
- Use gridlines or borders for a clean presentation of itemized data.
- Align columns correctly, especially prices and totals, to maintain a professional look.