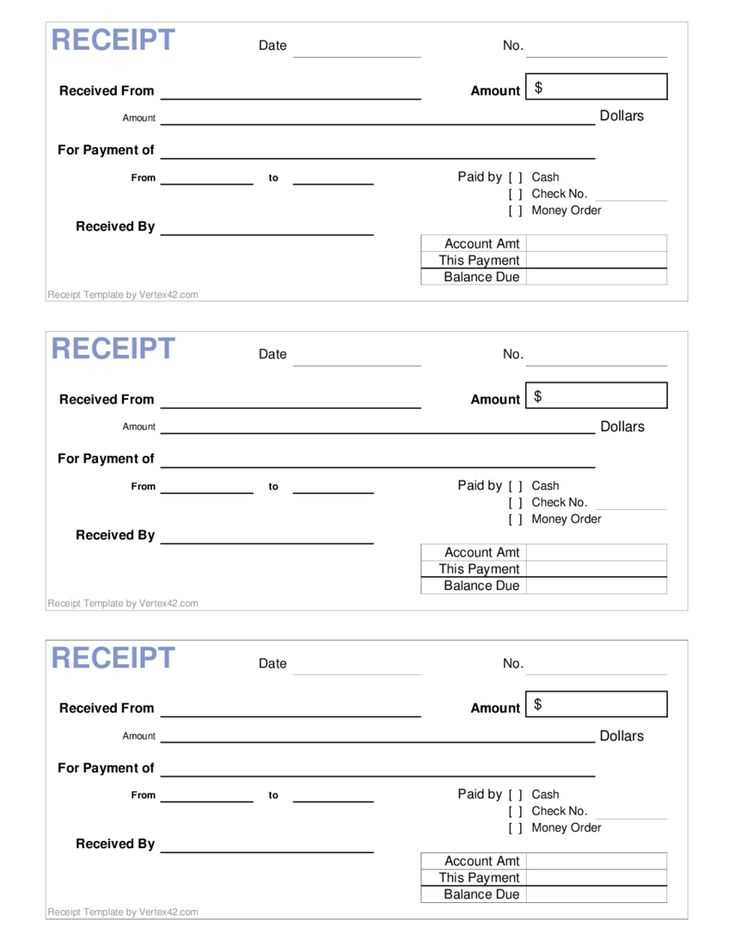
Creating a money receipt template is straightforward and practical for maintaining clear financial records. A well-structured receipt should include the recipient’s name, the amount received, the date of the transaction, and a brief description of the payment purpose. Ensure that this template is customizable to fit different scenarios, whether for personal or business use.
To get started, make sure to add space for details such as the payment method (cash, check, or online transfer) and any reference numbers associated with the transaction. This transparency helps both parties keep accurate records. A signature field is also a good idea to confirm receipt, especially for more formal transactions.
If you’re designing the template for business use, include your company name, logo, and contact information at the top. This will help the recipient identify the transaction easily. Additionally, providing a unique receipt number can streamline record-keeping, making it easier to track past payments when needed.
Detailed Guide on Money Receipt Templates
Begin with specifying the date of the transaction. This ensures the receipt reflects the exact time the payment was made, avoiding future confusion. Include the name of the payer and the recipient clearly, alongside their contact information for easy reference. For payments involving services, be sure to list a brief description of the service or goods provided, specifying quantities if applicable.
Next, ensure the amount is written in both numeric and word form. This minimizes errors in interpreting the total value, particularly for larger sums. If the payment was made through specific methods such as bank transfer, check, or cash, note this for clarity. Be transparent about any taxes or fees applied to the total amount, and clearly separate the base cost and taxes in your template.
For added security and accountability, include a unique receipt number. This reference number allows for easy tracking of transactions. If applicable, also include any payment terms or conditions related to the transaction, particularly if there’s a refund policy or warranty attached to the goods or services.
Finally, ensure the template is simple and easy to read. Use clear sections and bold headings to separate each piece of information, ensuring nothing is overlooked. A well-organized receipt not only serves its purpose but also enhances trust between the payer and the recipient.
How to Customize a Money Receipt for Personal Use
To tailor a money receipt for personal use, focus on clear and accurate information. Begin by including the date and a unique receipt number for easy tracking.
- Date: Always include the date of the transaction to ensure it is time-stamped.
- Receipt Number: Use a sequential or unique identifier for every receipt to help with organization.
Next, detail the payment method and amount. Be specific about the total value and whether it was paid in cash, by check, or via another method.
- Payment Method: Clearly indicate whether the payment was made with cash, check, or a different method.
- Amount: Specify the exact amount paid, both in numbers and words, to avoid confusion.
Don’t forget to include the name of the payer and recipient. This helps verify the transaction later if needed.
- Payer’s Name: Clearly list the name of the person making the payment.
- Recipient’s Name: Include the name of the person or business receiving the payment.
Lastly, add a description of the service or product exchanged. This provides context for the payment.
- Description: Be brief but specific about the purpose of the transaction.
By keeping the format straightforward and consistent, you can easily customize a receipt that meets your needs and keeps all necessary details accessible.
Step-by-Step Process of Issuing a Receipt for a Transaction
Begin by including the date of the transaction at the top of the receipt. This helps both parties track when the exchange took place.
Next, list the name and contact details of the business or individual issuing the receipt. Make sure the information is accurate and easy to identify.
Provide a unique receipt number. This number helps organize and reference the transaction for future inquiries or record-keeping.
Clearly describe the goods or services that were provided. Include specific details such as quantities, prices, and any applicable taxes or discounts.
Indicate the total amount paid, including the breakdown of any additional charges. Ensure that the figure is easy to read and check.
If payment was made by card or other methods, include the payment type or method used. This offers a transparent record of the transaction.
Finally, include a thank-you note or additional contact information for customer support. This adds a personal touch to the receipt.
Key Legal Considerations When Creating Money Receipts

Ensure that your receipt includes all required information. This typically includes the payer’s and payee’s names, the amount, the date of the transaction, and the purpose of the payment. These details help provide clear proof of the exchange and protect both parties in case of disputes.
Compliance with Local Laws

Check your jurisdiction’s requirements regarding receipt documentation. Some regions may require additional details such as business registration numbers or tax identification numbers for both parties. Be familiar with local tax laws to ensure compliance, especially when receipts serve as a basis for tax reporting.
Proper Signature and Acknowledgment

Make sure the receipt is signed by the payer or payee. In cases where it’s impractical to obtain a signature, digital confirmations may be used if legally valid in your jurisdiction. Acknowledging receipt of payment ensures accountability and confirms the transaction took place under agreed terms.