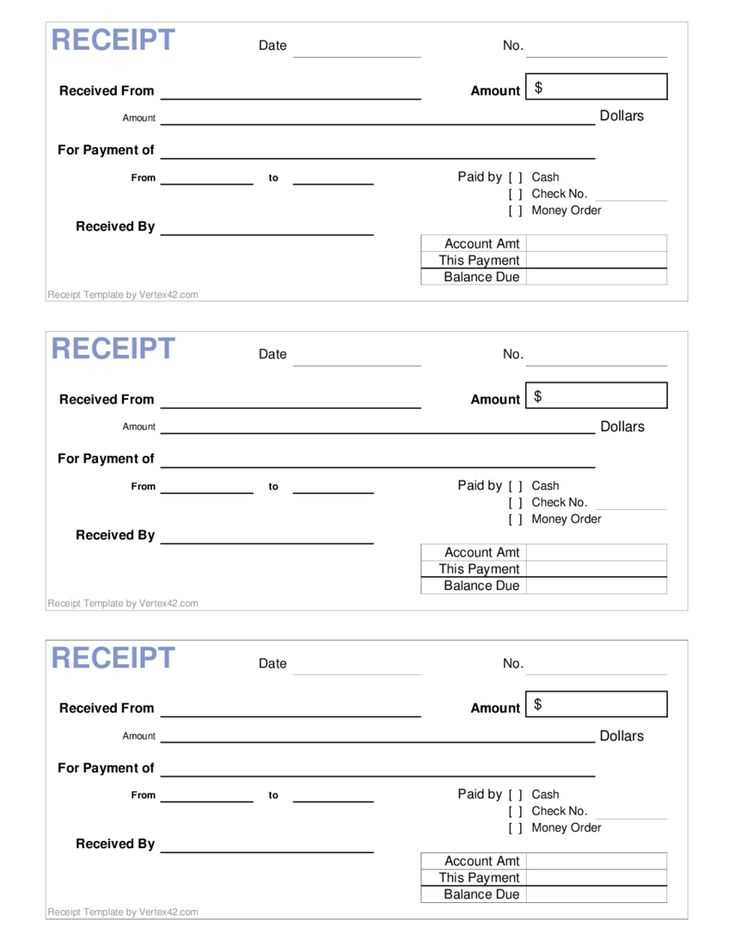
Ensure clarity in financial transactions by using a receipt template. A well-structured receipt helps confirm the amount received, the payer, and the purpose of the payment. Include key details such as the date, transaction number, and payment method. These elements establish a clear record for both parties involved.
Keep the format simple yet comprehensive. Specify the name of the payer and the recipient, along with an itemized breakdown of the payment if applicable. It’s also helpful to note the reason for the payment, whether it’s for services rendered, goods purchased, or a donation.
By using a standardized template, you streamline record-keeping and ensure all necessary information is captured consistently. This reduces the risk of misunderstandings and provides a reliable reference in case of future inquiries or audits.
Here are the corrected lines:
Ensure that the date format is consistent across all receipts. Use a standard format like MM/DD/YYYY to avoid confusion.
- Check the “Amount Received” field for accuracy. It should match the total listed.
- Double-check the recipient’s name for spelling errors to avoid mistakes.
- If including payment method details, clearly specify the mode (e.g., cash, credit card, check) and any relevant reference numbers.
- Make sure the “Description” of the transaction is precise and specific, avoiding vague terms.
- Include the correct contact information in case the recipient needs to reach out for clarification.
Final Touches
Review the receipt layout for clarity. Ensure that all information is readable and well-organized for the recipient’s ease of understanding.
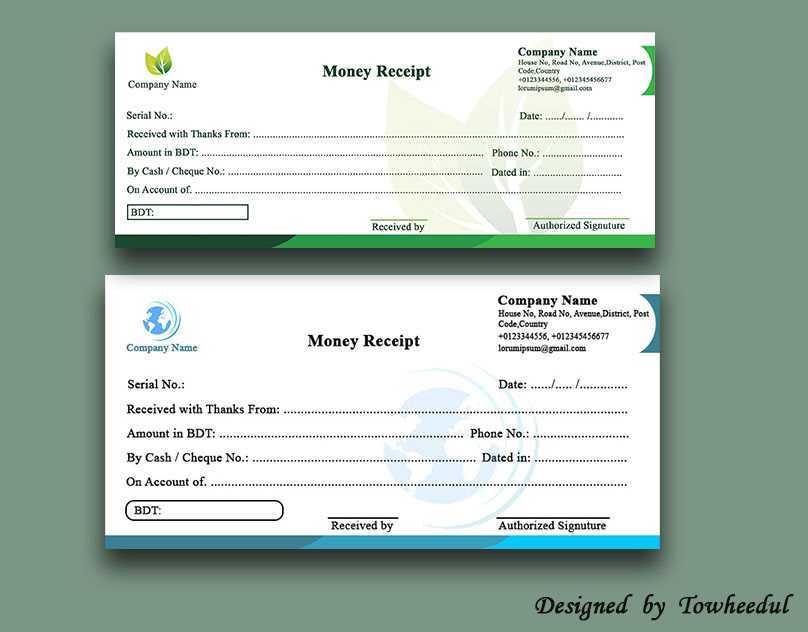
Receipt Template for Money Received

Use this simple receipt template to confirm the receipt of money. Start with the date of transaction, followed by the payer’s name and contact information. Specify the amount received and the method of payment, such as cash, check, or bank transfer. Include a brief description of the transaction, detailing the purpose of the payment. Finally, sign the receipt to validate it.
- Date: Include the exact date the payment was received.
- Payer’s Information: Name, address, and contact number for easy identification.
- Amount: Clearly state the exact sum received.
- Payment Method: Indicate whether the payment was made in cash, by check, or electronically.
- Description: Specify what the payment was for to ensure transparency.
- Signature: Ensure both parties sign the receipt to confirm the transaction.
Start by clearly listing the transaction date at the top of the form. Include the name of the payer and the recipient, followed by the amount received and the payment method used. Make sure these details are easily visible and well-organized.
Important Details to Include

In addition to the payer’s name and amount, specify the purpose of the payment, such as for goods or services. This provides context for the transaction. You may also want to include a receipt number for tracking purposes. Always ensure that the total amount is prominently displayed to avoid any confusion.
Layout and Design Tips

Keep the design simple but clear. Use headings to separate key sections of the receipt, like payer details, amount, and transaction type. Consider leaving space for signatures or any other necessary notes. The format should be easy to read and should not overcrowd the page with unnecessary information.
Allow customization of fields such as business name, contact information, and transaction details. This helps tailor receipts to the specific needs of your business and customers, making each document more relevant and useful.
Additional Line Items

Provide options for adding extra information, such as discounts, taxes, or service charges. Let customers see a detailed breakdown of their purchases, which enhances transparency and provides clarity on the final amount paid.
Personalized Messages

Enable businesses to include personalized messages or promotions at the bottom of the receipt. This option can be useful for sending thank-you notes, offering future discounts, or providing instructions for return policies. Customizable messages make receipts feel more personal and improve customer engagement.
Ensure that your receipt template complies with local regulations. Adhere to tax laws by including the correct details such as the business name, address, and tax identification number. These components are often required for legal transactions and audits.
Verify the inclusion of payment method details, including credit card or cash, as this provides a transparent record of the transaction. Additionally, specify any applicable taxes in a separate line item to avoid confusion and meet regulatory requirements.
Review industry-specific standards, as certain sectors may require additional fields such as customer identification numbers or business registration details. These may be mandated by financial authorities to ensure proper documentation.
It’s important to include a clear refund or return policy, especially in cases where consumers may need to refer to this information later. This minimizes legal risks by clearly stating terms upfront.
| Component | Legal Requirement |
|---|---|
| Business Name & Address | Required for transparency |
| Tax ID Number | Mandatory for tax reporting |
| Payment Method | Documenting payment details |
| Tax Information | Clear breakdown of taxes |
| Refund Policy | Optional but advised for clarity |
Regularly update your templates in response to legal changes. Tax laws and other regulatory requirements can evolve, so keep your templates up to date to avoid fines or disputes.
When designing a receipt template for money received, ensure the document includes the key information clearly. Start with the amount received, followed by the payer’s name and payment method. Be specific about the date and any relevant reference numbers to avoid confusion. Always use a straightforward format, listing the payment details in a logical order, ensuring the receiver and payer can easily identify all the necessary information.
Include a section for the signature or acknowledgment of receipt, confirming that the money has been received in full. A well-organized and concise receipt can save time during any future references or transactions.