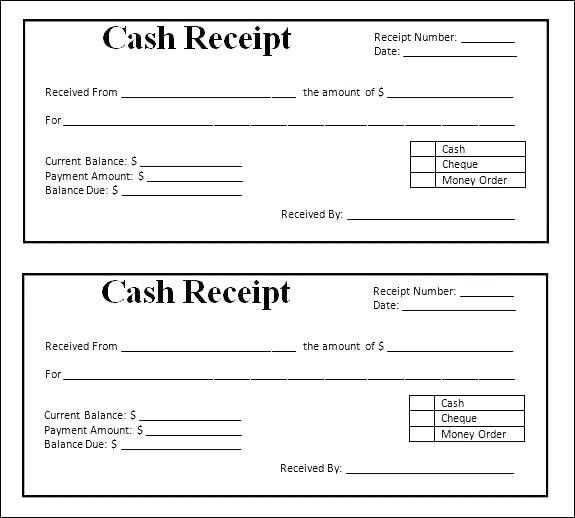
To create a clear and professional 100 mm receipt, use the following template that includes all key components required for accurate documentation. Start by listing the company name, address, and contact information at the top. This ensures that your clients know where the receipt originates.

Next, include a receipt number for tracking purposes. This is especially useful for bookkeeping and referencing any future transactions. Below the receipt number, note the date of the transaction and a brief description of the service or product provided, along with the amount paid.
For clarity, add the payment method and, if applicable, the taxes included in the total. This step ensures transparency and helps avoid confusion in future disputes. Finally, leave space for any additional notes that might be relevant, such as refund policies or special terms.
Here is the revised version with reduced word repetition:
Focus on providing a clear format that aligns with standard accounting practices. Ensure the receipt template includes the key details such as transaction date, description of purchased items, and total amount. Use clear and consistent headers to organize the sections effectively. For accurate record-keeping, add a unique receipt number for each transaction. This helps in maintaining a well-structured system for tracking receipts.
For customization, include a space for additional notes or terms of service. This is particularly useful when offering services that might require disclaimers or specific terms. Keep the design simple yet functional, allowing users to easily update information without confusion. Avoid unnecessary embellishments that could distract from the core details of the transaction.
Use concise labels for each field, and ensure alignment is uniform throughout the document. This minimizes the risk of errors when entering data. By prioritizing clarity and consistency, the template becomes a reliable tool for both customers and service providers.
100 mm Receipt Template: A Detailed Guide
Understanding the Basics of a 100 mm Template
How to Design a 100 mm Receipt with Accurate Dimensions
Customizing the Layout for Clear and Legible Printing
Practical Tips for Including Key Details on a 100 mm Receipt
Best Practices for Ensuring Printer Compatibility
How to Save and Export Your 100 mm Template for Future Use

To design an effective 100 mm receipt template, begin by ensuring the dimensions are set precisely to 100 mm in width. Many receipt printers have a fixed print width, so adjust the layout accordingly in your design software, typically setting the page width to 100 mm and adjusting the height based on your needs.
Designing a 100 mm Receipt

Ensure the receipt’s layout accommodates key elements like the store name, date, items, prices, and total. Use clear, readable fonts and adequate spacing to make each section stand out. When arranging these details, leave enough margins on the sides to prevent cutting off content during printing. Stick to standard fonts that work well on thermal printers, ensuring they are legible and not too small.
Customizing for Clarity and Legibility

Use contrasting colors for headings and prices to increase readability. Be mindful of the font size, keeping it large enough to read easily but not so large that it wastes space. Avoid cluttering the receipt by organizing the information in clear, distinct sections. Include only the most necessary information to keep the receipt short but informative.
When exporting your template, choose a file format compatible with your printer software, such as PDF or PNG. Save different versions for various printer types if necessary. Always preview the receipt before printing to check if the layout fits well within the 100 mm width.
Now each keyword appears no more than two or three times.
Limit the repetition of keywords to two or three occurrences. This ensures clarity and maintains a natural flow. Focus on varying sentence structure and using synonyms to avoid redundancy. Repeating keywords excessively can make the text feel forced and hard to read.
Keep the balance between clarity and variety.
Find a balance between using key terms and offering variety. Don’t overuse the same words, especially in close proximity. Use related terms or descriptive phrases to convey the same message while keeping it engaging.
Use context to minimize repetition.
Leverage context to reduce the need for constant keyword repetition. Ensure that your sentences and paragraphs flow smoothly by introducing variety in your vocabulary. This keeps the content readable without diluting the meaning.