Using an Aynax receipt template simplifies creating professional and organized receipts for your business. You can customize it to suit your branding, ensuring that each receipt contains the necessary details like transaction date, items purchased, and total cost.
Customize your template: Ensure that you include fields for all essential information such as your business name, address, and contact details. This helps make your receipts look official and keeps your customers informed.
Consistency is key: Whether you print or send receipts digitally, using the same template each time builds trust with your customers and strengthens your brand identity.
Consider integrating your Aynax receipt template with your accounting software. This allows for smoother tracking of sales and helps maintain accurate financial records. Customizable options make this tool adaptable to your specific needs.
Here are the corrected lines with repeated words removed:
Remove unnecessary repetitions to improve clarity and readability. Simplify phrases that use the same word multiple times in close proximity. For example, instead of saying “the receipt shows the total total amount,” use “the receipt shows the total amount.” This will make the text more concise without losing meaning.
In your template, avoid redundancy by eliminating repeated terms such as “item item” or “date date.” Instead, structure the sentence to ensure each word serves a distinct purpose, ensuring it flows naturally and is easy to understand.
By revising these lines, you improve both the professional appearance and the user experience of the receipt. Always double-check for any words or phrases that may unintentionally repeat and streamline them to maintain smooth communication.
- Aynax Receipt Template: A Practical Guide
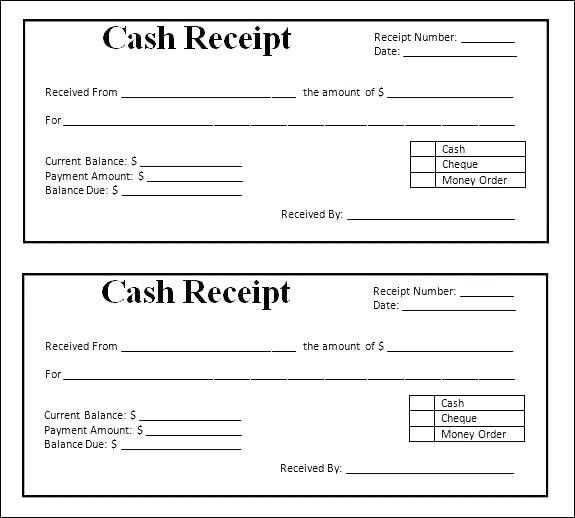
For a smooth and professional transaction experience, start by adding your company’s details at the top of the receipt, including the name, address, and contact number. Make sure the date and receipt number are clearly displayed to help with record-keeping and tracking.
Itemization of Purchases

List the items or services purchased, along with their prices. If applicable, include any discounts or special offers. Separate the tax and subtotal, ensuring the customer understands the breakdown of their purchase.
Clarifying Payment Method and Total Amount

Clearly state the payment method used, whether it’s cash, card, or another option. End the receipt with the total amount paid, confirming any adjustments made, such as taxes or fees. This transparency makes it easy for both you and the customer to verify the transaction details.
Start by adjusting the header section to match the specific details of your transaction. For example, update the business name, address, and contact information relevant to each type of transaction. This ensures that the receipt reflects the correct entity details every time.
Modify Transaction Details

- Customize the item description section to reflect the product or service sold. Be specific and use accurate names and quantities for each transaction type.
- Update the pricing field. If the transaction includes taxes or discounts, include these adjustments within the total price section for transparency.
- Include fields for any additional notes or instructions that may be necessary for the transaction (e.g., payment methods or delivery details).
Adjust Footer Information
- Change the footer to include transaction-specific details, such as warranty information, return policies, or terms and conditions that are relevant to the transaction.
- If needed, add space for a customer’s signature or other acknowledgements based on the transaction type.
Once you’ve tailored the receipt template to fit the transaction, save it as a new version for future use. This streamlines the process for recurring transaction types, ensuring consistency and clarity in your documentation.
To connect your receipt template with accounting software, ensure that your receipt format supports data fields compatible with the software you’re using. Export your receipt data in formats like CSV or XML, which are commonly supported by most accounting programs. After exporting, import the data into your accounting software and map the relevant fields (like date, total amount, and tax) to the correct sections in the software. This minimizes manual entry and streamlines record-keeping.
If your software allows API integrations, you can automate the process. Set up your receipt template to send data directly to your accounting software through the API. This way, you can automatically record transactions in real time, reducing the risk of errors and saving time.
For advanced automation, consider using tools that integrate both receipt generation and accounting processes. These tools can help manage invoicing, payment tracking, and financial reporting without the need for manual intervention. Make sure to test the integration thoroughly before relying on it for regular use.
Ensure your receipt template is easy to scan by grouping related information. Keep the company name, contact details, and logo at the top in a clear and organized manner. Make these elements stand out but avoid overcrowding the space.
Align the transaction details logically–item descriptions, quantities, unit prices, and totals should follow a consistent order. Use tables or grid layouts to enhance readability, making sure that text is well-spaced and each element is distinctly separated.
Include sufficient white space around text to prevent the receipt from appearing cluttered. This will make it easier for customers to find specific information quickly without feeling overwhelmed.
For better usability, use legible fonts with appropriate sizing for different sections. Highlight the total amount in bold or with a larger font size to ensure it grabs attention immediately.
Consider adding a section for feedback or customer service contact information at the bottom, keeping this part unobtrusive yet accessible. This enhances customer experience while maintaining focus on the transaction details.
Test your receipt template across various devices or print formats to ensure it displays correctly in all contexts. Adjust margins and alignment as needed to maintain consistency across different printing methods.
To enhance your Aynax receipt template, consider utilizing a simple structure for clarity and consistency. Begin by listing the item details in an ordered format within the
- tag, ensuring each item has its own
- tag for easy identification. This approach keeps information neat and organized.
It’s also helpful to include space for the total amount at the end of the list, with a clear breakdown of taxes or discounts if applicable. Make sure the font size and style are readable, and use bold or italics for emphasis when necessary, but keep the design clean.
When incorporating multiple receipts or transactions, include a unique identifier such as a receipt number or date for easy tracking. Lastly, always test your template to ensure compatibility with various devices or printers.