Creating a Bootstrap purchase receipt template provides a straightforward way to design clean and professional invoices for your business. This template leverages Bootstrap’s grid system, ensuring responsiveness and easy customization to fit any brand or product type. Using this structure allows for easy alignment of text and data, making your receipts look well-organized and easy to read.
Start with a basic layout: include sections for the buyer’s information, purchased items, prices, and total amount. Bootstrap’s pre-built components like tables, forms, and typography can enhance readability. Add clear labels and use bold text for important figures such as the total cost, making them stand out for quick recognition. Don’t forget to format dates and invoice numbers, ensuring they appear prominently at the top of the receipt.
For a polished touch, include a footer with your business’s contact details or terms of service. Customizing your template with colors or logos can make it feel more personal. Bootstrap’s utility classes can also help with fine-tuning the layout, adjusting margins, padding, and text alignment as needed to suit your design preferences.
Here’s the corrected version:
Use a clean layout with clear sections to enhance readability. Organize the receipt into a header with the business name, followed by purchase details like item description, quantity, price, and total amount. Make sure to format the dates and transaction numbers consistently for quick reference.
Header: Ensure the header includes the company logo, business name, and contact information, making it easy for customers to reach out if needed.
Itemized List: List each purchased item with quantity, unit price, and total. This breakdown provides clarity and avoids confusion. Align text properly for a neat presentation.
Total Amount: Highlight the total amount in a larger font to make it stand out. This helps customers quickly locate the final cost.
Footer: Include payment method and a thank-you note or refund policy in the footer. A clear footer reinforces professionalism and leaves a positive impression.
Ensure everything is well-spaced, so customers can easily read the document. Consistency in font, size, and layout improves the overall experience. Test the template across different devices to guarantee compatibility and responsiveness.
- Bootstrap Purchase Receipt Template Guide
Begin by structuring your receipt layout with Bootstrap’s grid system. Use containers to wrap the content and create clear divisions. Here’s an example:
| Container: | Wrap the content in a .container or .container-fluid for full-width. |
| Grid System: | Divide content into rows and columns using .row and .col classes. This will ensure that elements are aligned neatly. |
| Typography: | Use Bootstrap’s typography utilities like .display-4 for titles and .lead for descriptions to style text effectively. |
After setting up the grid, focus on the essential components of the receipt. Include fields like company details, customer information, itemized purchases, and payment summary. Ensure these sections are clearly separated for better readability.

For the itemized list, use a table. The following code snippet demonstrates how to structure it:
| Item | Price | Quantity | Total |
|---|---|---|---|
| Product A | $10.00 | 2 | $20.00 |
| Product B | $15.00 | 1 | $15.00 |
Use Bootstrap’s .text-right class to align total prices to the right and .font-weight-bold to highlight key information like subtotal and taxes.
Lastly, add a footer for payment methods, receipt number, and terms. You can use a simple .row and .col layout for this:
| Footer: | Include payment method icons, receipt number, and terms & conditions. |
By following this guide, you can quickly implement a clean and responsive Bootstrap purchase receipt template. Keep elements organized, and always test the responsiveness across devices to ensure a seamless user experience.
Select the appropriate Bootstrap version based on your project’s needs. Bootstrap 5 is ideal for new projects because it removes jQuery dependencies, offers better customization options, and improves accessibility. If you’re maintaining an older project, consider sticking with Bootstrap 4 as it is more stable and widely supported.
When choosing, consider compatibility with your existing tech stack. If your project relies on jQuery or older JavaScript plugins, Bootstrap 4 might be the better choice. Bootstrap 5, on the other hand, aligns better with modern JavaScript frameworks like React or Vue.
For mobile-first designs, both versions offer responsive grid systems, but Bootstrap 5 has improvements in grid layout, spacing utilities, and new components like off-canvas and accordion. These features make it more flexible and efficient for responsive design.
Evaluate the community support and documentation as well. Bootstrap 5 has more modern tools and features, but Bootstrap 4 has a larger user base and more tutorials available, which can be helpful if you’re looking for a quick solution.
Lastly, if you plan to update your template over time, Bootstrap 5’s modular structure will make it easier to scale and integrate new features as they become available.
Begin by defining the main structure of your receipt with a container element, such as a div or section. This will hold all the necessary sections like the header, items list, and footer.
In the header section, include the business name, logo, and contact information. Use a div with appropriate classes to organize these elements neatly. For example, use class=”header” for the container and separate each element inside it with its own div.
Next, list the purchased items inside a table. Use the thead for column titles such as “Item Name,” “Quantity,” and “Price.” The tbody will contain the actual product data, ensuring each row represents a purchased item.
For the totals, use a div or table at the bottom. Display the subtotal, taxes, and total amount clearly. If you’re using a table for totals, keep the tfoot section for easy readability. Make sure to align the text properly to maintain a clean layout.
For the footer, include payment method details and any other relevant information like return policies or contact information. Place this section inside a div and apply appropriate margins to separate it from the rest of the content.
To improve readability, ensure proper spacing between sections. Add padding or margins where necessary to avoid a crowded look.
To enhance the visual appeal of Bootstrap components, modify default styles by adjusting spacing, colors, and typography. Start with the built-in utility classes for margins, padding, and alignment to fine-tune the layout without writing custom CSS. For instance, use .mb-3 to control bottom margin or .text-center for centering text.
Next, update component colors to match your brand or theme. Utilize Bootstrap’s color classes like .bg-primary for background colors or .text-muted for subtler text. If the built-in color options don’t fit your design, extend them in the _variables.scss file to define custom shades.
Typography plays a key role in refining the look. Bootstrap comes with default fonts, but integrating a custom font from Google Fonts or Adobe Fonts can elevate the design. Apply custom fonts using the font-family property in your CSS, targeting specific components for consistency across the site.
For more intricate adjustments, tweak Bootstrap’s grid system. This allows for precise control over column sizes, offsets, and visibility across different screen sizes. Combining grid classes like .col-md-6 with custom breakpoints ensures your layout is responsive and clean.
Don’t forget the hover and focus states. By adding hover effects like :hover or :focus, you can give users interactive cues. For example, change the background color of buttons on hover with .btn:hover, giving the interface a dynamic touch.
These small yet effective customizations provide a polished, personalized look that enhances both user experience and design consistency. Fine-tuning Bootstrap components to suit your unique style is a straightforward way to set your project apart.
To add dynamic data to your Bootstrap purchase receipt template, use placeholders that will be replaced with actual values when rendering the template. This can be achieved with server-side programming languages or JavaScript.
Using JavaScript for Client-Side Rendering

On the client side, JavaScript can be used to populate the template with dynamic data. First, create HTML elements with specific IDs or classes where the data will go.
- For example, create a
<span id="customerName">to hold the customer’s name. - Use JavaScript to access and modify these elements with values from your data.
Example:
<script>
const customerName = "John Doe"; // Example dynamic data
document.getElementById('customerName').textContent = customerName;
</script>
Server-Side Rendering with PHP

If you’re using PHP, you’ll pass data to the template from the server, often via an associative array. Embed dynamic data directly into the HTML using PHP echo statements.
- Create variables in PHP, such as
$customerName = 'John Doe'; - Echo the variable inside the HTML template:
<span></span>
This method ensures that your purchase receipt template is personalized for each user based on the data you pass to it.
Ensure you sanitize the data to prevent injection attacks and display errors properly.
Focus on clarity and simplicity. Choose a clean and readable font like Arial or Helvetica for the receipt content, ensuring all text is legible at different screen sizes.
Use Bootstrap’s grid system to create a well-organized layout. Structure the receipt with clear sections for billing details, items, and totals. Align the content using .row and .col classes for neat spacing.
Incorporate contrasting colors for headings and totals to guide the reader’s attention. Make totals bold or use a different background color to highlight them. Stick to a consistent color scheme that aligns with the brand.
Leverage Bootstrap’s .table class for a clean and responsive table format to list items. Add .table-striped for better readability by alternating row colors.
Keep the receipt compact by minimizing unnecessary information. Remove redundant borders, margins, and padding to maintain a tidy look while ensuring key details are prominent.
Utilize Bootstrap’s .text-right class to align prices and totals to the right, providing a neat and professional finish.
Ensure the receipt is mobile-friendly by testing on different devices. Use .container or .container-fluid to control the width and prevent the layout from breaking on smaller screens.
Test your template on both mobile and desktop devices to ensure proper functionality across screen sizes. Use browser developer tools to simulate different screen widths and device orientations. Make adjustments in CSS media queries to address layout issues, ensuring elements scale properly on smaller screens without breaking the design. Prioritize touch functionality, checking buttons, forms, and links for responsive behavior on mobile devices.
Debug by examining your template in different browsers. Browsers often render elements differently, so it’s crucial to test on Chrome, Firefox, Safari, and Edge. Use browser developer tools to inspect element behavior and identify layout or styling issues, especially with flexbox or grid layouts. Check for any JavaScript errors in the console that may affect user interactions.
Use real devices for the final testing phase, as simulators may not catch all issues. Test on both iOS and Android phones to ensure compatibility. Pay attention to load times, ensuring that images, scripts, and stylesheets load efficiently without slowing down performance. Use tools like Google Lighthouse to analyze page performance and accessibility on various devices.
After testing, refine your template by fixing any discovered bugs. Adjust the code to address any inconsistencies, optimize for faster loading, and improve the user experience across all devices. Repeat the testing process as you make changes to ensure the template works seamlessly for all users.
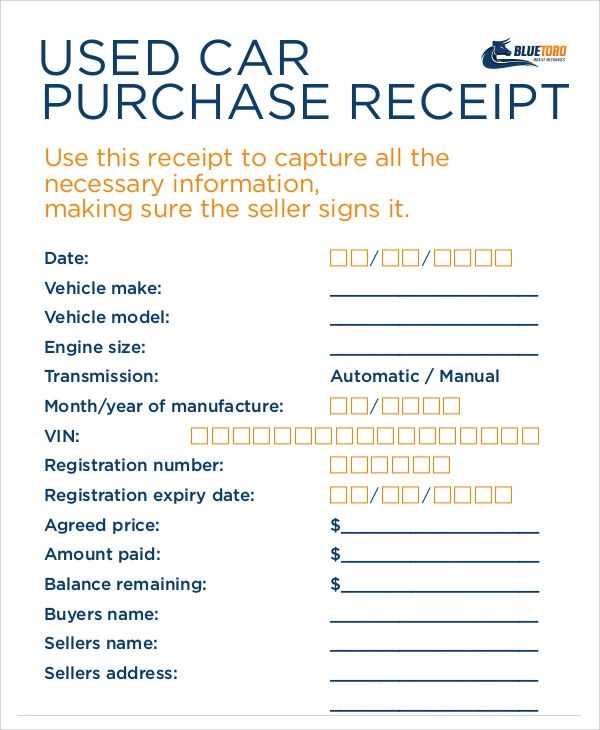
To create a clean and functional Bootstrap purchase receipt template, consider organizing the receipt into distinct sections for clarity. Begin with an easily identifiable header, including the store or company’s logo and the receipt title. Below that, provide customer and purchase details like name, address, purchase date, and transaction ID.
- Receipt Header: Place the store’s logo on the left, followed by the receipt title (“Purchase Receipt”). This immediately informs the customer about the document’s purpose.
- Customer Information: Include fields for the customer’s name, contact information, and shipping address. This ensures the receipt is personal and relevant.
- Purchase Details: Present the items purchased in a table format. Each row should list the item name, quantity, price per unit, and total cost for that item.
- Taxes and Discounts: Add a separate section below the purchase details to clearly list any applicable taxes, shipping fees, and discounts. Provide subtotals for transparency.
- Total Cost: Highlight the final amount at the bottom. Use bold or larger text to make this stand out.
- Footer: Leave space for terms, customer service contact information, and a thank you note. Keep this part minimal yet informative.
By following this layout, you provide customers with a well-structured, professional receipt that is easy to read and understand.